Introduction
Blitz Report is an Oracle Forms based software, fully integrated with Oracle E-Business Suite. It enables your IT team to easily store and edit SQL scripts for reports, and to make them available to your business users. Blitz Report runs as a concurrent process and generates output files in XLSX or text delimited CSV format. Upon completion, reports automatically download and open in Excel.
With Blitz Report, we created the most efficient and easy to use operational reporting solution for Oracle EBS. Optimized for skilled IT professionals to better organize and maintain their reporting queries, and for business users to quickly access EBS data in a format they love without having to learn new skills.
We hope that you will enjoy working with Blitz Report as much as we do, and we welcome your feedback to [email protected].
1 Getting started
Blitz Report can be used from four places, and this guide has one chapter for each:
- Oracle EBS Forms – the classic run screen opened from the EBS menu or from any form via the Blitz Report toolbar entry.
- Blitz Report Excel Add-in – run, refresh and drill down directly from Microsoft Excel, without opening Oracle EBS.
- Blitz Report Web – the browser based run page for users working in the EBS web applications.
- Scheduled – reports run as concurrent requests on a schedule and deliver their output by email, see the scheduling section of the Forms chapter.
To run your first report: open Blitz Report, pick a report from the list or search it by name, enter restrictive parameter values (for example one period or one operating unit), and click Run. The output opens in Excel when it completes.
Beyond reporting, Blitz Uploads change EBS data from Excel, the Supply Chain Hub provides a planning workbench, and GL Financial Statement and Drilldown (FSG) builds refreshable financial statements in Excel – each covered in its own chapter.
2 Running reports in EBS Forms
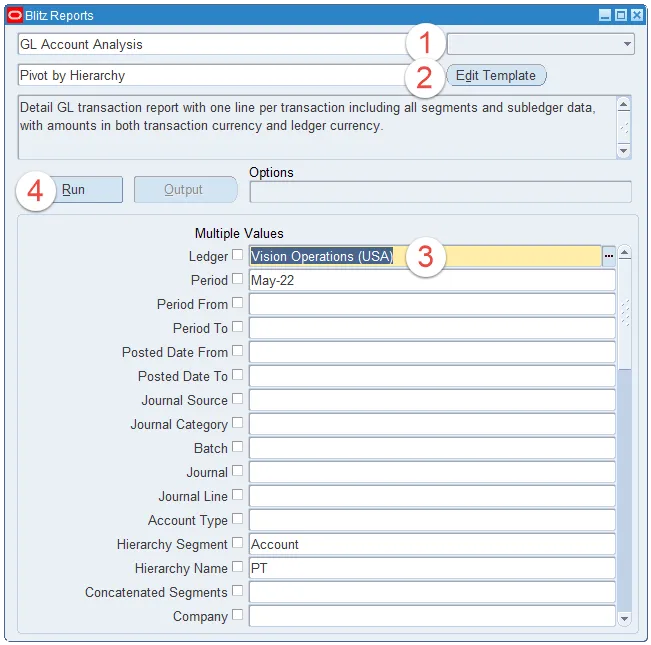
Basic steps to run a Blitz Report are:
There is a  training video available on selecting and running reports.
2.1 Selecting a report
When opening Blitz Report for the first time, a selection of available reports is displayed automatically. The list can be restricted further by typing the first characters of the desired report name.
When subsequently opening Blitz Report, the last report executed will default in the report name field. If you open the reports LOV, all of your “most frequently used” reports will be listed at the top of the list. You can still scroll down, or use the following selection options for finding and selecting reports:
- Perform a text search by typing into the report name field. This executes a full text search on report name and description, parameters, SQL definition, template name and description, enabling you to search by column names, for example. The search is not case sensitive and allows creation of logical expressions using keywords ‘and’ or ‘or’ and use of brackets to group sub-expressions.
- Double click into the report name field
- Use the LOV attached to the report name
- Press the F1-key
- Pick a Category from the dropdown list
- Use the find/torch menu symbol
- Run a query on the report name or description fields via F11, Ctrl+F11
By default, users can select from reports assigned to their current logon responsibility only, but the LOV of reports can be extended by setting Filter Reports by Responsibility to ‘No’ in the Preferences window. This way, users will see all the reports assigned to them, regardless of their current logon responsibility.
Text search example:
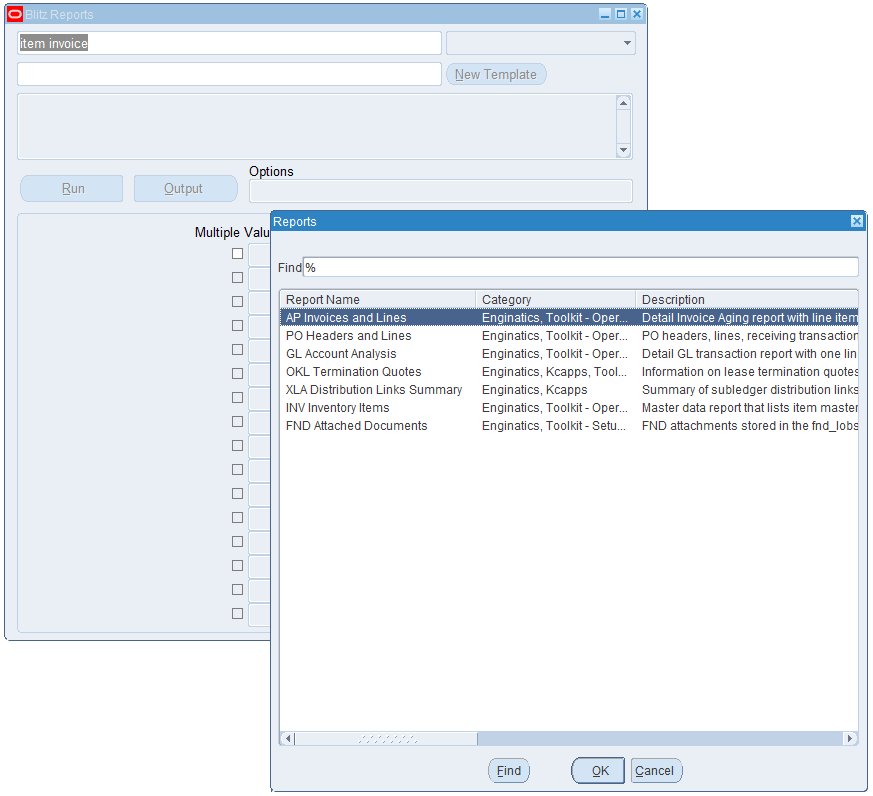
Scrolling further to the right in the search results shows the matching score and fields in which the keywords are found.
When entering multiple keywords, the search matches all keywords by default.
Above example lists all reports containing both words, ‘item’ and ‘invoice’.
To search on either of the keywords, combine them with ‘or’.
To search for an exact match in the order of keywords e.g. ‘item’ directly followed by ‘invoice’, enclose them into quotation marks such as “item invoice”.
2.2 Parameter values
Report parameters filter, limit or define the extracted data. Parameters can have lists of values that either enforce selection of one particular value (e.g. account number) or that allow matching by wildcards such as ’%’ or ‘_’.
To display the LOV for a parameter, double click either into the parameter value field or on the three LOV dots on the right.
Some parameters may allow entry of multiple values, depending on the definition of the parameter (see here for details).
To run a report for a list of account numbers for example, check the ‘Multiple Values’ checkbox next to the parameter and either select account numbers one by one from the LOV or enter a semicolon-separated list of numbers manually.
The selected template can add its own conditions to the run screen. They follow the report parameters, see Template conditions.
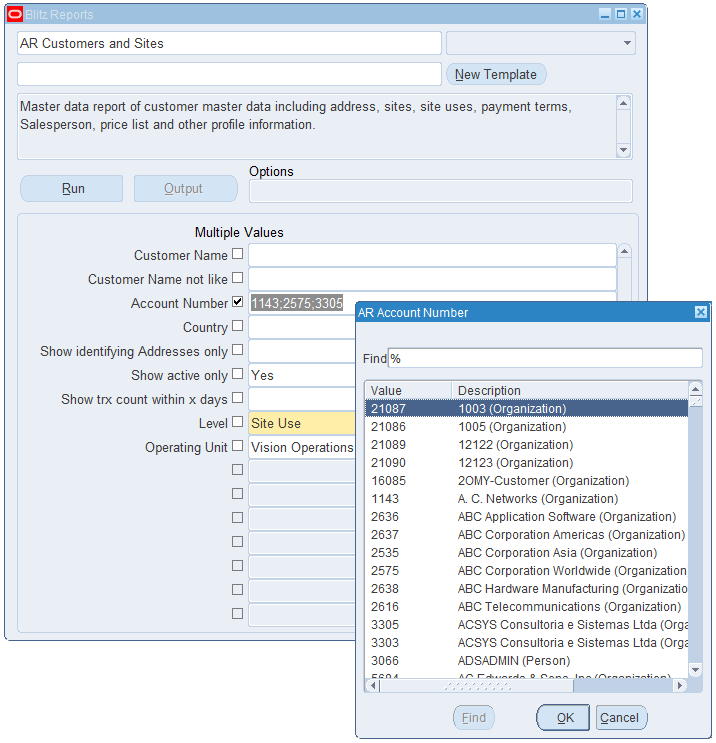
Larger lists of multiple parameter values up to a length of 32000 characters can be entered using the ‘Edit Field’ menu function.
Multiple values can be separated by semicolon or line feed. Using the ‘Edit Field’ menu icon, you can for example copy and paste a list of parameter values directly from an Excel sheet.
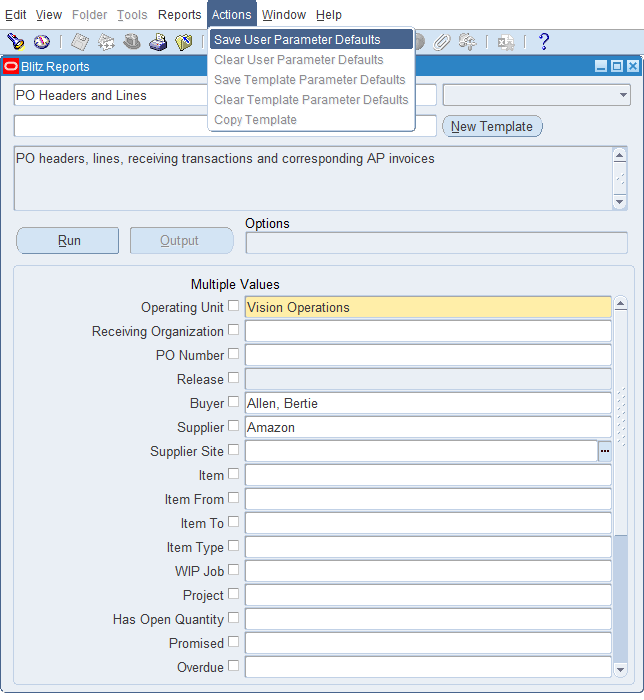
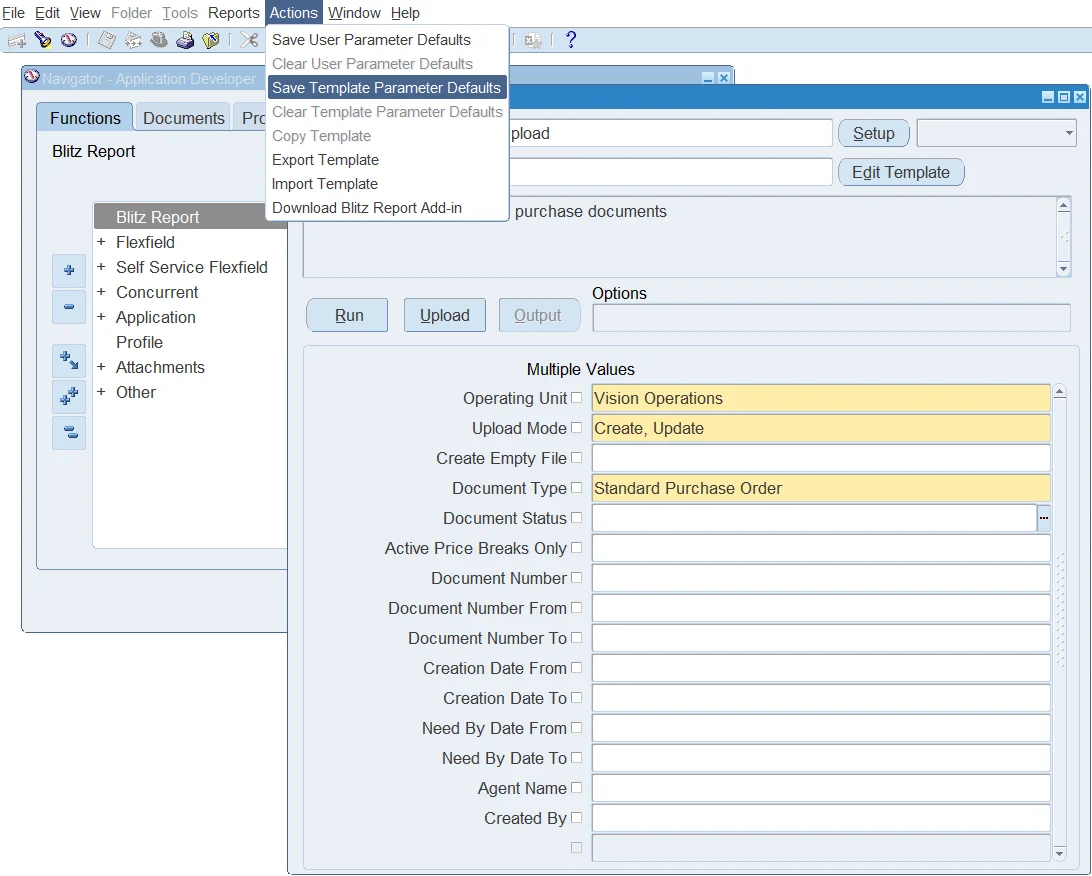
Users can store their own default parameter values using the Actions > Save User Parameter Defaults menu option.
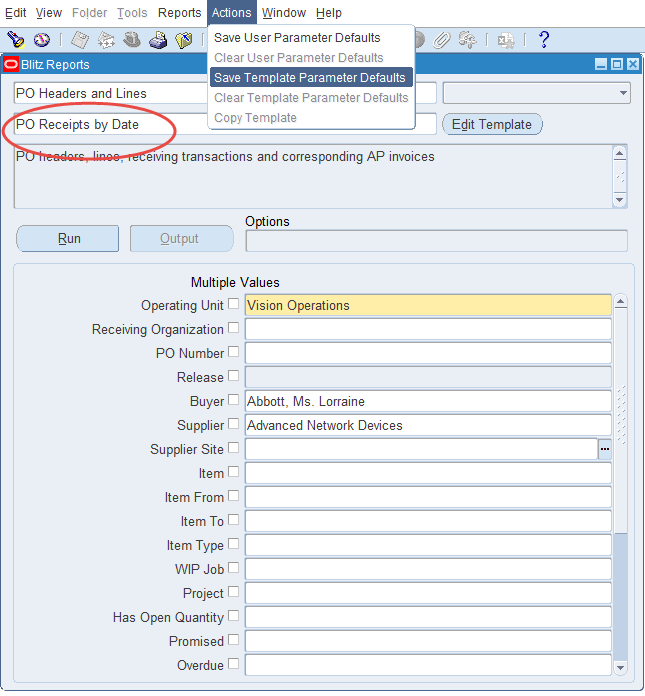
Once a template is selected it is also possible to store default parameter values against a template using the Actions > Save Template Parameter Defaults menu option.
2.3 Running and viewing the output
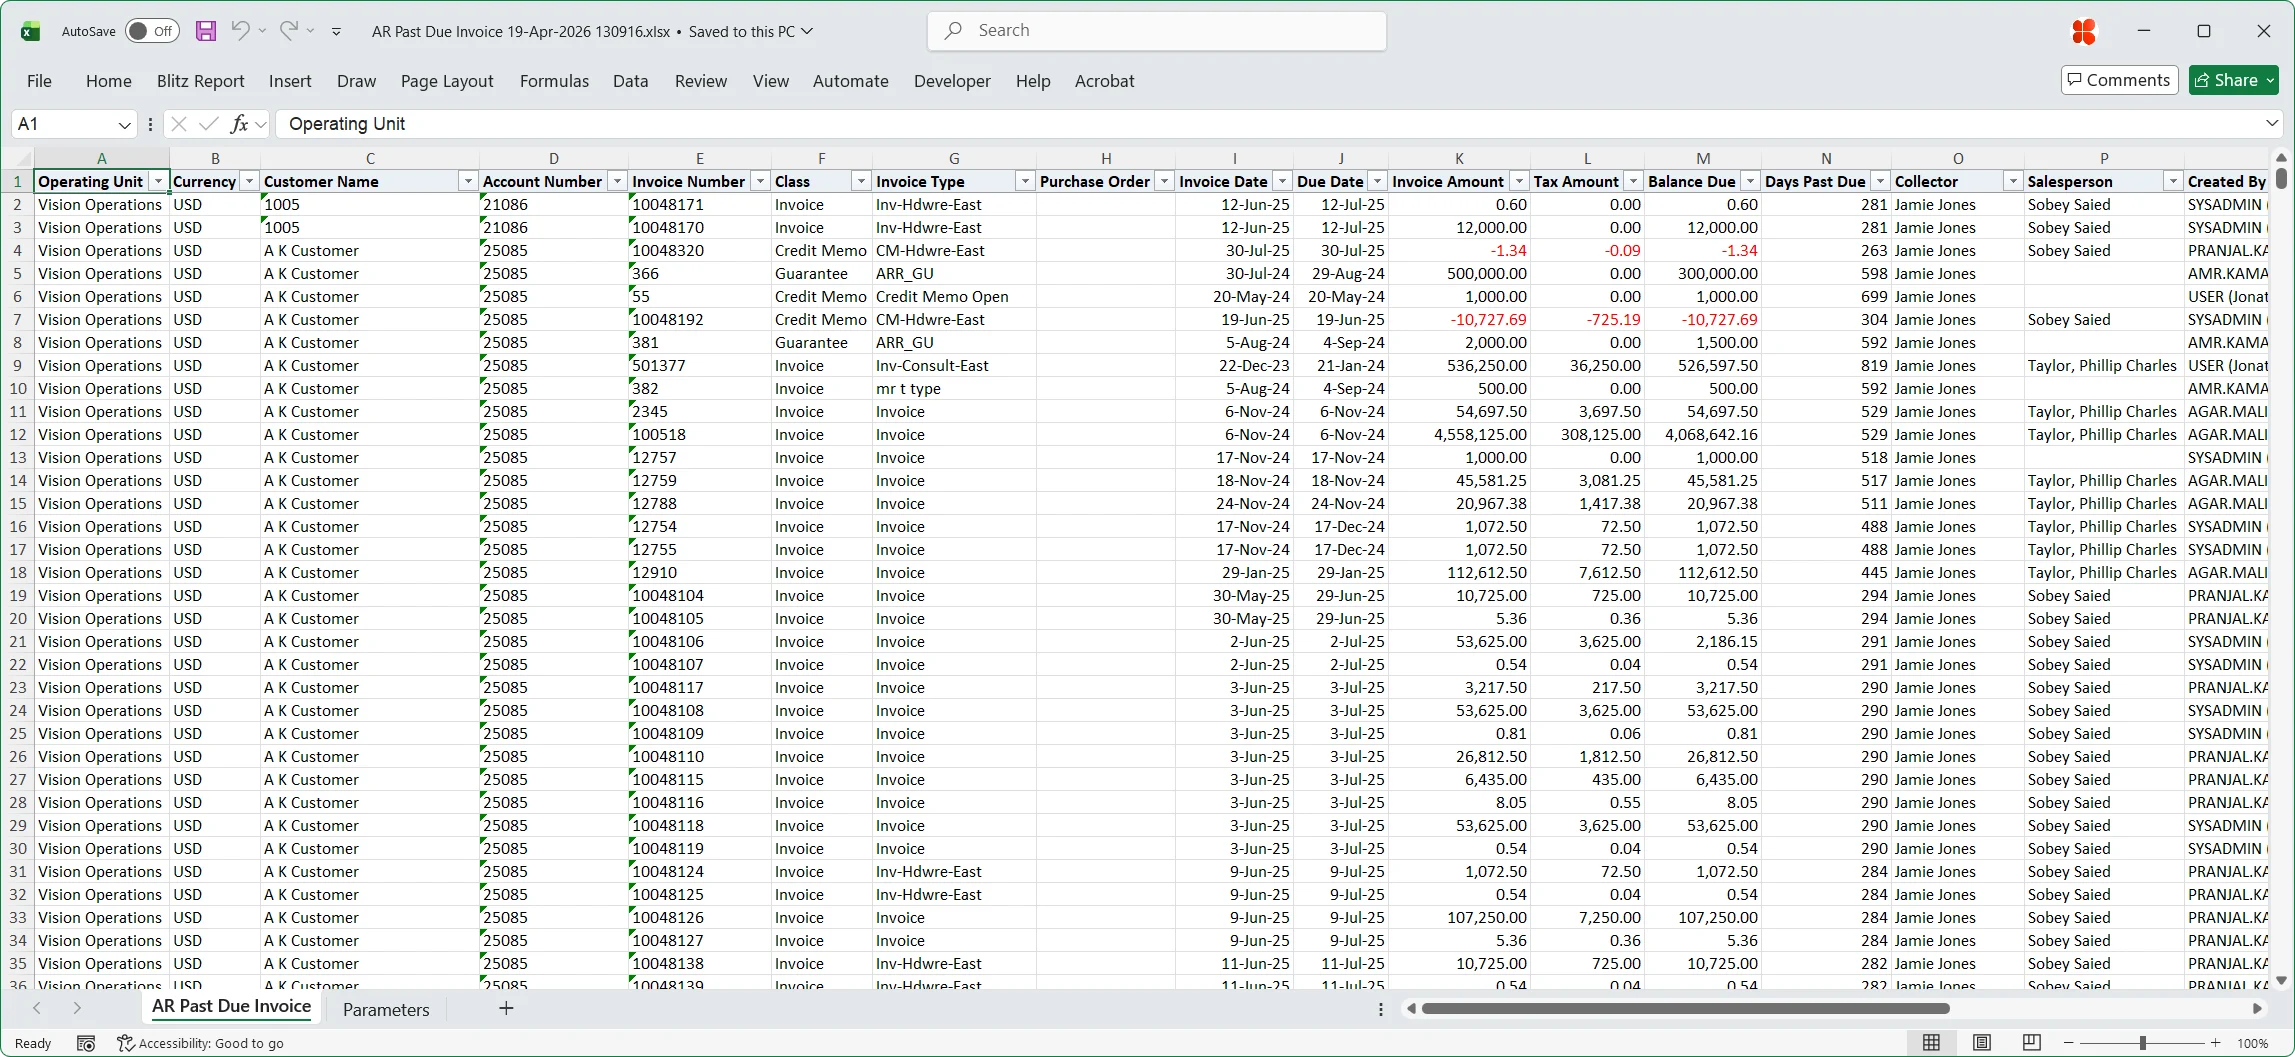
A click on the ‘Run’ button launches a background concurrent process to extract the report data. The output XLSX file opens automatically upon program completion.
While the report concurrent process is pending or running, the request status is displayed on the output button. Once the report is complete, the output button can also be used to re-download the output file.
The Options window is accessed by clicking on the grey options field. It allows controlling the report generation process and the output format at run time, for example email delivery and output formats. The Server Output Directory and Server File Name options are only shown to users with ‘Developer’ or ‘System’ access, or to other users if the Blitz Report Server Output Directory Access profile option is set. The runtime options inherit their default values from the Blitz Report Setup Window options with the same names.
User view:
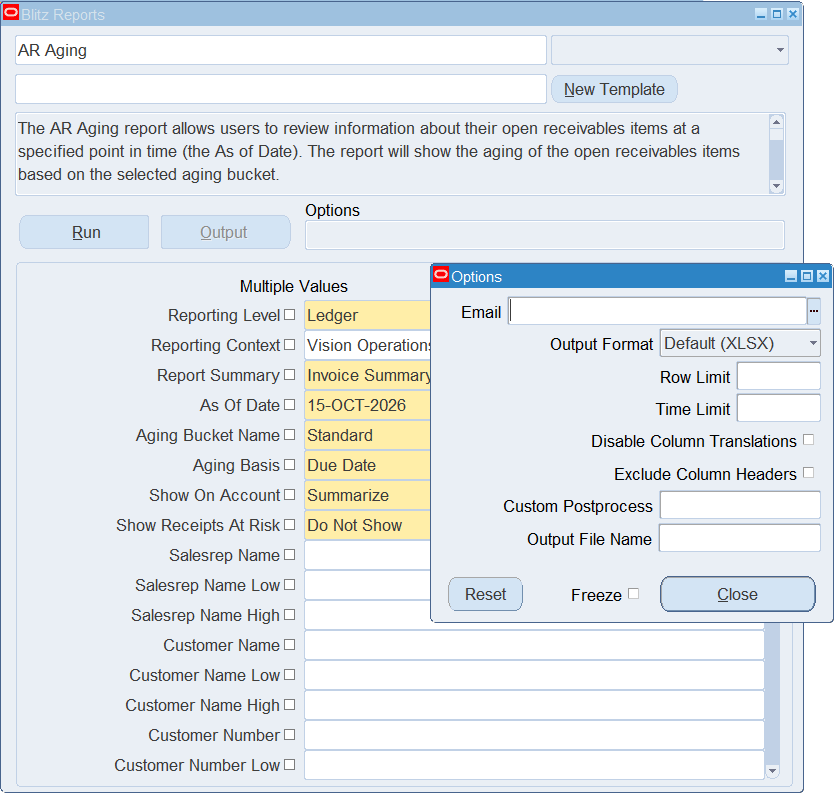
Developer view, which additionally shows the Server Output Directory and Server File Name fields:
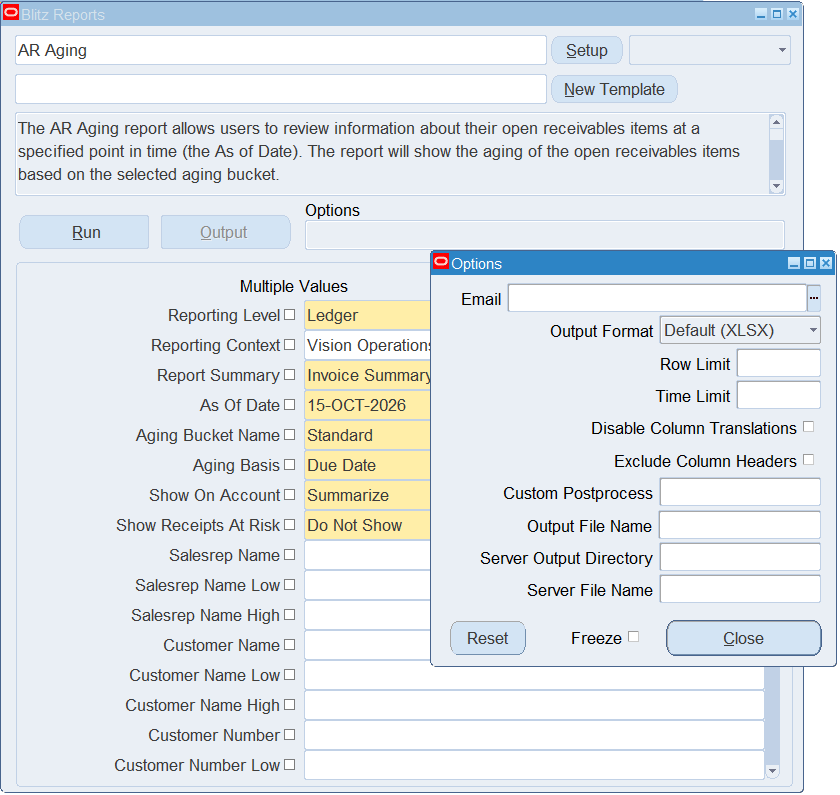
Enter an e-mail address that you wish to send the report output to. Multiple email addresses can be entered as a comma-separated list. Developers can define a default email address for individual reports, or you can set up your own default email address in the Preferences window.
The default email subject for Blitz Reports is stored in FND message XXEN_REPORT_EMAIL_SUBJECT. To change this text, navigate to Application Developer > Application > Message > query message XXEN_REPORT_EMAIL_SUBJECT and edit the message text.
You can use the following placeholders for automated replacement at run-time:
&REPORT_NAME &TEMPLATE_NAME &OUTPUT_FILE_NAME &ROW_COUNT &DB_NAME &USER_NAME &REQUEST_ID &SITE_NAME |
&OUTPUT_FILE_NAME is the name of the attached file without its extension, so a subject message with just this placeholder gives every mail the subject its attachment carries.
You can also create new custom messages. Prefix these with XXEN_REPORT_EMAIL and use them as default email subjects by setting the profile option Blitz Report Email Subject Message.
Output Format
Output file format: Default (XLSX), CSV, PDF or TSV. PDF creates the Excel output first and converts it to a PDF file on the concurrent processing server.
Row Limit
You can restrict the number of row in the output file by indicating that option.
Time Limit
Indicates timeout in minutes. Program is terminated by the ‘Blitz Report Monitor’ after indicated time. This avoids excessive server loads if e.g. user submits report with insufficient parameter restrictions.A time limit can also be set when running reports or using profile option Blitz Report Time Limit. If there are values set on different levels, the order of precedence is as follows:
- Run window options time limit
- Profile option on user level
- Time limit on report level
- Profile option on responsibility level
- Profile option on site level
Disable Column Translations
Disabling translation of the report’s header if multi-language setup is in place. E.g.: interface requirements.
Exclude Column Headers
Removing header column from the output file. E.g. for interface requirements
Custom Postprocess
A custom post-processing shell script can be set up to run after report completion, for example to distribute or transform the output file to a different format. PDF needs no script: choose PDF as the Output Format.
The script must be placed under the $CUSTOM_TOP/bin/custom/ directory, for example $XXEN_TOP/bin/custom/generate_and_send_pdf.sh, and it allows the use of variables as shown in the following example:
# You can use a custom postprocess script to perform additional actions on the Blitz Report output files, e.g. scp them to a different server, transform them to .pdf via external tools etc. # This script is called with following parameters: # $FCP_LOGIN example: APPS/w#*fe=+~12fweDg # $p_report_name example: AP Suppliers # $p_template_name example: Pivot by supplier type # $p_request_id example: 6590137 # $outfile_name example: /d01/oracle/VIS/inst/apps/VIS_r12/logs/appl/conc/out/AP_Suppliers_6590142.xlsx # $output_filename example: AP_Suppliers_6590142.xlsx # $download_filename example: AP Suppliers 17-Nov-2019 153012.xlsx (user facing browser download name, as served by Oracle EBS forms) # $additional_outfile_name example: /d01/oracle/VIS/inst/apps/VIS_r12/logs/appl/conc/out/AP_Suppliers_20191117.xlsx # $parameter1 # $parameter2 # ....... # $parameter87 # # Example of copying output xlsx file to an interface directory on a remote server: # scp "$outfile_name" [email protected]:/interface_dir |
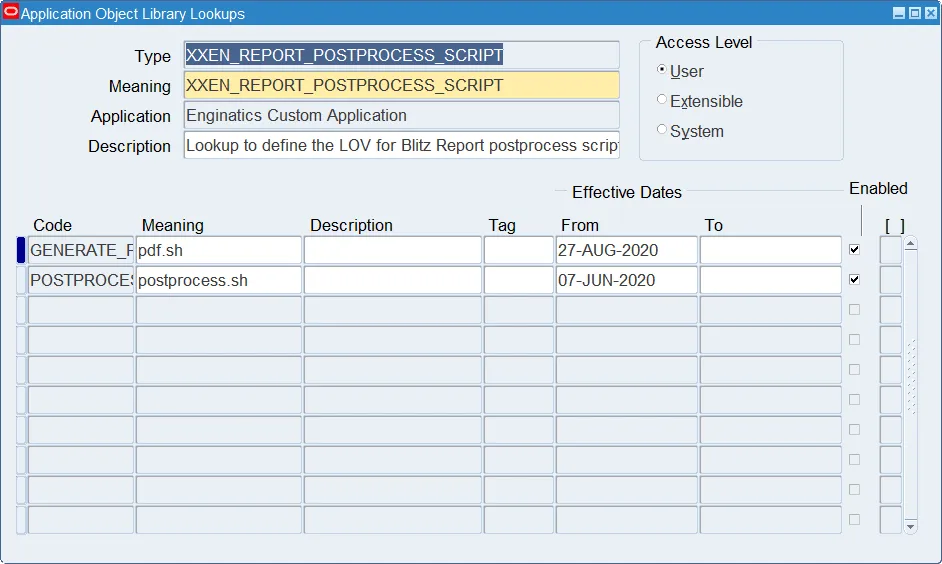
To add a new custom postprocess script name to the runtime options LOV, add it to lookup XXEN_REPORT_POSTPROCESS_SCRIPT as shown in the following screenshot:
Output File Name
Defines the Excel output file name, downloaded to the client desktop and used as the name of the email attachment. Tokens can be used to create a filename dynamically, for example based on report parameter values.
Server Output Directory
Saves a copy of the report output file in a directory on the application server. Any network folder mounted on that server can be used as the destination, which is how scheduled reports deliver their output to shared drives. Tokens can be used to create a directory path dynamically, for example based on report parameter values. If the resulting directory does not exist on the filesystem, it is created. Please ensure that the apps owner has the required permissions for the directory creation.
Whether this field is available, and whether a destination can be typed freely, depends on the Blitz Report Server Output Directory Access profile option:
- Not set – the two server output fields are hidden, which is the default. Users with ‘Developer’ or ‘System’ access always see them.
- Unrestricted – the fields are shown and any directory can be entered.
- Restricted – the fields are shown, but the directory has to be selected from the list of approved output locations.
The approved locations are maintained by your own key users in the XXEN_REPORT_OUTPUT_LOCATIONS lookup. Each entry pairs a short alias, for example “Sydney – Finance reports”, with the directory path it stands for, and the list of values shows the alias next to the path. Adding a location on a server that is already connected takes effect immediately, without any involvement from IT.
Server File Name
Naming convention for the copy written to the server output directory. Tokens can be used to create a file name dynamically, for example based on report parameter values or on the run date, so that a scheduled report writes a new date stamped file on every run. With Restricted access the file name cannot contain a path, so that the approved directory cannot be circumvented.
Reset button
This button is used to set runtime options to the default values based on the profile option or report level settings.
Freeze flag
When checking the freeze flag, option values are not changed or reset to their defaults when navigating to a different report.
Tokens
You can use any of the below tokens to dynamically generate values for the following runtime options: Output File Name, Server Output Directory, Server File Name.
<report name> – report name
<report_name> – report name, all spaces are replaced to underscores.
<template name> – template name
<template_name> – template name, all spaces are replaced to underscores.
<request_id> – concurrent request id
<parameter name> – value of the specified parameter name
<parameter_name> – value of the specified parameter name, all spaces are replaced to underscores.
<date format string> – actual run date in the specified Oracle date format string
Here is the example of a filename using all of the above tokens, replacing spaces to underscores.
<report_name>–<template_name>–<request_id>-for-<Operating_Unit>-on-<DD-MM-YYYY>
The resulting filename is:
AP_Suppliers-Operating_unit_only-6317575-for-Vision_Operations-on-06-10-2022.xlsx |
Here is the example of the similar filename but without replacing spaces to underscores:
<report name>–<template name>–<request_id> for <Operating Unit> on <DD-MM-YYYY>
The resulting filename is:
AP Suppliers-Operating unit only-6317575 for Vision Operations on 06-10-2022.xlsx |
And here is an example of a directory using tokens:
/interface/<report_name>_<DD-MM-YYYY>
It is possible to enter tokens manually or to choose them from the LOVs associated with the runtime option fields.
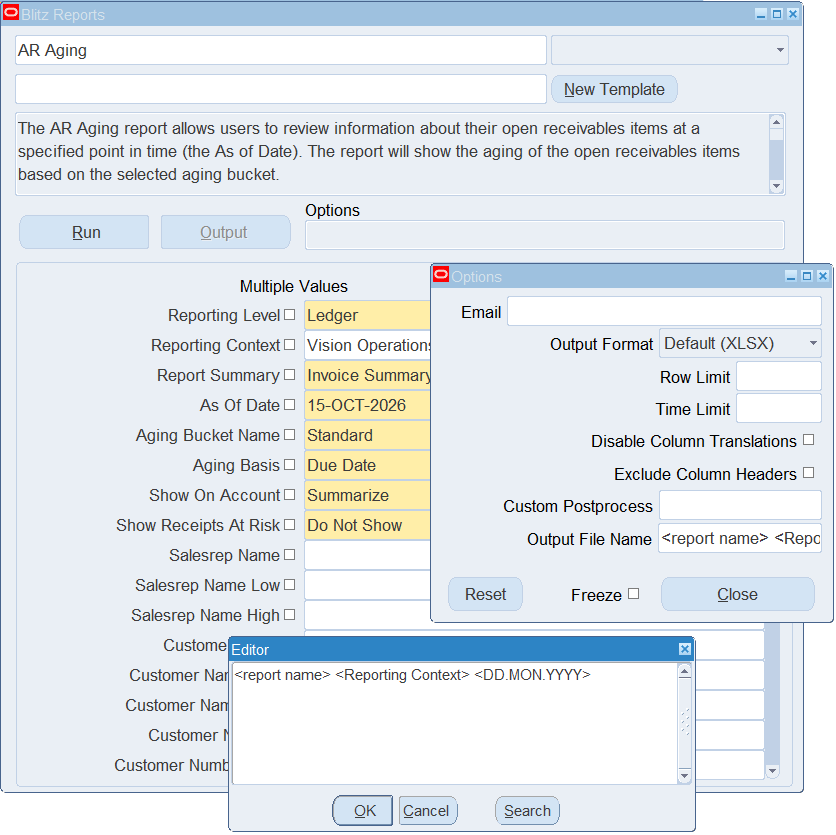
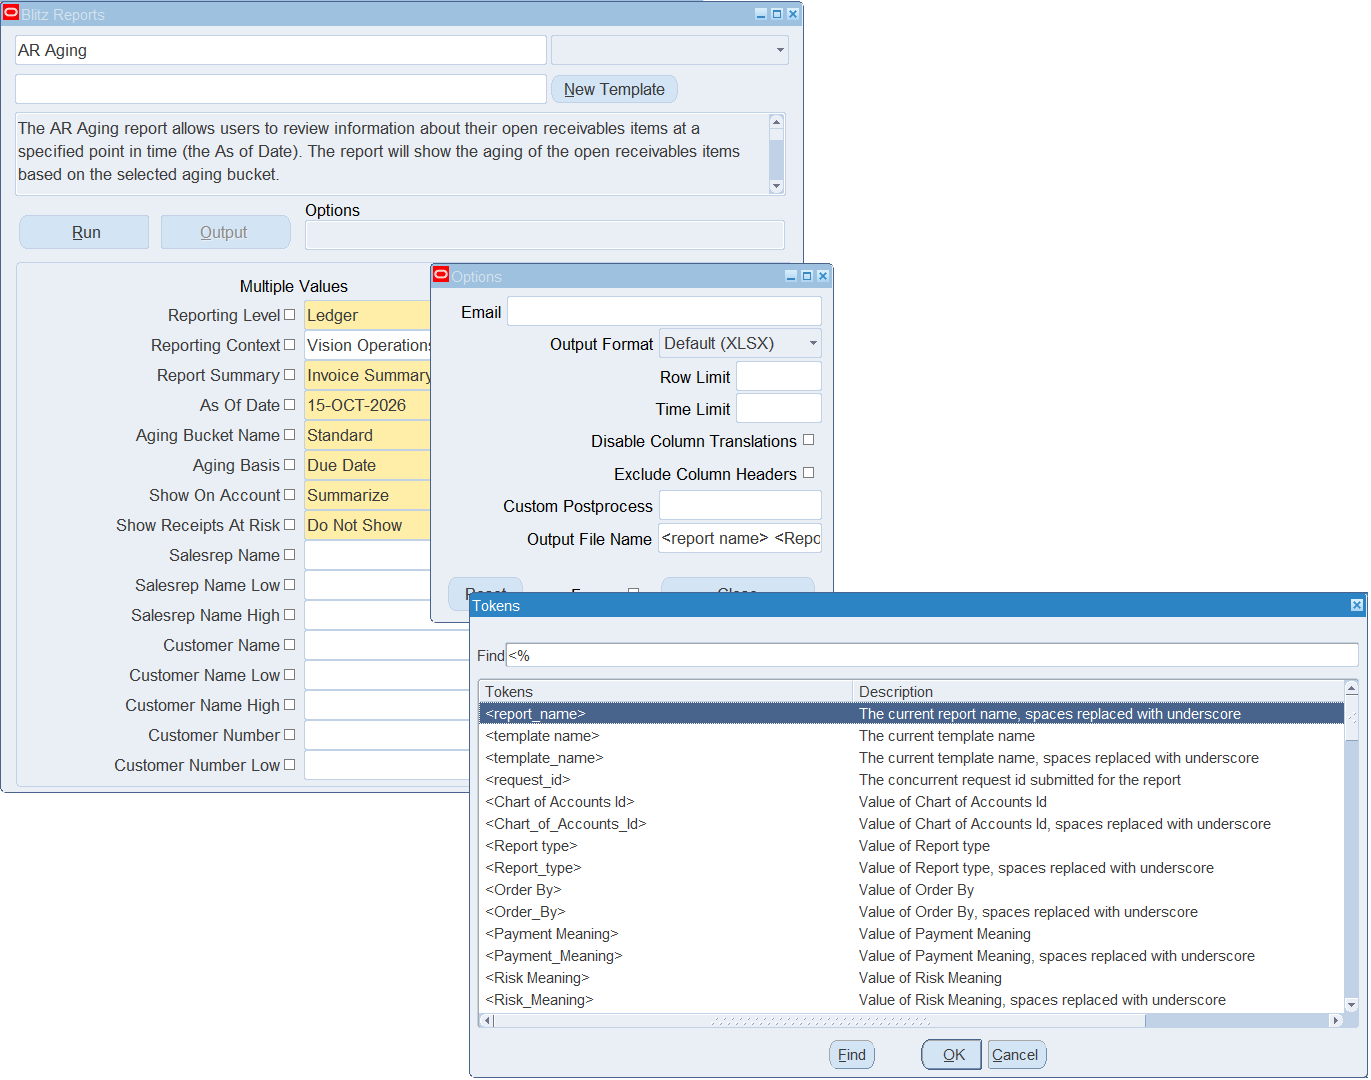
Manually entered tokens are validated against the LOV values, and an error message is displayed in case a token is not valid.
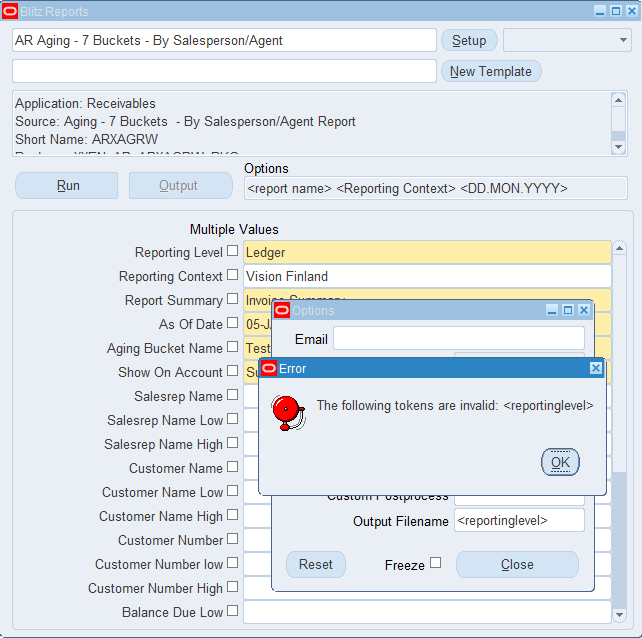
1. The file name that is downloaded to the client desktop when opening the Blitz Report output. This is also the attachment file name when sending Blitz Reports via email, with the Oracle EBS delivery option as well as the advanced email delivery.
2. The output file on the concurrent processing server in directory $APPLCSF/out.
3. An additional copy of the output file, placed into a directory on the application server.
2.5 Templates
From the options window, you can either select an existing template to edit, or, if the template name is empty, create a new template by clicking on the ‘New’ button. There is a training video available on creating and sharing layout templates.
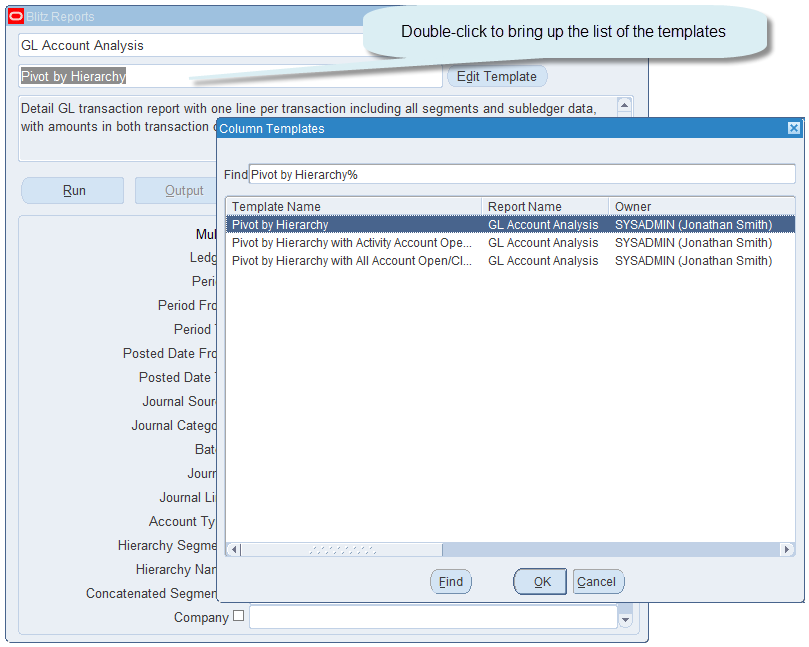
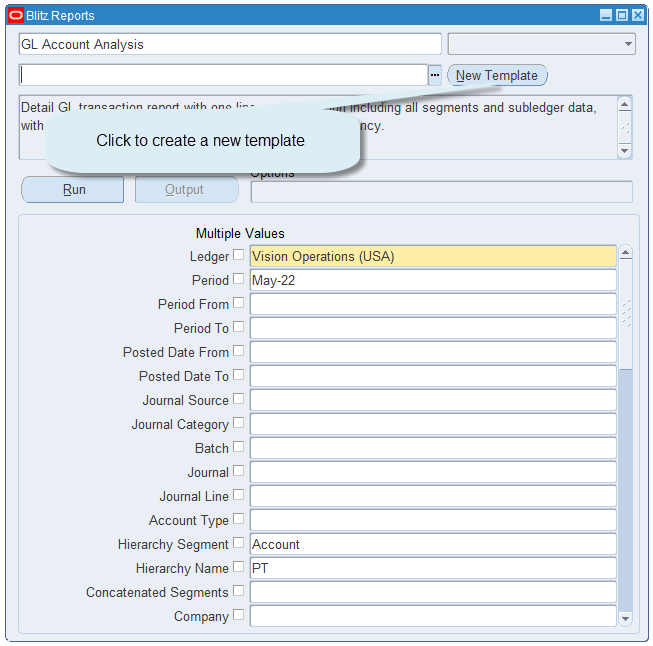
Template layout
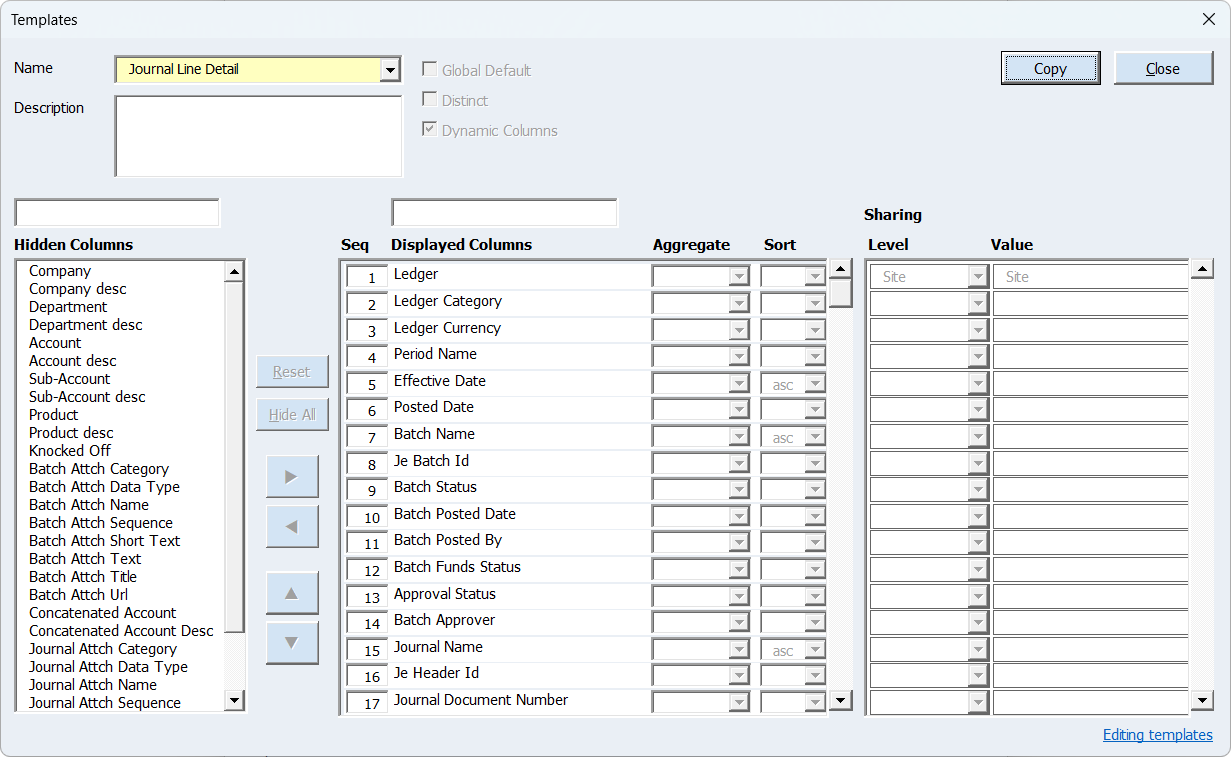
A template allows users to select the data columns, the level of reporting (detail transactional or summarized), aggregation calculations, and to define a pivot table output. Using templates, report columns can be selected and/or de-selected, summarized, and sorted as well as pivoted.
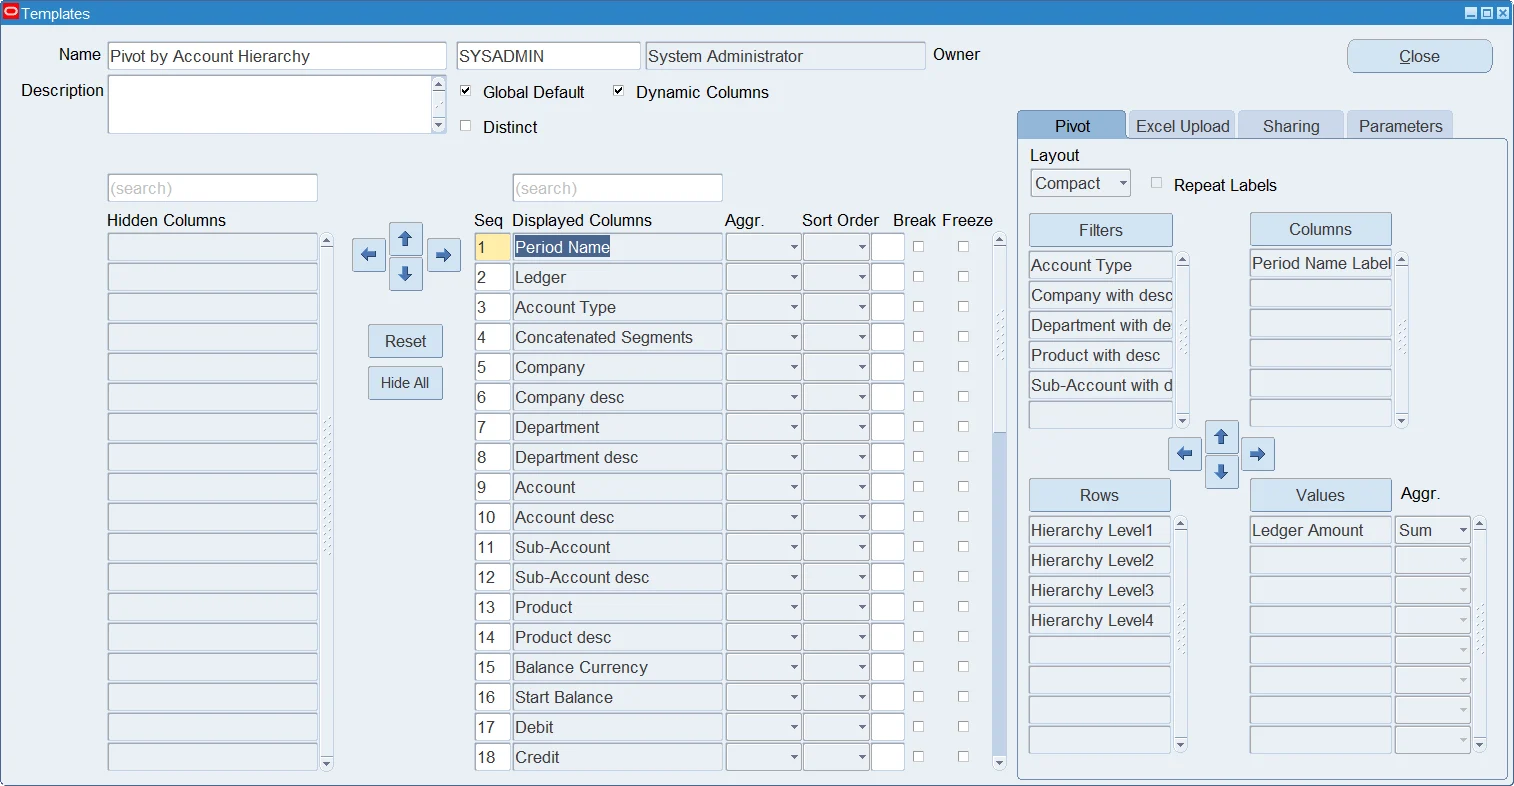
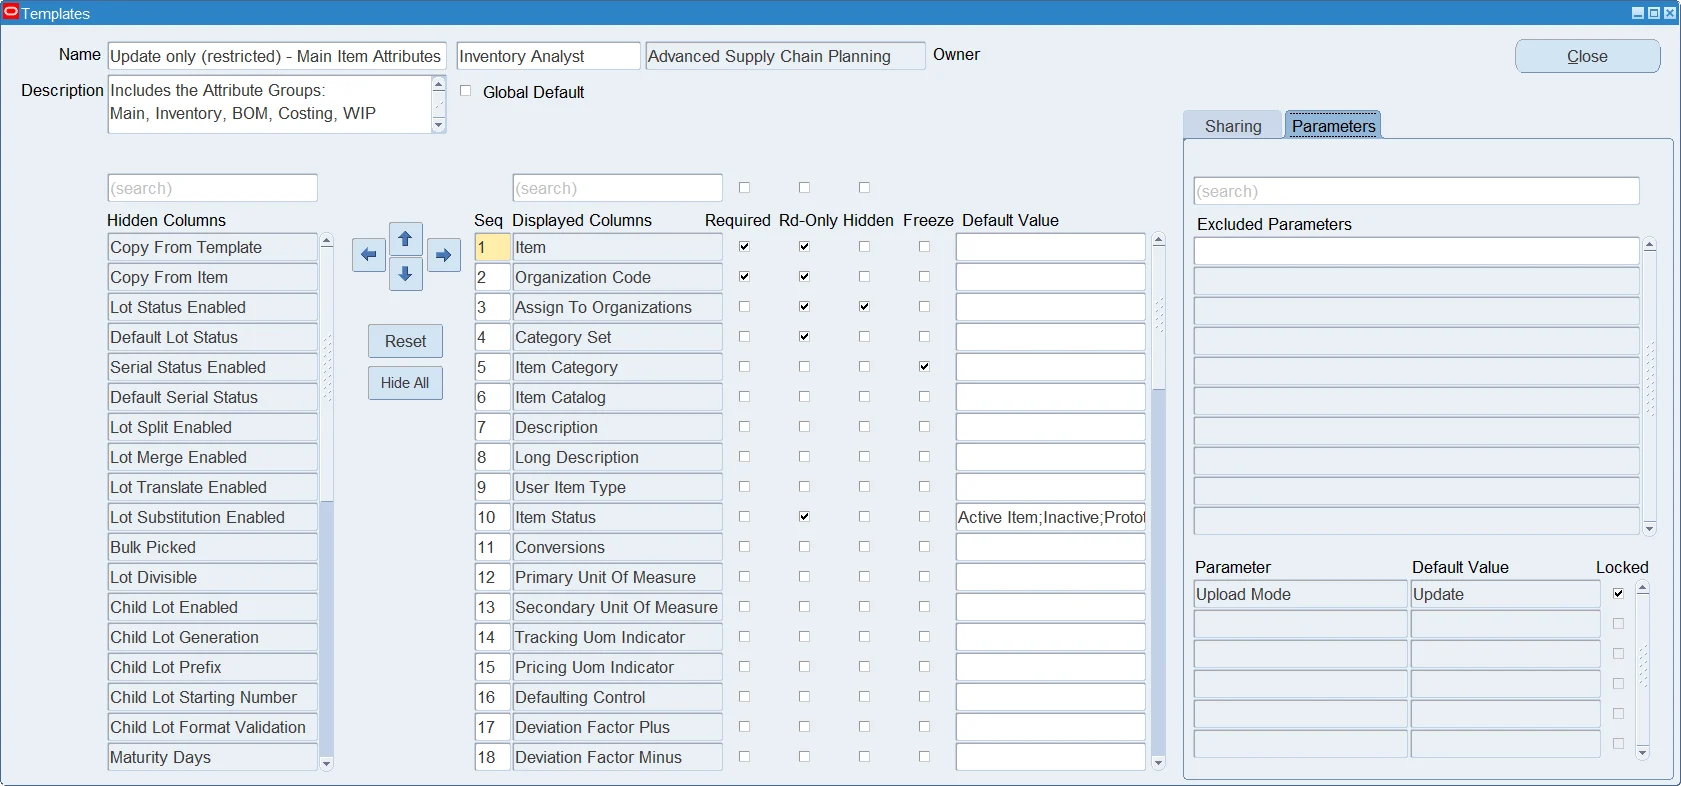
The template window looks slightly different for reports and for uploads, as some of the elements only make sense for one of them.
The following elements are available for both report and upload templates:
- Name – the name of the template.
- Description – the description of the template.
- Global Default – sets the template as the default for all report users (available for developers only).
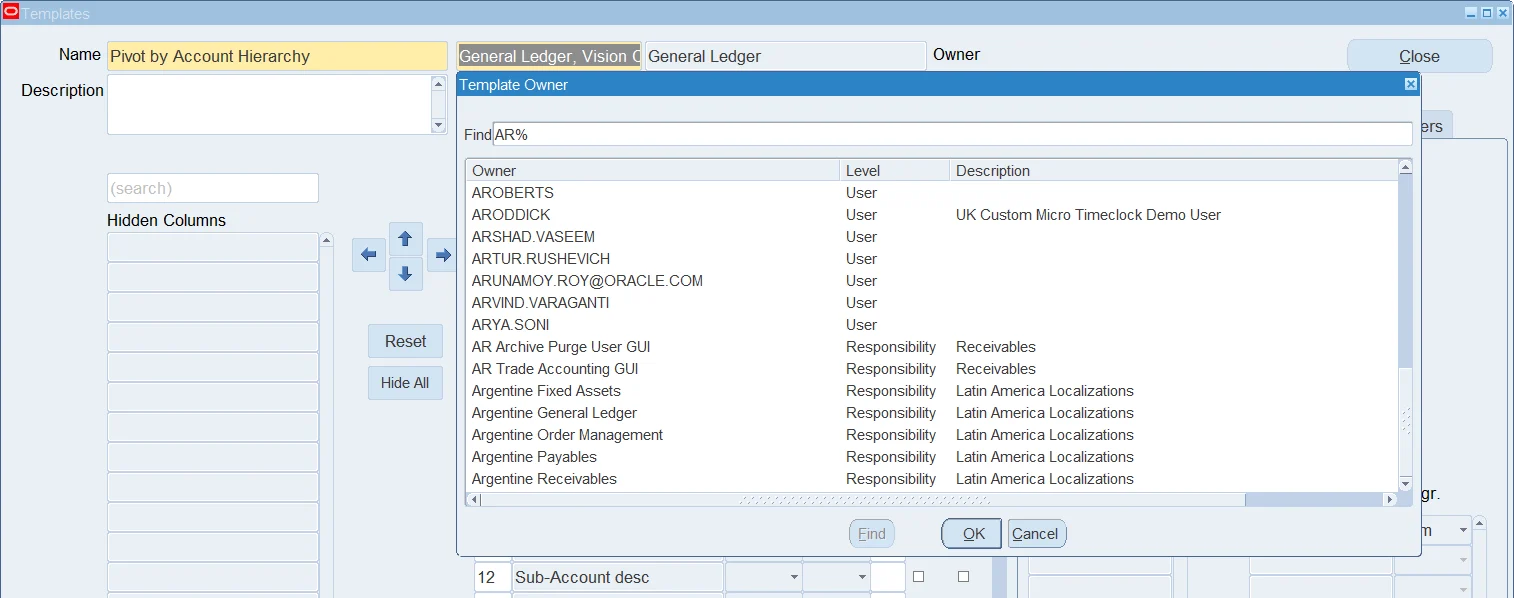
- Owner – shows who owns the template. Initially, this is the user who created it. Users with Blitz Report Access level User Admin, Developer or System, or with Blitz Report Template Access level ‘Super User’, can transfer ownership by double-clicking the owner field. Ownership can be transferred to another user or to a responsibility. If a responsibility owns a template, all users of that responsibility can view and modify it, which is useful for templates maintained by a team.
- Available Columns – list of columns that are available for display, but are not selected yet.
- Displayed Columns – list of columns that are selected and included in current report output.
- Column search – can be used to quickly find specific available or displayed columns.
- Freeze – marks the column at which the panes of the generated Excel file are frozen.
- Arrow buttons – move columns between “available” and “displayed”, as well as changing their display order. You can use the Ctrl and Shift keys to select groups of columns (multi-select) and move them simultaneously to and from either column. You can use double-click to move data from one column to the other.
- Reset – button to recover the initial column layout.
- Hide All – button to deselect and move all data off of the “selected” columns and back to the “available” column.
Report templates additionally offer the following column properties, together with the Pivot table and Excel upload tabs described below:
- Distinct – suppresses duplicate rows in the report.
- Aggr. – is used for summary reports and specifies how to aggregate the data (the choices are average, count, min, max, sum).
- Sort Order – determines the order of the output data (ascending / descending).
- Sort Priority – determines the sort priority if more than one sort order is selected.
- Sheet Break – allows splitting the output file into different sheets for every column value change.
Upload templates do not show the properties above, as they do not apply to an upload. They control how the generated spreadsheet is filled in and validated instead:
- Required – makes the column mandatory: the upload is rejected if the cell is empty, and the column cannot be removed from the displayed columns. Columns that are already defined as mandatory in the upload itself are always required, so their checkbox cannot be unticked.
- Read-Only – shows existing values but prevents the user from changing them. Together with a single Default Value the column is fixed to that value; together with a semicolon separated list the column’s list of values is reduced to the allowed values.
- Hidden – keeps the column in the generated Excel file but hides it from the user. The column still pre-fills its Default Value and drives dependent lists of values and validations, which is useful when the value is already determined by the choice of template. Hidden columns are placed at the right end of the sheet.
- Default Value – pre-fills the column in the generated Excel file, so the value is entered into every new row. A semicolon separated list, for example ‘Create;Update’, defines a set of allowed values, of which the first one is used as the default.
Pivot table
The Filters, Columns, Rows and Values fields are used to create and deliver the data in pivot table format with full drill down to details. The data must be selected to print on the report in order to be used in the Pivot table. The pivot table section of the template screen is divided into 4 sections:
- Filters – these are the columns you will use to filter the data. Filters are things like GL account, Department, Subaccount, Customer, Vendor, Project or Product, to name a few popular choices.
- Columns – this will define which data should appear in separate columns. Period, Project, Subaccount, to name a few popular choices.
- Rows – this will define the data summary level for each row in the pivot table.
- Values – this will define the numeric data that will be summarized to provide the totals for the level defined in the Row columns.
- Aggr. – for the information selected in the “values” section, how to aggregate the data (the choices are average, count, min, max, sum).
A pivot table is only created when the data fits on one sheet. For output exceeding the Sheet Row Limit or split by a Sheet Break, upload an Excel template with a pivot based on the workbook data model (Power Pivot).
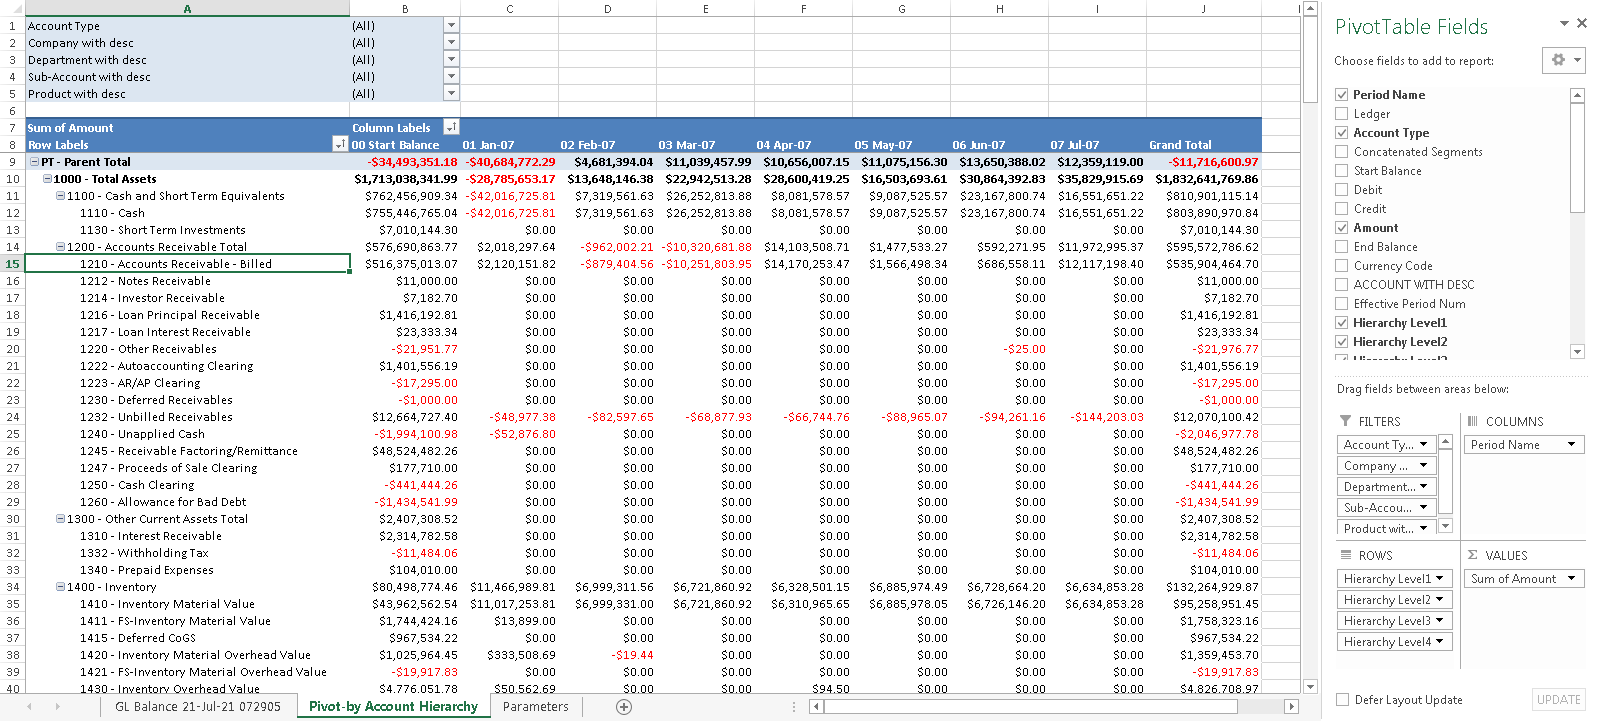
Sample pivot table output:
Excel upload
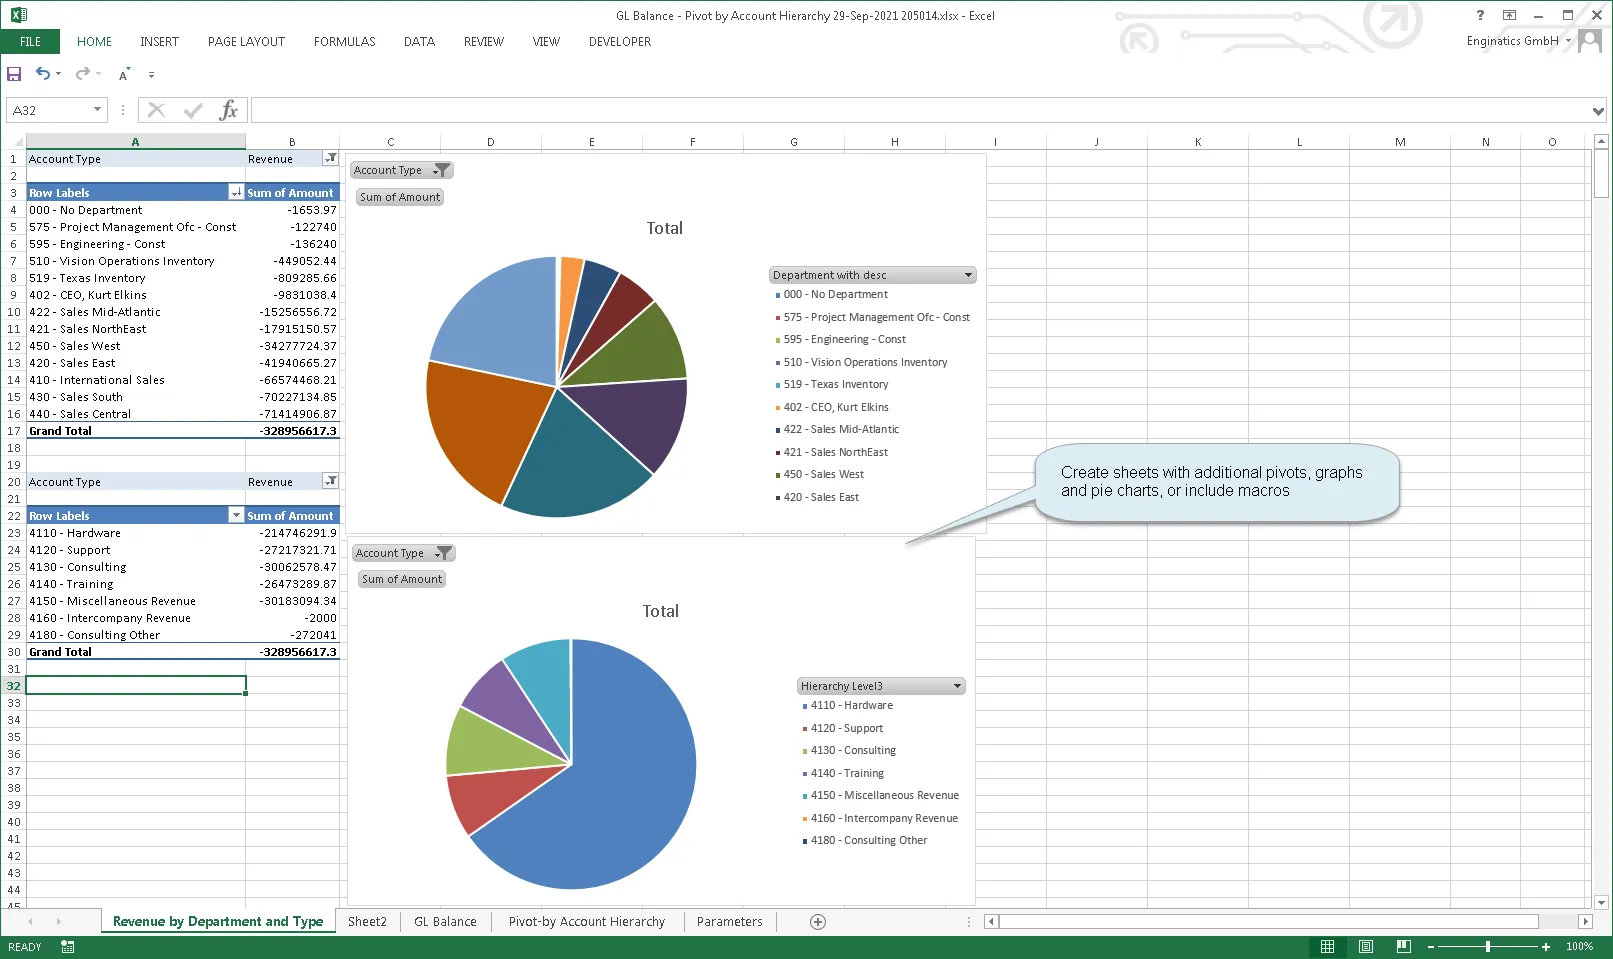
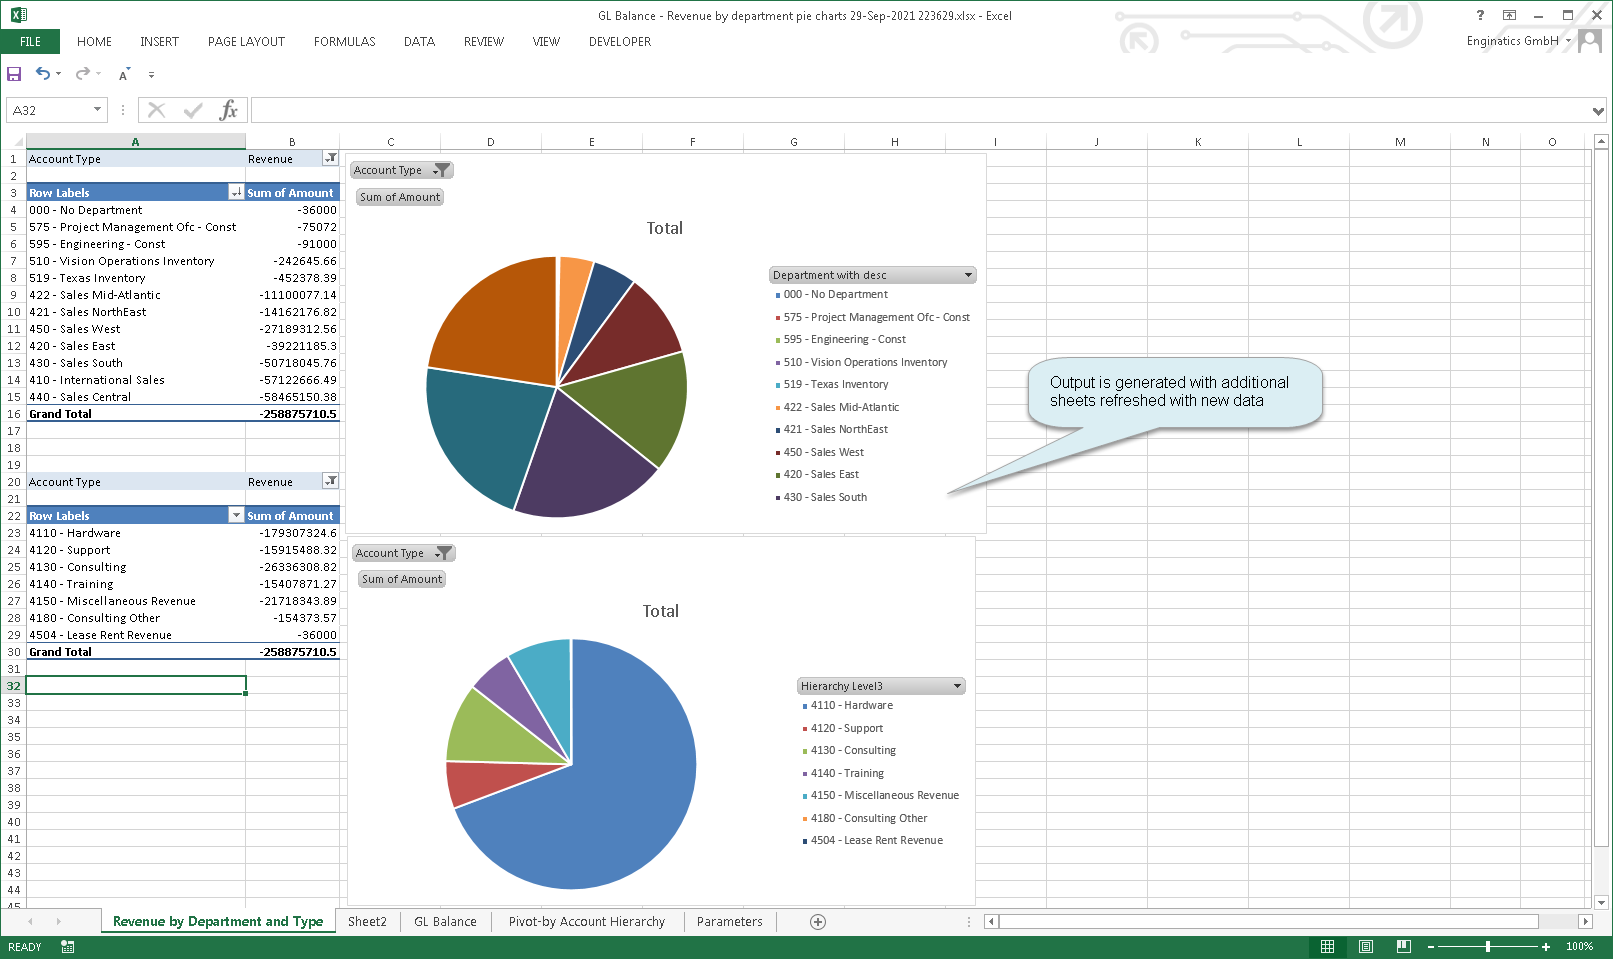
The Excel template upload functionality allows creation of additional sheets with graphs, pie charts, macros or any other Excel functionality. To use this feature, execute the following steps:
- Run a report and open the output
- Create sheets with additional pivots, graphs and pie charts or include macros. Place the data sheet as the first sheet in the workbook.
- Upload the saved Excel file including additional sheets or macros to the template
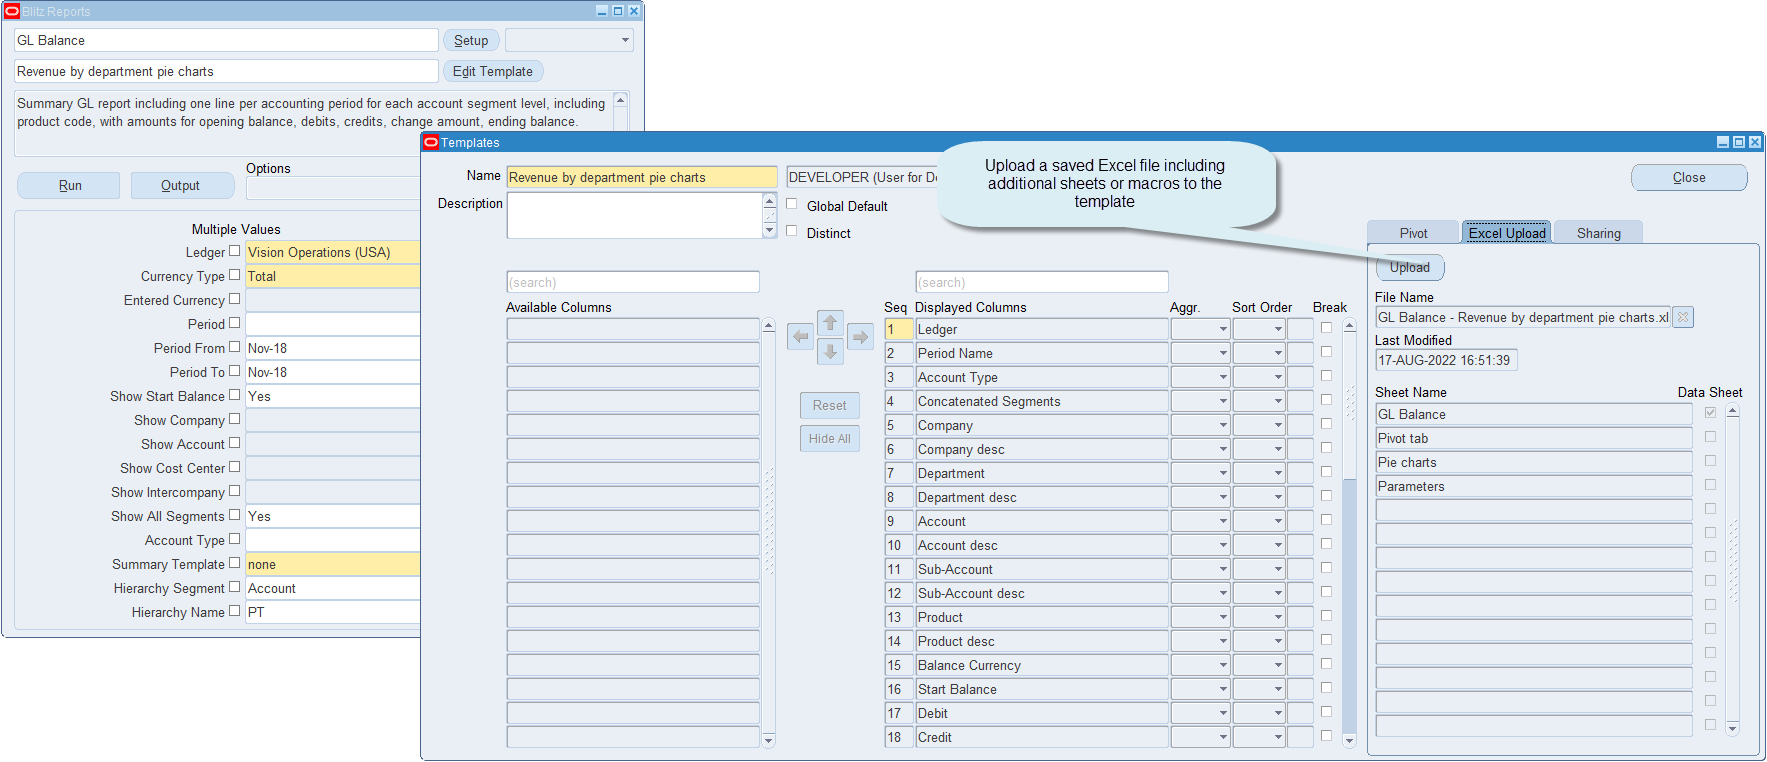
- Run the report again with parameters as required and the output is generated with additional sheets and refreshed with new data
Datasheet
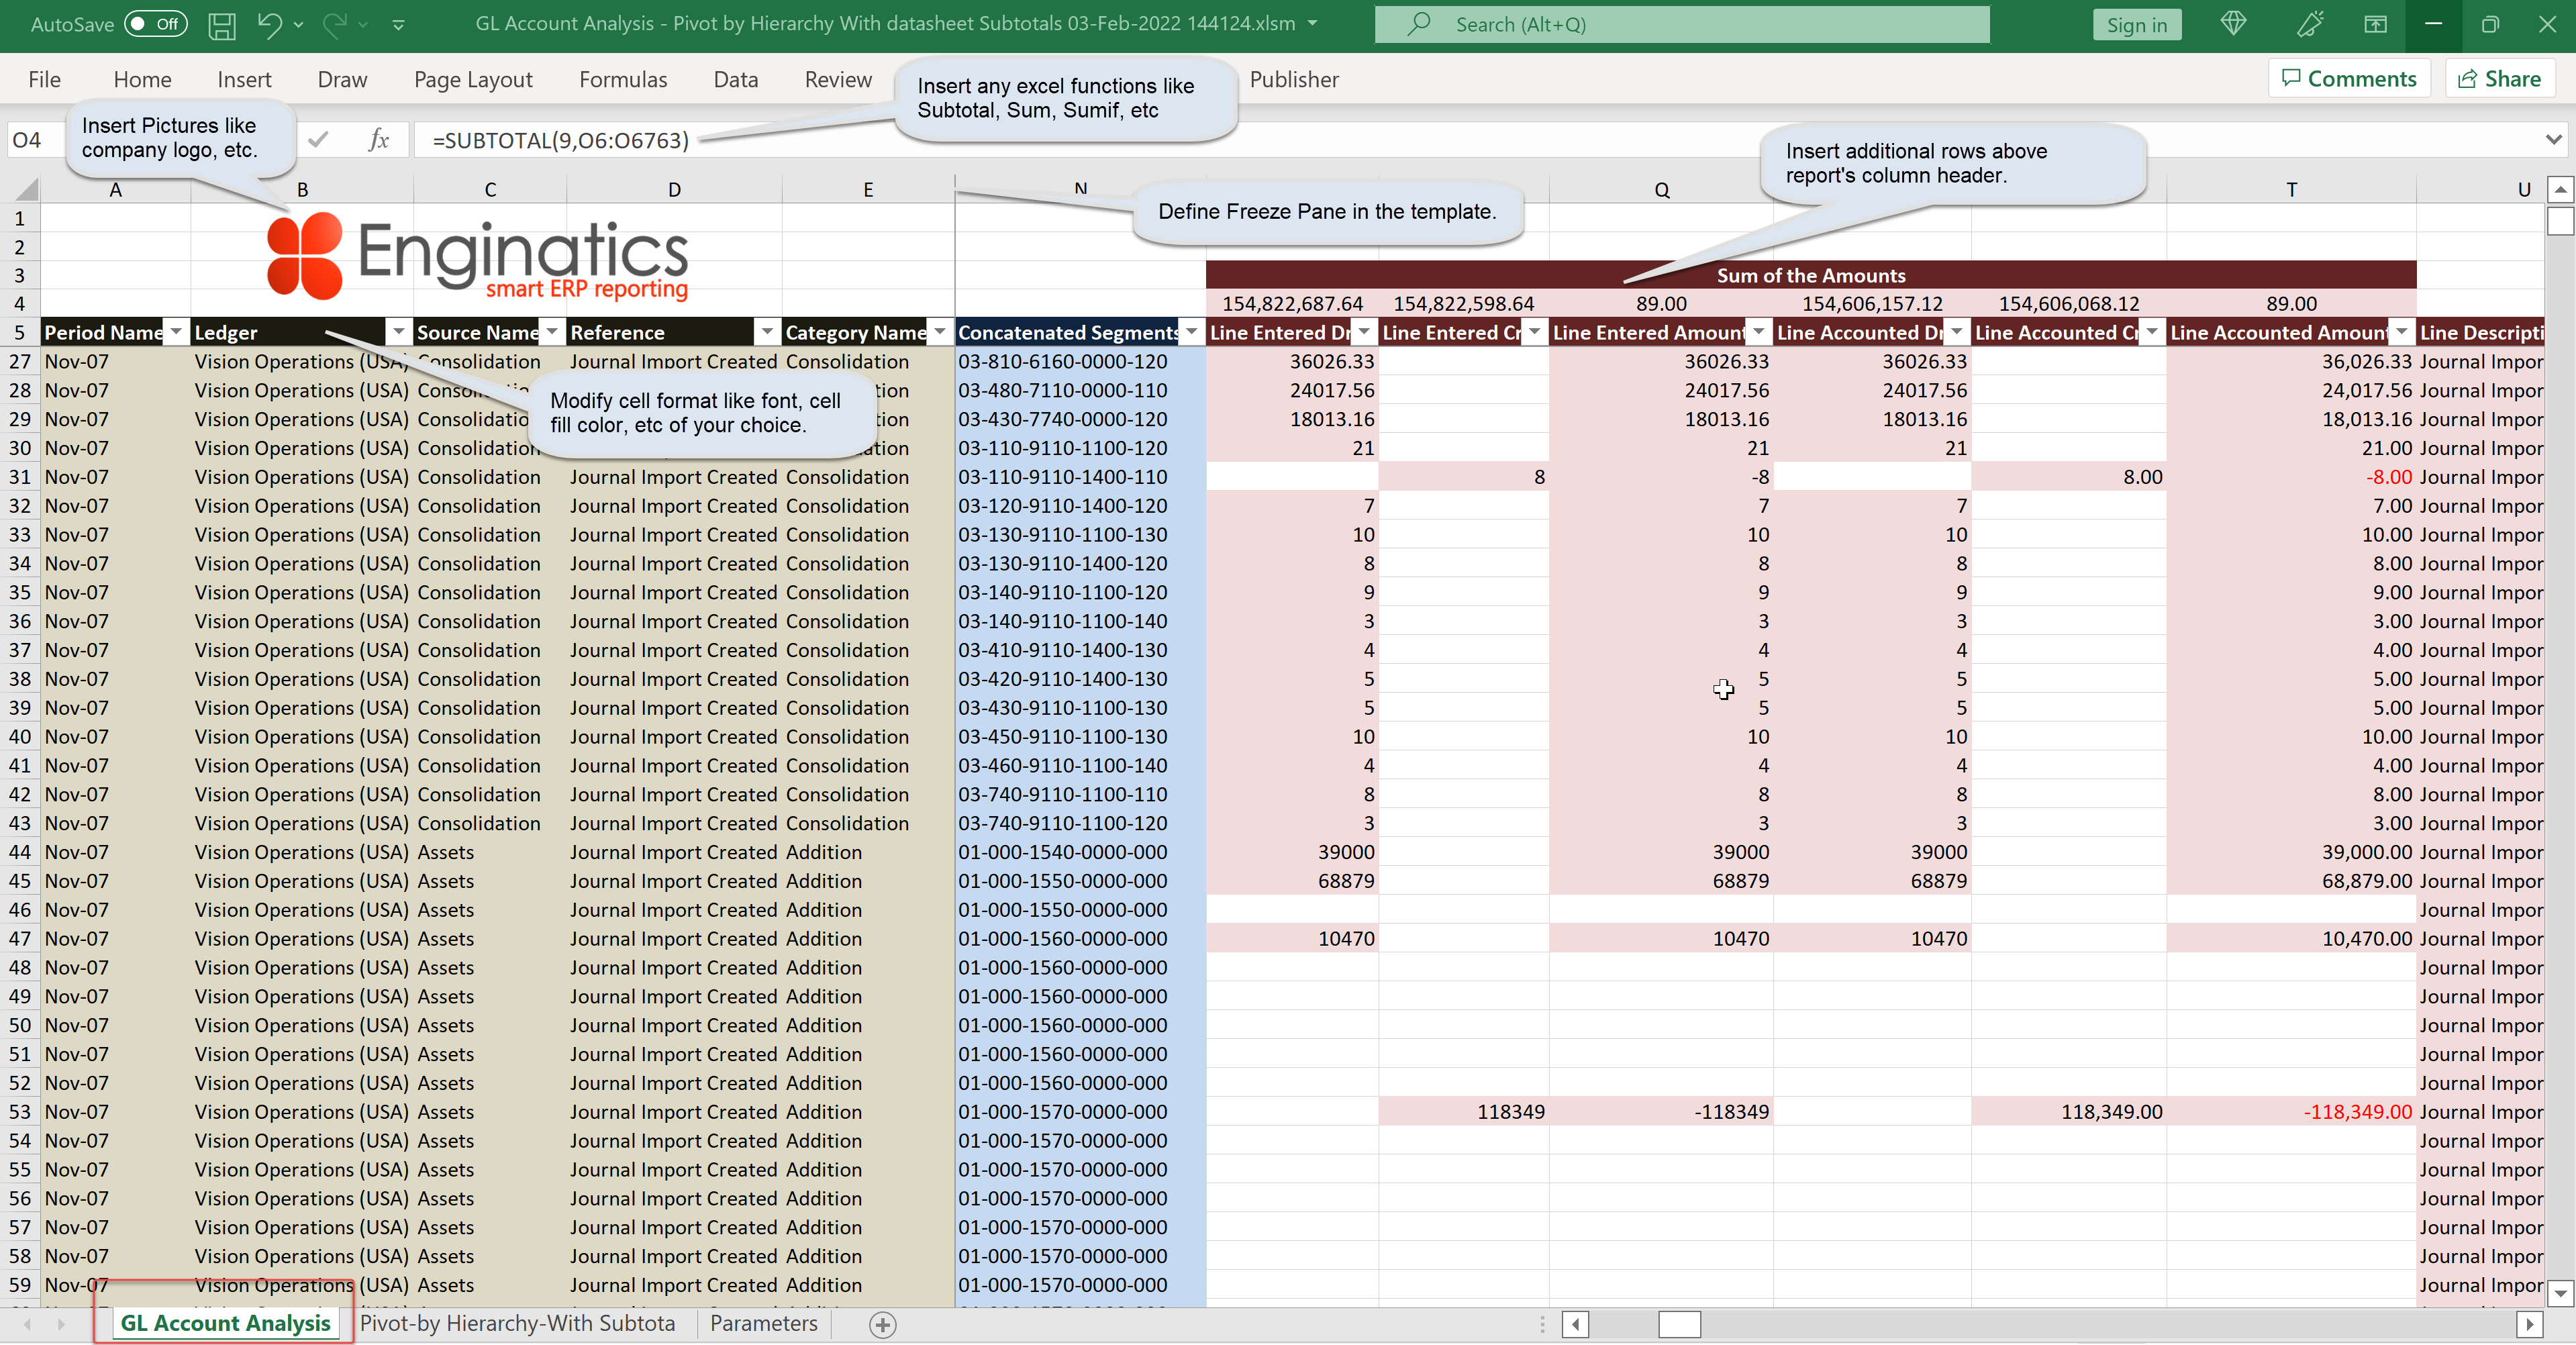
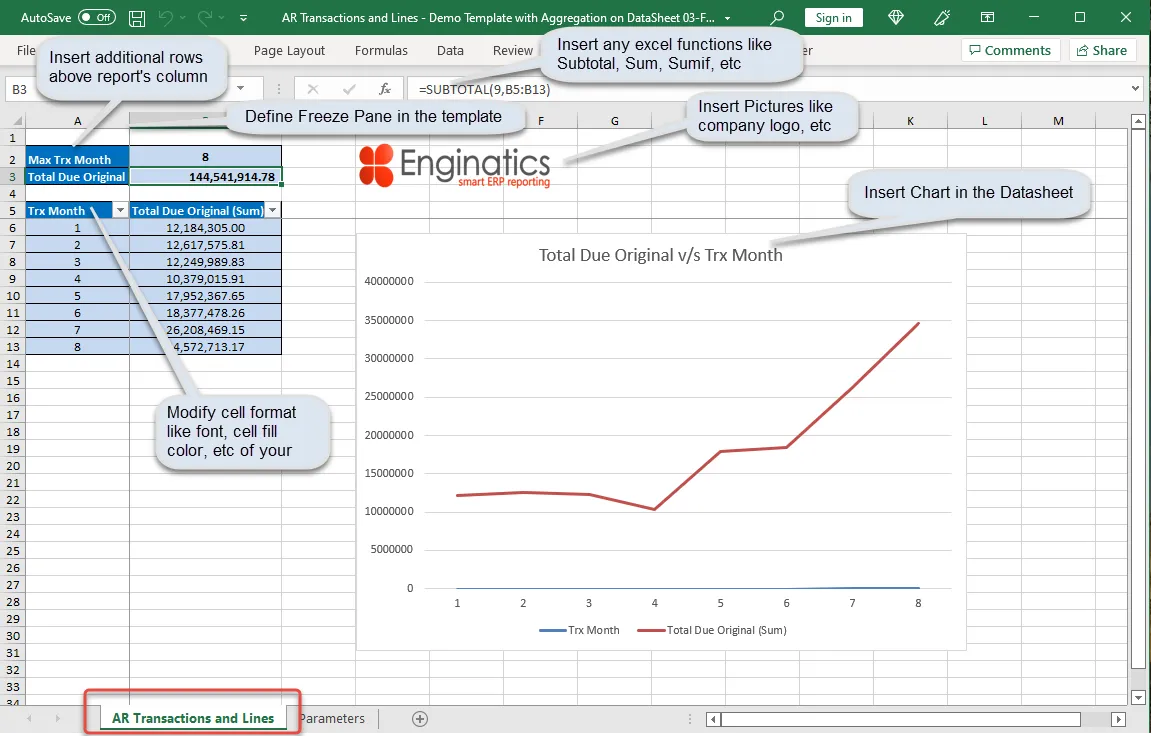
The excel template upload functionality also allows custom template definitions to the datasheet. The excel functions, pictures, screenshots, charts, header footer texts, comments, notes and freeze panes can be defined in the datasheet. Freeze panes can also be defined without uploading an Excel template file, by ticking the Freeze flag on the relevant template column. To use this feature, execute the following steps :
- Run a report and open the output
- Modify the datasheet based on the required template. Examples provided below
- Datasheet template having
- Pictures like company logo,
- Modified cell format like font, cell fill color, etc,
- Excel functions like Subtotal, Sum, SumIf, etc,
- Additional rows added above the data column header,
- Freeze pane applied
- Datasheet template having
- Datasheet template having
- Line chart,
- Pictures like company logo,
- Modified cell format like font, cell fill color, etc,
- Excel functions like Subtotal, Sum, SumIf, etc,
- Additional rows added above the data column header,
- Freeze pane applied
- Datasheet template having
- Upload the saved Excel file including modifications to the datasheets.
- Run the report again with parameters as required. The output is generated with the uploaded datasheet template having refreshed with new data.
Template owner
Every template has an Owner, shown next to the template name. The owner is either the user who created the template, or a responsibility. Only the owner can change a template’s content — its column selection, layout, sharing and default values. Two exceptions apply: users whose Blitz Report Template Access profile option is set to ‘Super User’, or whose Blitz Report Access is ‘User Admin’, can change any template, and developers can always do so.

If a template belongs to someone else, its fields are shown but cannot be changed. To adapt such a template, use Actions > Copy Template to take your own copy: you become the owner of the copy and can change it freely, while the original stays untouched. This is the normal route for a user who wants a variation of a shared template.
Ownership can also be handed over. A developer can set the Owner of a template to another user, or to a responsibility, in which case every user holding that responsibility can maintain the template together. This is how a report developer gives a team the ability to look after the column selection of a template that the developer built. What the new owner may not change are the template’s restrictions — see Template security in the developer guide.
Template sharing
Templates can be shared across the following levels:
- Site: all users in the system
- Responsibility: users having the responsibility
- User: an individual user
Sharing gives other users access to run a template, but not to modify it. To let a group of users maintain a template together, a responsibility can be set as the template owner instead, see the Blitz Report Template Access profile option.
Restricted templates
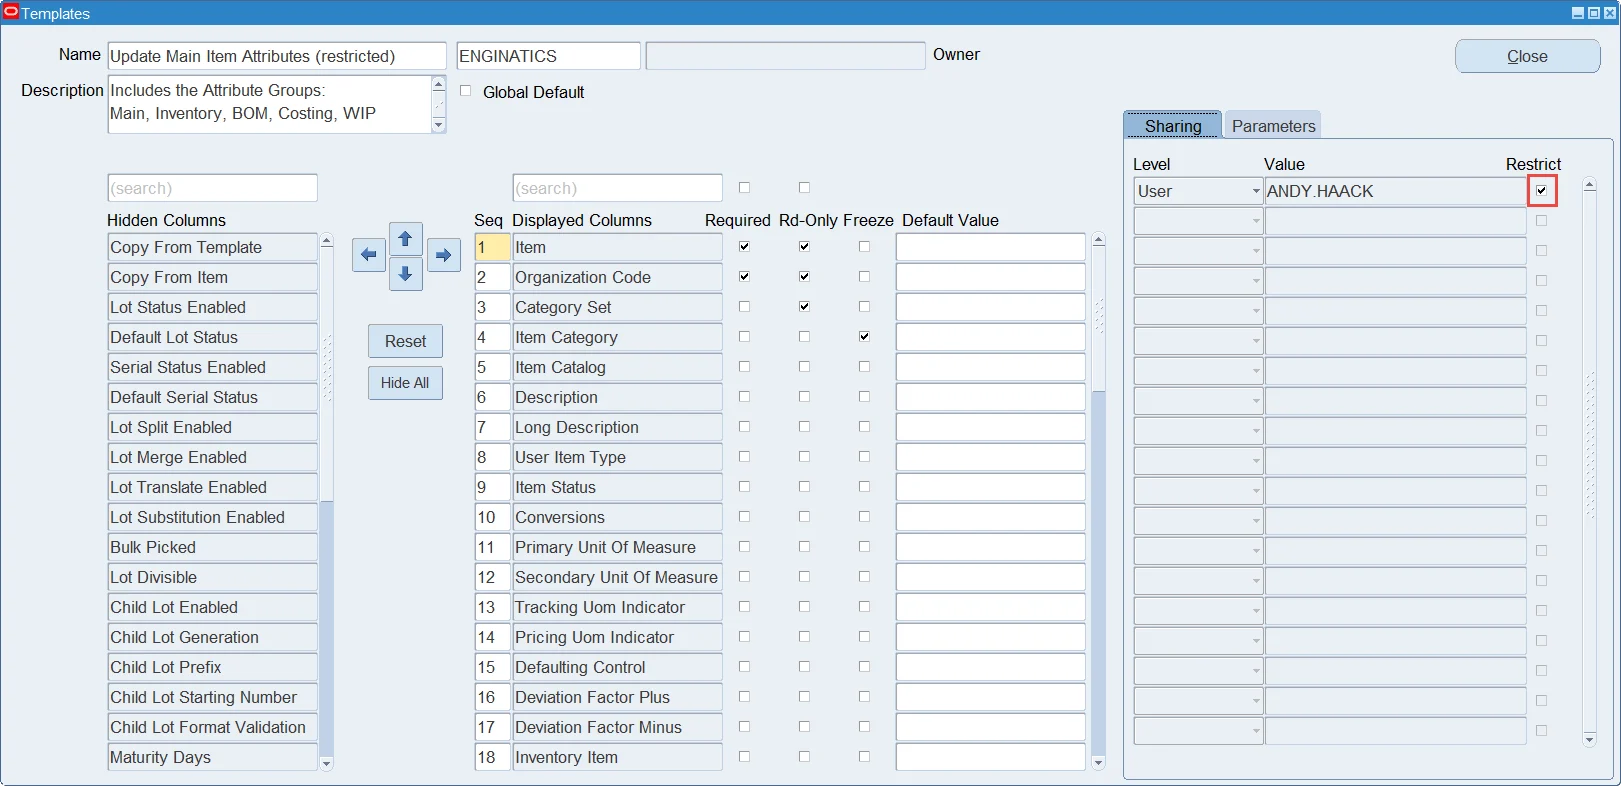
A shared template can additionally be marked with the Restrict flag for a responsibility or an individual user. Users who are restricted for a report can only see and run the restricted templates of that report: the default layout and all other templates are no longer offered, so the report is always run with the controlled column layout and parameter values. If more than one restricted template is shared with a user, all of them remain available for selection.
This is useful where a report or upload should only ever be used in a particular way, for example an upload template that is restricted to updating existing records.
Excluded parameters
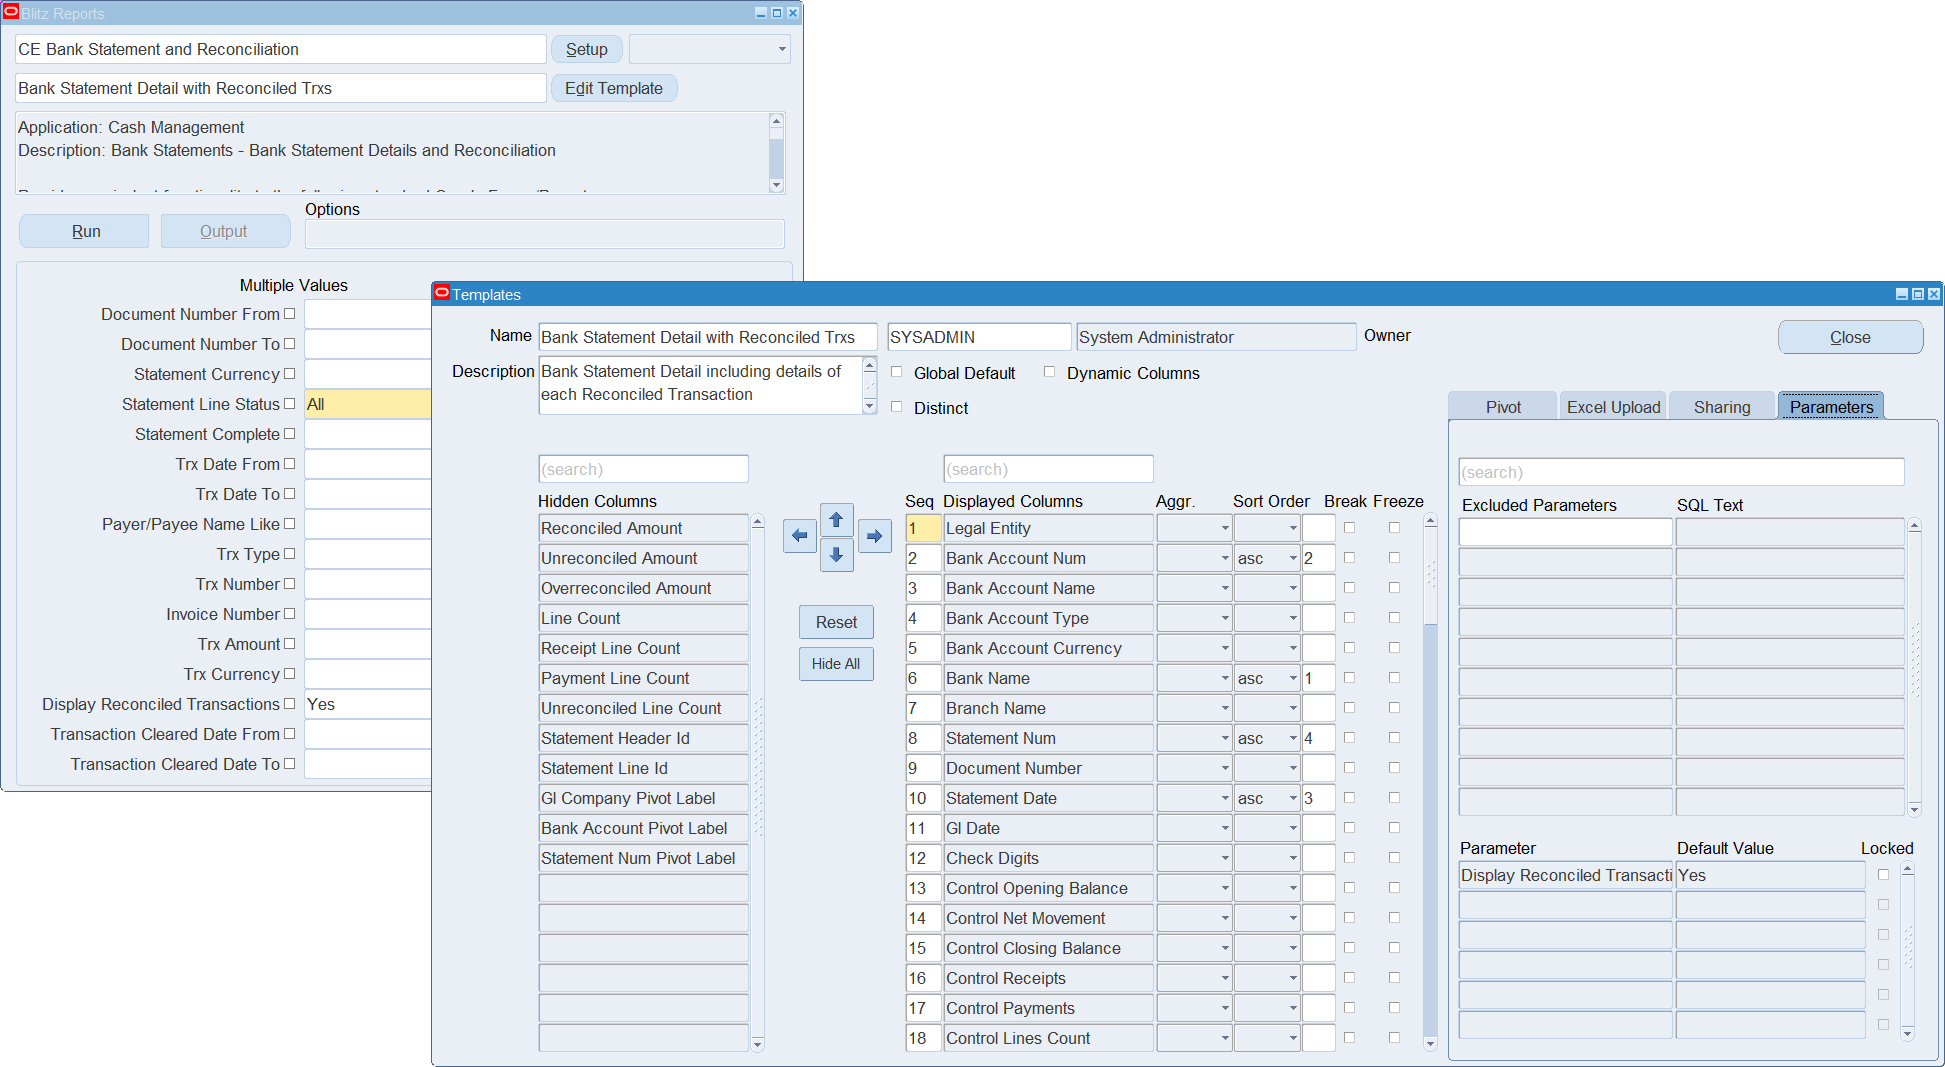
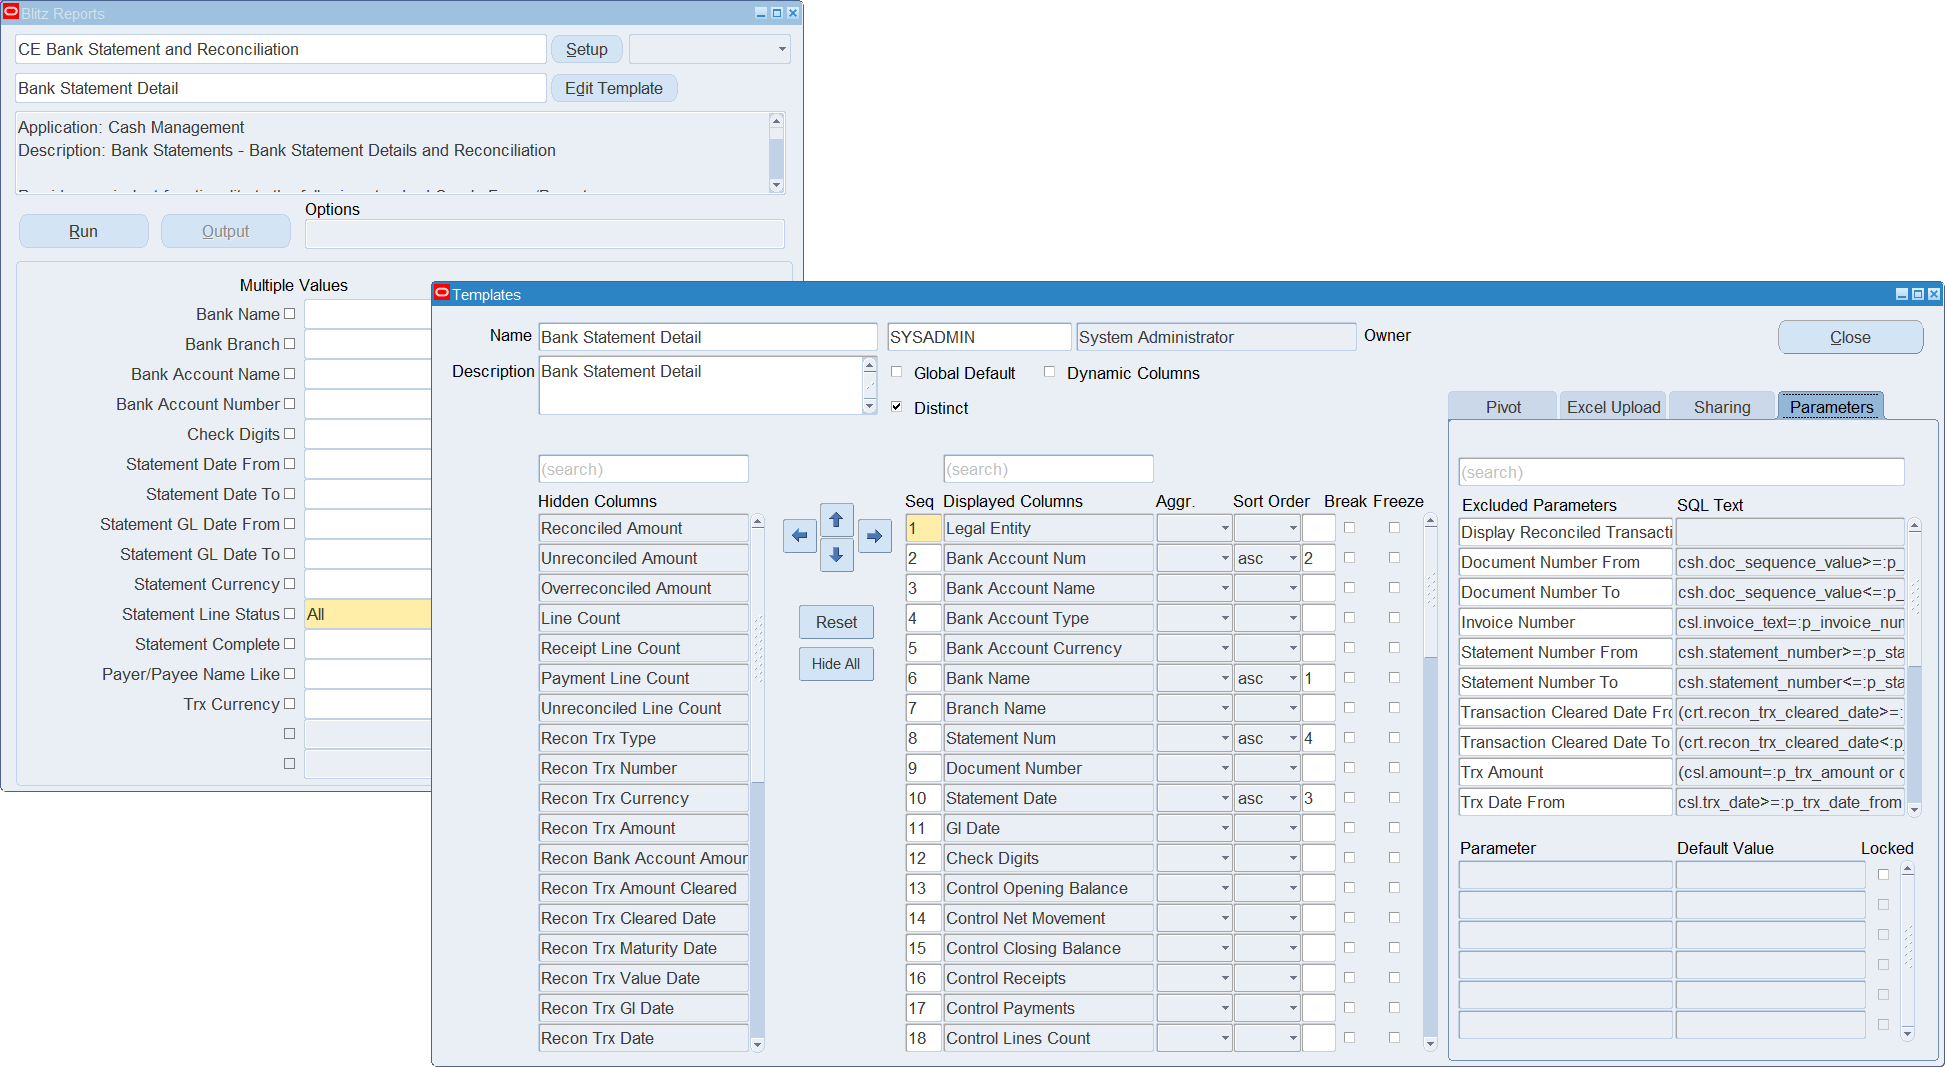
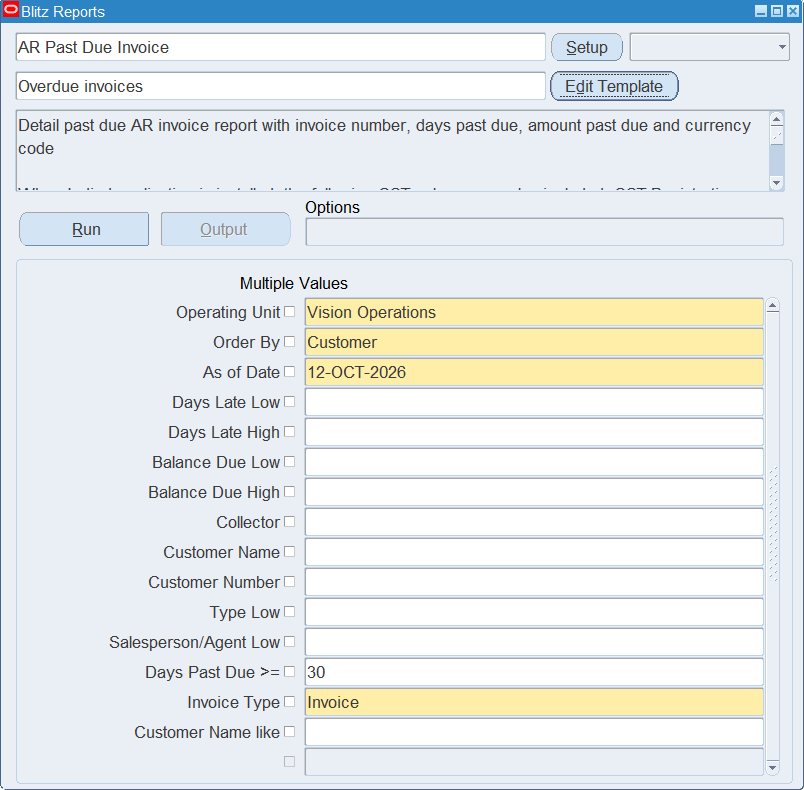
You can exclude certain parameters for a template. When the template is selected on the Run window, the excluded parameters are not displayed. The followings screenshots provide an example:
Template conditions
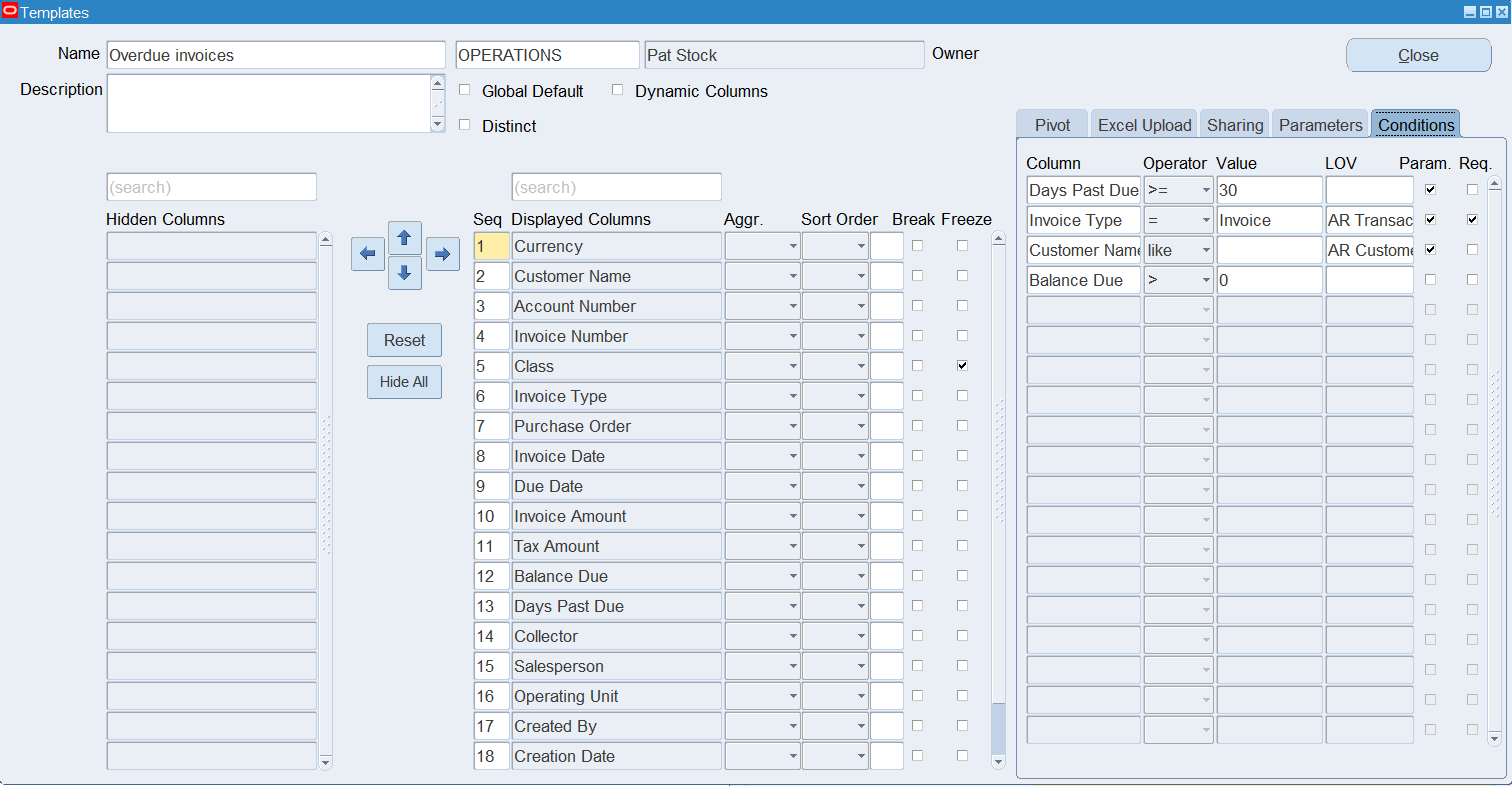
The Conditions tab restricts the rows a template returns. Each condition compares a report column with a value: select the Column and the Operator, then type the Value, pick it from the list of values or, for a date, from the calendar. With =, <>, like and not like, a semicolon-separated list matches any of its values (=, like) or none of them (<>, not like). Dates compare whole days. The LOV field proposes a list of values for the column, which you can change. Without developer access, you can choose from the lists of values used by the reports you can run.
A condition without Param. applies to every run. With Param. ticked, it appears on the run screen after the report parameters, labelled with the column and operator, for example Days Past Due >=. Its value on the Conditions tab is the default, and an empty value does not restrict the data. Req. makes a value mandatory. The output’s Parameters sheet lists the conditions applied to the run.
For uploads, conditions restrict the existing records downloaded for update.
2.6 Scheduling a report
Blitz Reports can be scheduled as background processes to run at a certain date or time. This feature can be used to run time-consuming reports during non-office hours, or to automatically distribute files by email or place them into a folder on the file system. There is a training video available on scheduling and output file distribution.
The easiest way to schedule a report is to run the Blitz Report first, and to then copy the submitted concurrent request and schedule it:
- Run a report from the Blitz Report run window with parameter restrictions as required
- Navigate to the menu > view > requests > submit a new request > single request > Copy > Find > select the concurrent request submitted in step 1
- Update schedule and delivery options as required and re-submit the request. The copy runs with the template condition values of the original run.
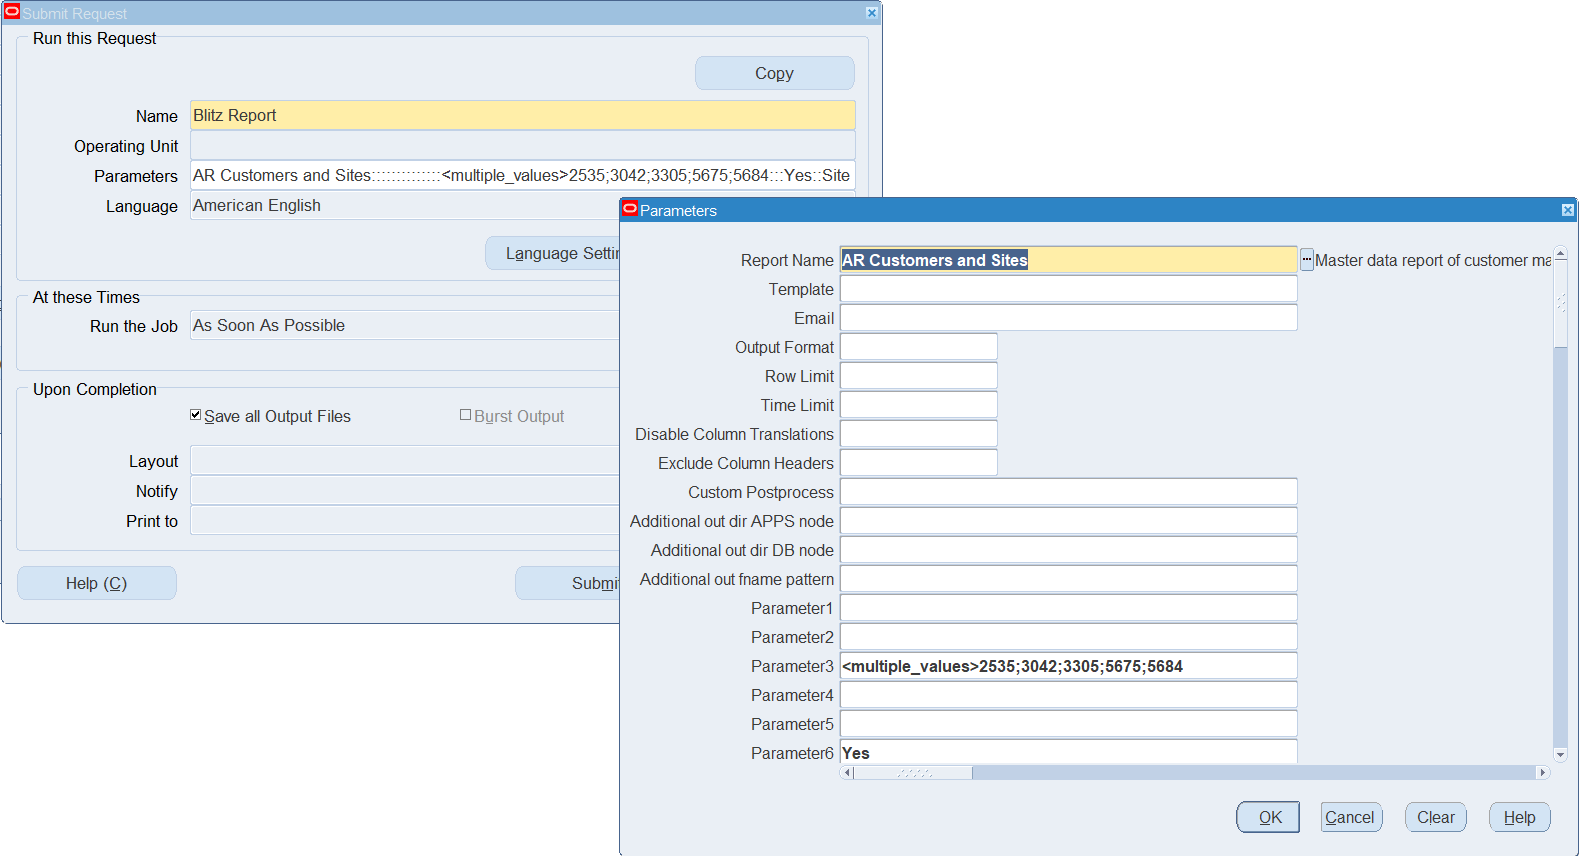
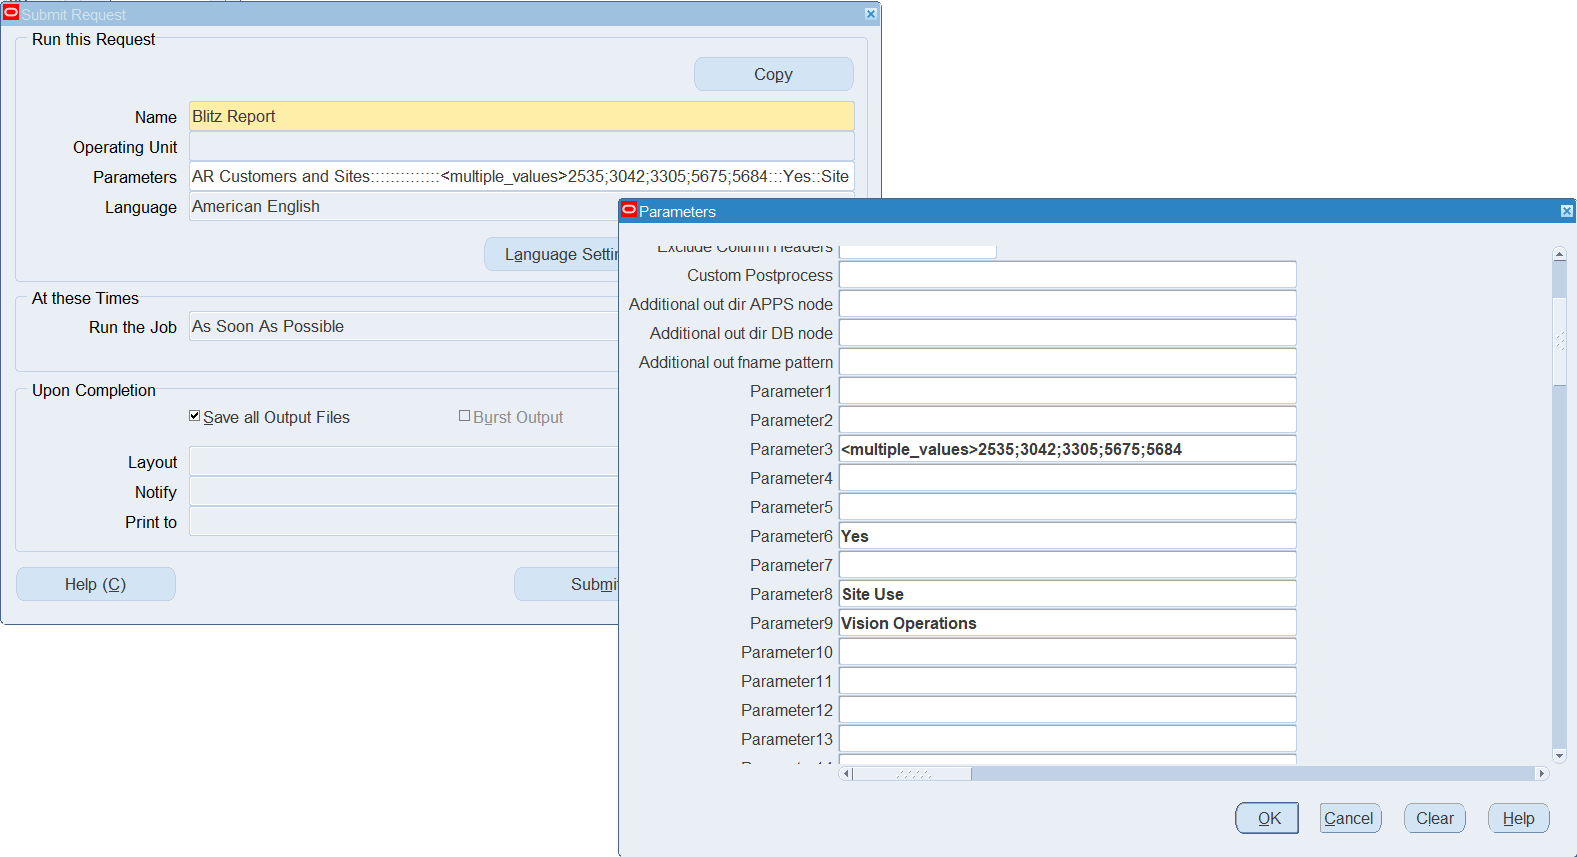
Alternatively, you can submit a new ‘Blitz Report’ concurrent request, populating its parameters manually. Select the required report name from the LOV and populate parameters 1 to 87 with values in exactly the same order as they appear on the Blitz Report run window. For example, if the third parameter is ‘Operating Unit’ with a value of ‘Vision Operations’, then Parameter3 of the concurrent request would need to be populated with this value in order to filter the report data by operating unit.
A multiple values string can be entered by using the keyword (see below).
To schedule the report ‘Customer Sites’ and extract the data as shown in the previous example, concurrent request parameters would need to be entered as follows.
Delivery options and output distribution
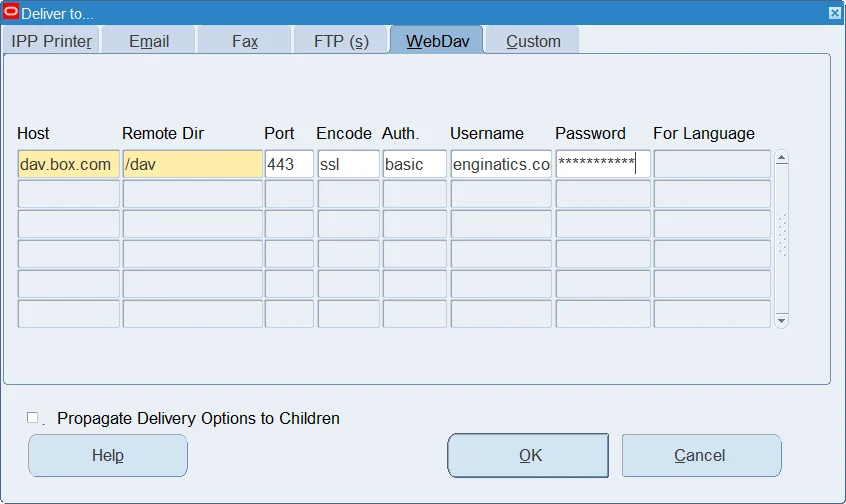
Oracle’s delivery options allow sending the report output e.g. as an email attachment, to an FTP location or uploading it to a WebDAV cloud storage.
If a scheduled report does not retrieve any data, Blitz Report neither sends the empty output file nor copies it to the server output directory. In case you also want to send empty output files for scheduled reports, set Blitz Report Suppress Empty File Delivery to ‘No’.
2.7 Saving parameter defaults
The Actions menu of the run screen saves the currently entered parameter values as defaults: ‘Save User Parameter Defaults’ stores them for the current user, and ‘Save Template Parameter Defaults’ stores them for the selected template. The corresponding ‘Clear’ entries remove the saved defaults again. Saving template parameter defaults also stores the values entered for the template’s prompted conditions.
Template parameter defaults can additionally be marked as Locked, so that they cannot be changed on the run window. This is mainly used for uploads, see locked parameters.
2.8 Copying, exporting and importing templates
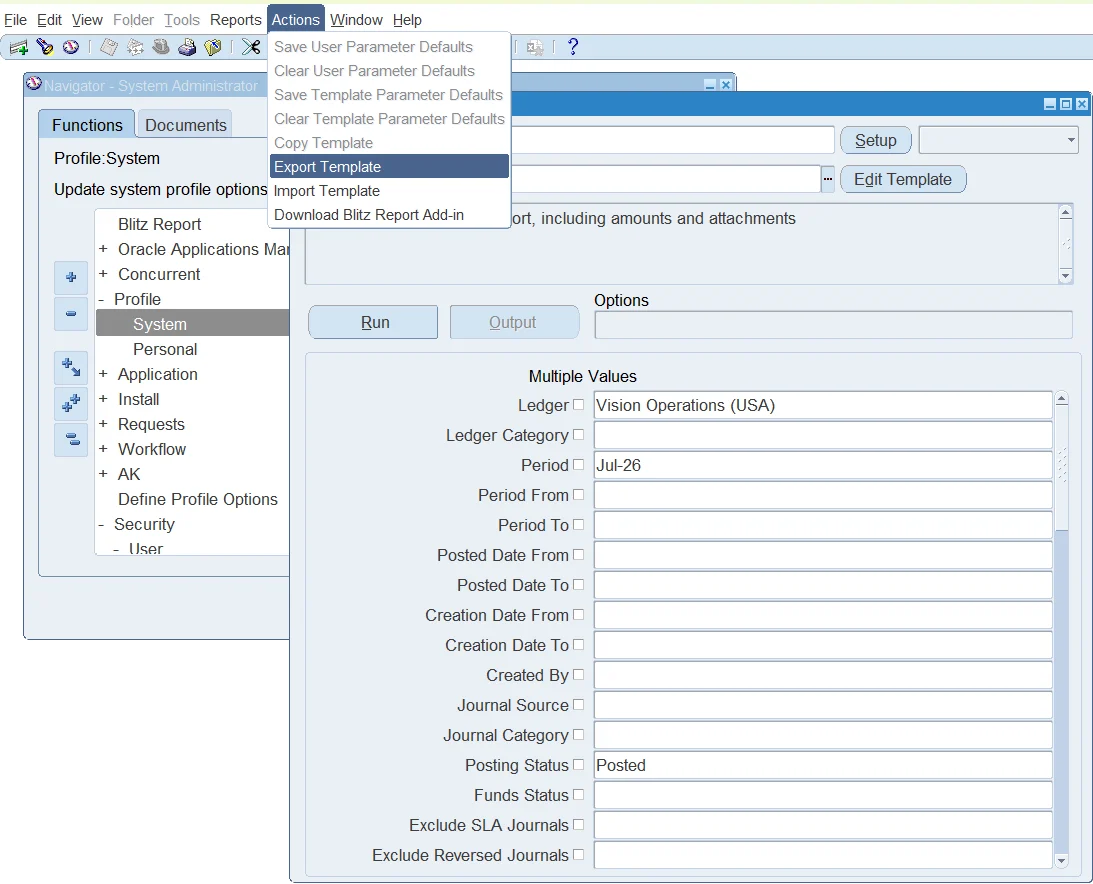
Templates can be copied, exported to a file and imported again through the run screen’s Actions menu, for example to move a template to another instance or to create a variant of an existing layout.
2.9 Preferences
Each user sets their own preferences in the Preferences window, which opens from the Actions menu of the run window. They also apply to reports run from the Blitz Report web page and the Excel add-in. An empty field uses the default.
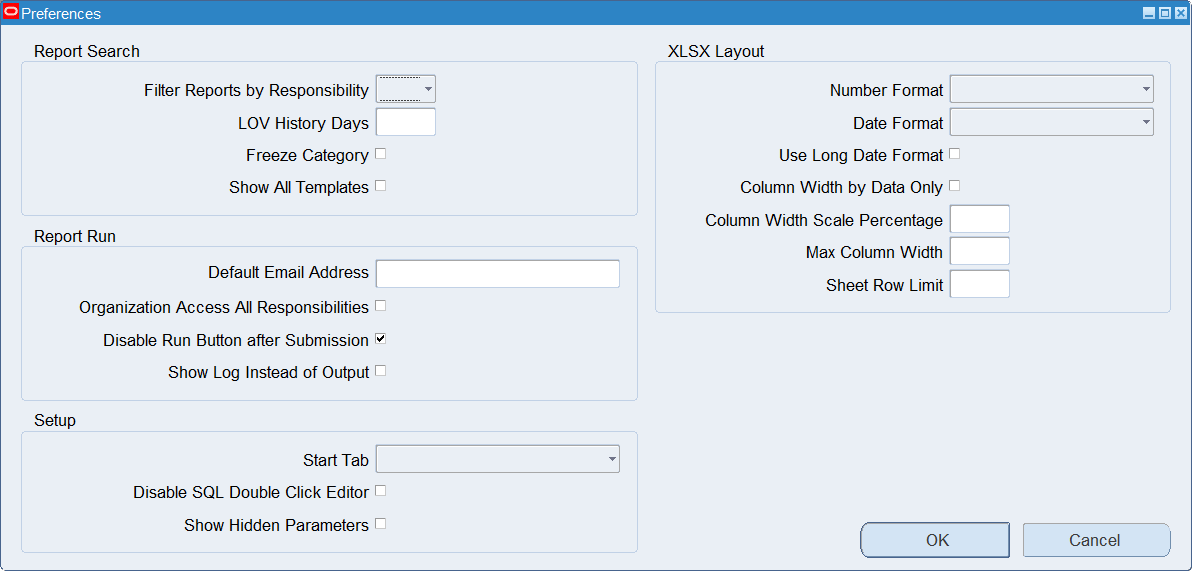
| Preference | Description |
|---|---|
| Report Search | |
| Filter Reports by Responsibility | Yes: the report and template lists show those of the current responsibility only. No: also those of your other responsibilities. Empty: Yes, and No for developers. |
| LOV History Days | Number of days for which your recently run reports are listed first in the report list. 0 sorts the list alphabetically. Default 365. |
| Freeze Category | Keeps a picked category selected, so that later report searches stay restricted to it. |
| Show All Templates | Lists the templates of all reports, not only those of the selected report. Picking a template of another report opens that report. |
| Report Run | |
| Default Email Address | The email address that your report runs default to, when the report does not define its own default email. |
| Organization Access All Responsibilities | The operating unit, inventory organization, ledger and asset book lists of report parameters show the organizations of all your responsibilities with access to Blitz Report instead of those of the current one. Uploads always use the current responsibility. |
| Disable Run Button after Submission | Disables the Run button after a submission, to prevent submitting the same report with the same parameters twice by accident. Ticked by default. |
| Show Log Instead of Output | Opens the request log instead of the output, for debugging. |
| Setup | For users with access to the Setup window. |
| Start Tab | The tab of the Setup window that opens first. |
| Disable SQL Double Click Editor | A double click in the SQL text selects a word instead of opening the editor window. |
| Show Hidden Parameters | Shows hidden parameters on the run window, for debugging or to save their template defaults. For developers. |
| XLSX Layout | |
| Number Format | Format of numeric columns for which neither the report nor the column defines one. |
| Date Format | Date format of the Excel output. Empty: profile option ICX: Date format mask. |
| Use Long Date Format | Shows dates with the full year and leading zeros, e.g. 05-Jan-2018 instead of 5-Jan-18. |
| Column Width by Data Only | Fits the column widths to the data only, so headers wider than their data are cut off. Without it, the columns fit both their headers and their data. |
| Column Width Scale Percentage | Scales the calculated column widths, for screens on which the content does not fit. Default 100. |
| Max Column Width | Maximum column width in characters. Default 60. |
| Sheet Row Limit | Rows per sheet. Further rows go to additional sheets. Default 1048576, the Excel maximum. Set it lower if a sheet with many columns reaches the 4 GB size limit. |
Number Format, Date Format, Use Long Date Format and Organization Access All Responsibilities show the value that the system administrator sets for everyone with the profile options of the same name. A value you choose applies to you only.
3 Excel Add-in
The Blitz Report Excel Add-in runs reports, refreshes data and drills down directly from Microsoft Excel, without opening the Oracle E-Business Suite forms or web user interface. It connects to one or more EBS environments through webservices and respects the same responsibilities, report assignments and data security as all other Blitz Report user interfaces. The server side connectivity is set up during installation, see Configure webservice connectivity (ORDS or ISG) in the Installation Guide. Every window of the add-in carries a link to its section of this guide, and the run screen links to the report’s or upload’s page in the report library.
The following video shows the add-in at work: running reports and uploads, drilldowns, Blitz FSG statements and the AI integration with Microsoft 365 Copilot and Claude in Excel.
3.1 Installing the add-in
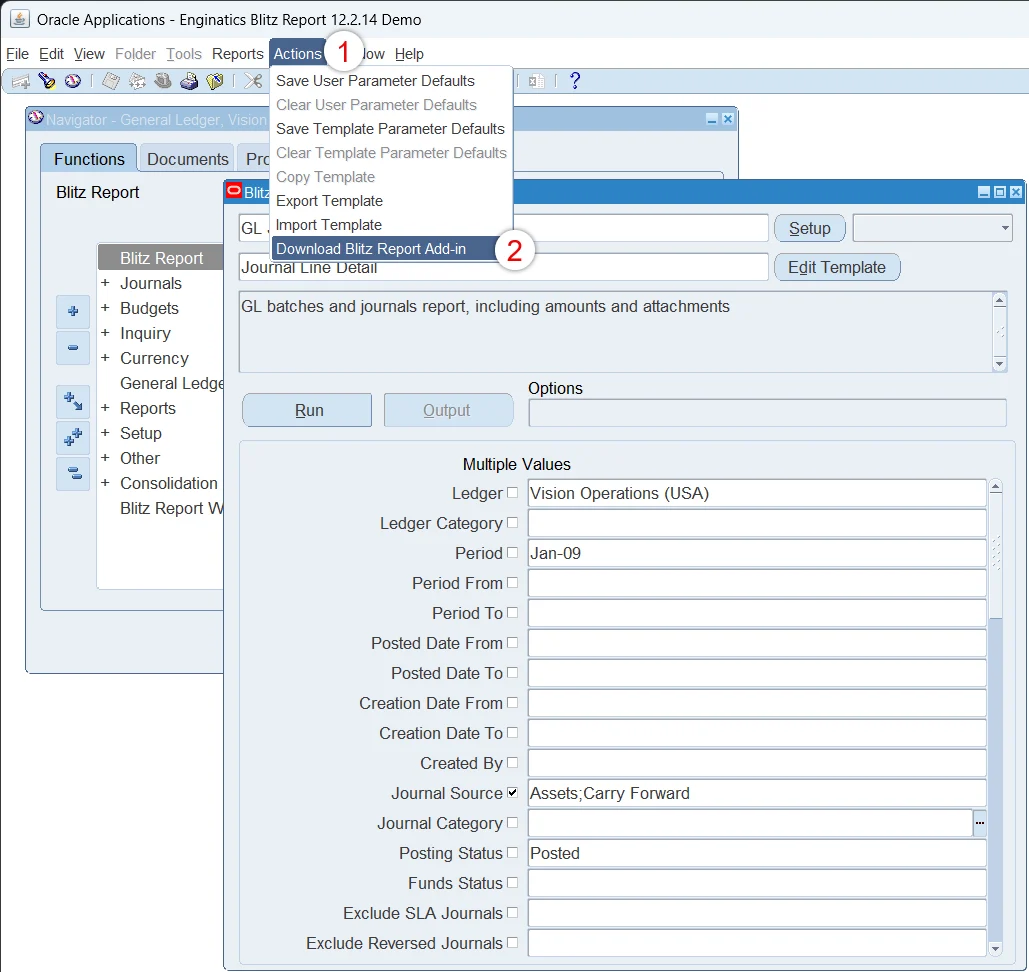
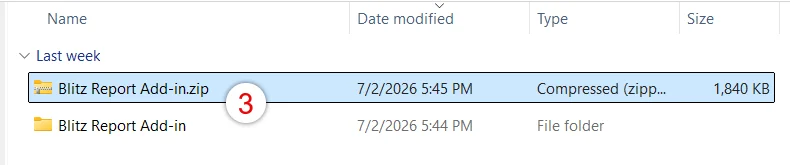
Download the add-in from the Blitz Report run screen via Actions > Download Blitz Report Add-in. The download is a zip file containing the add-in and an installer script. Extract the zip file, close Excel, and double-click ‘Install Blitz Report Add-in.bat’: the script copies the add-in to your Excel add-ins folder and registers it to load automatically. The next time Excel starts, it shows the Blitz Report ribbon tab.

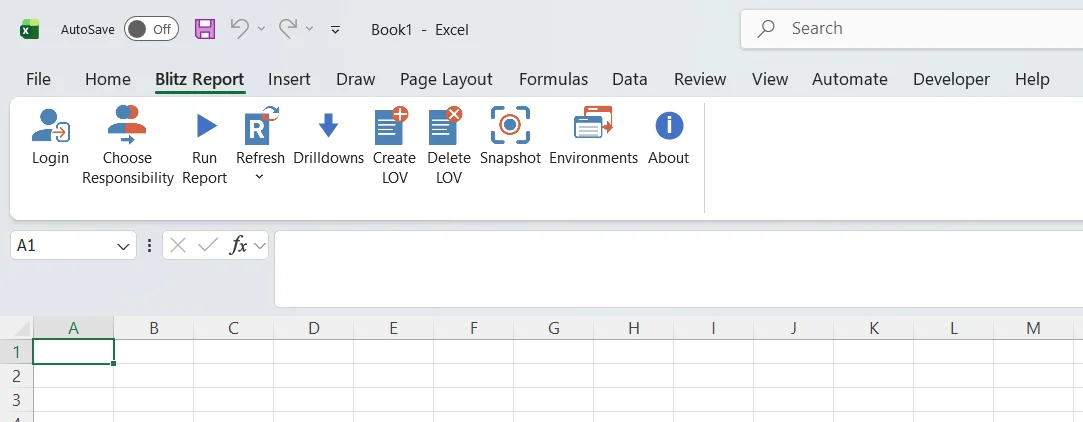
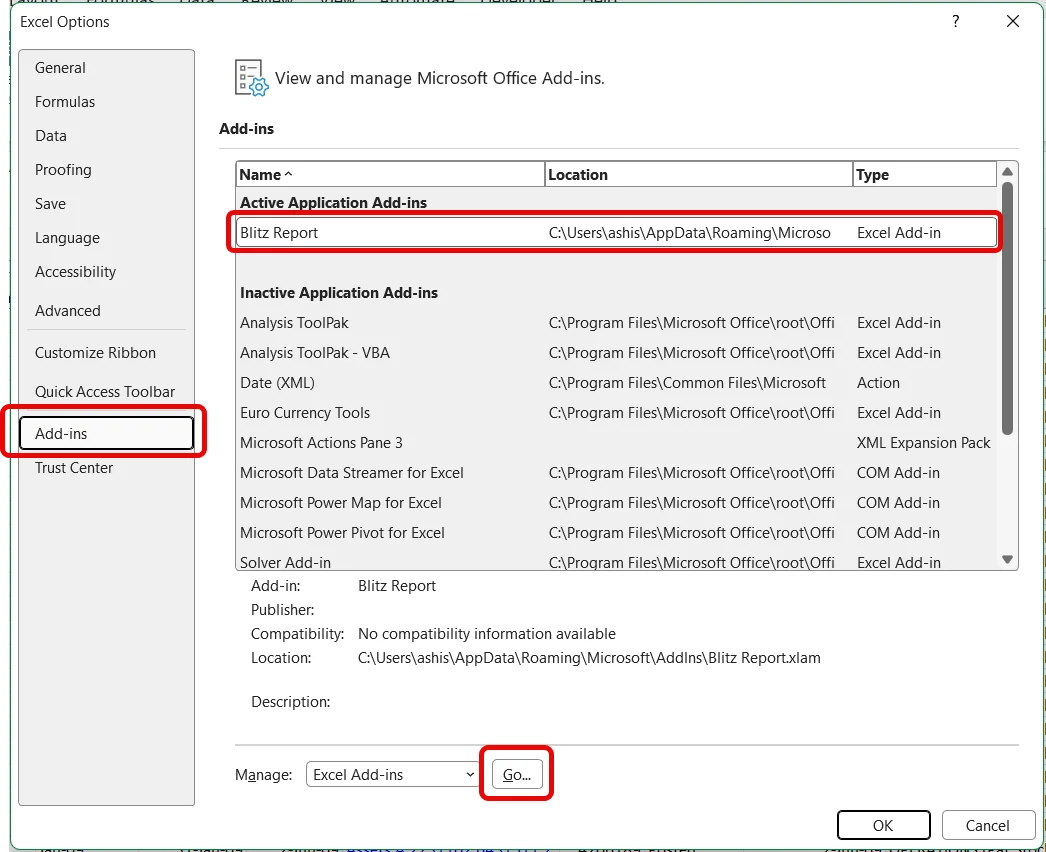
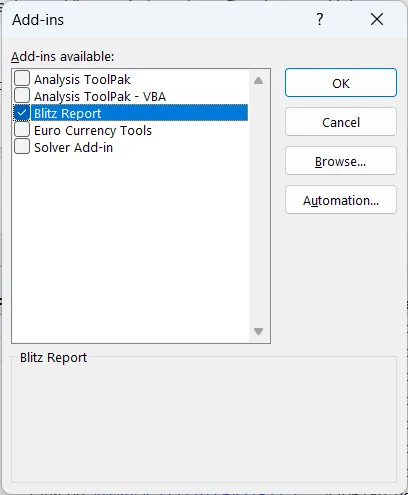
If the ribbon tab does not appear after restarting Excel, check that the add-in is active under File > Options > Add-ins: select Excel Add-ins in the Manage box, click Go and tick Blitz Report.
Manual installation
If the installer script fails, for example with ‘Access is denied’ because a security policy on your PC blocks PowerShell scripts, install the add-in manually:
- Copy ‘Blitz Report.xlam’ from the extracted zip file to the Excel add-ins folder: type %APPDATA%\Microsoft\AddIns into the Windows Explorer address bar and press Enter to open it.
- Right-click the copied file, select Properties and tick Unblock if the option is shown, otherwise Excel may refuse to load an add-in downloaded from a web server.
- Start Excel and open File > Options > Add-ins, select Excel Add-ins in the Manage box and click Go. Tick Blitz Report in the list, or click Browse and select the copied file if it is not listed, then click OK. The Blitz Report ribbon tab appears immediately and loads automatically from now on.
3.2 Environments
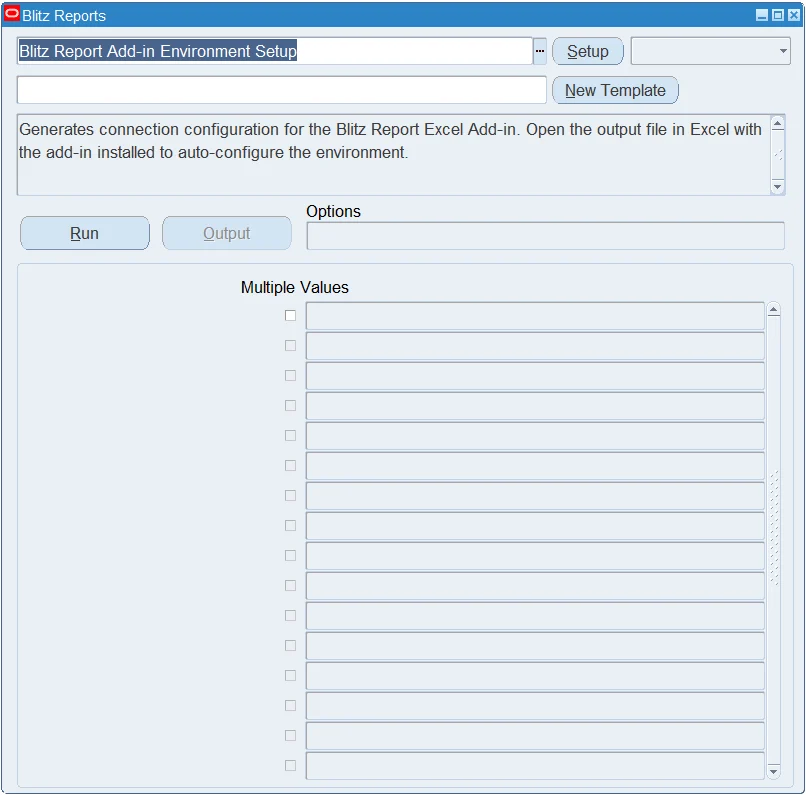
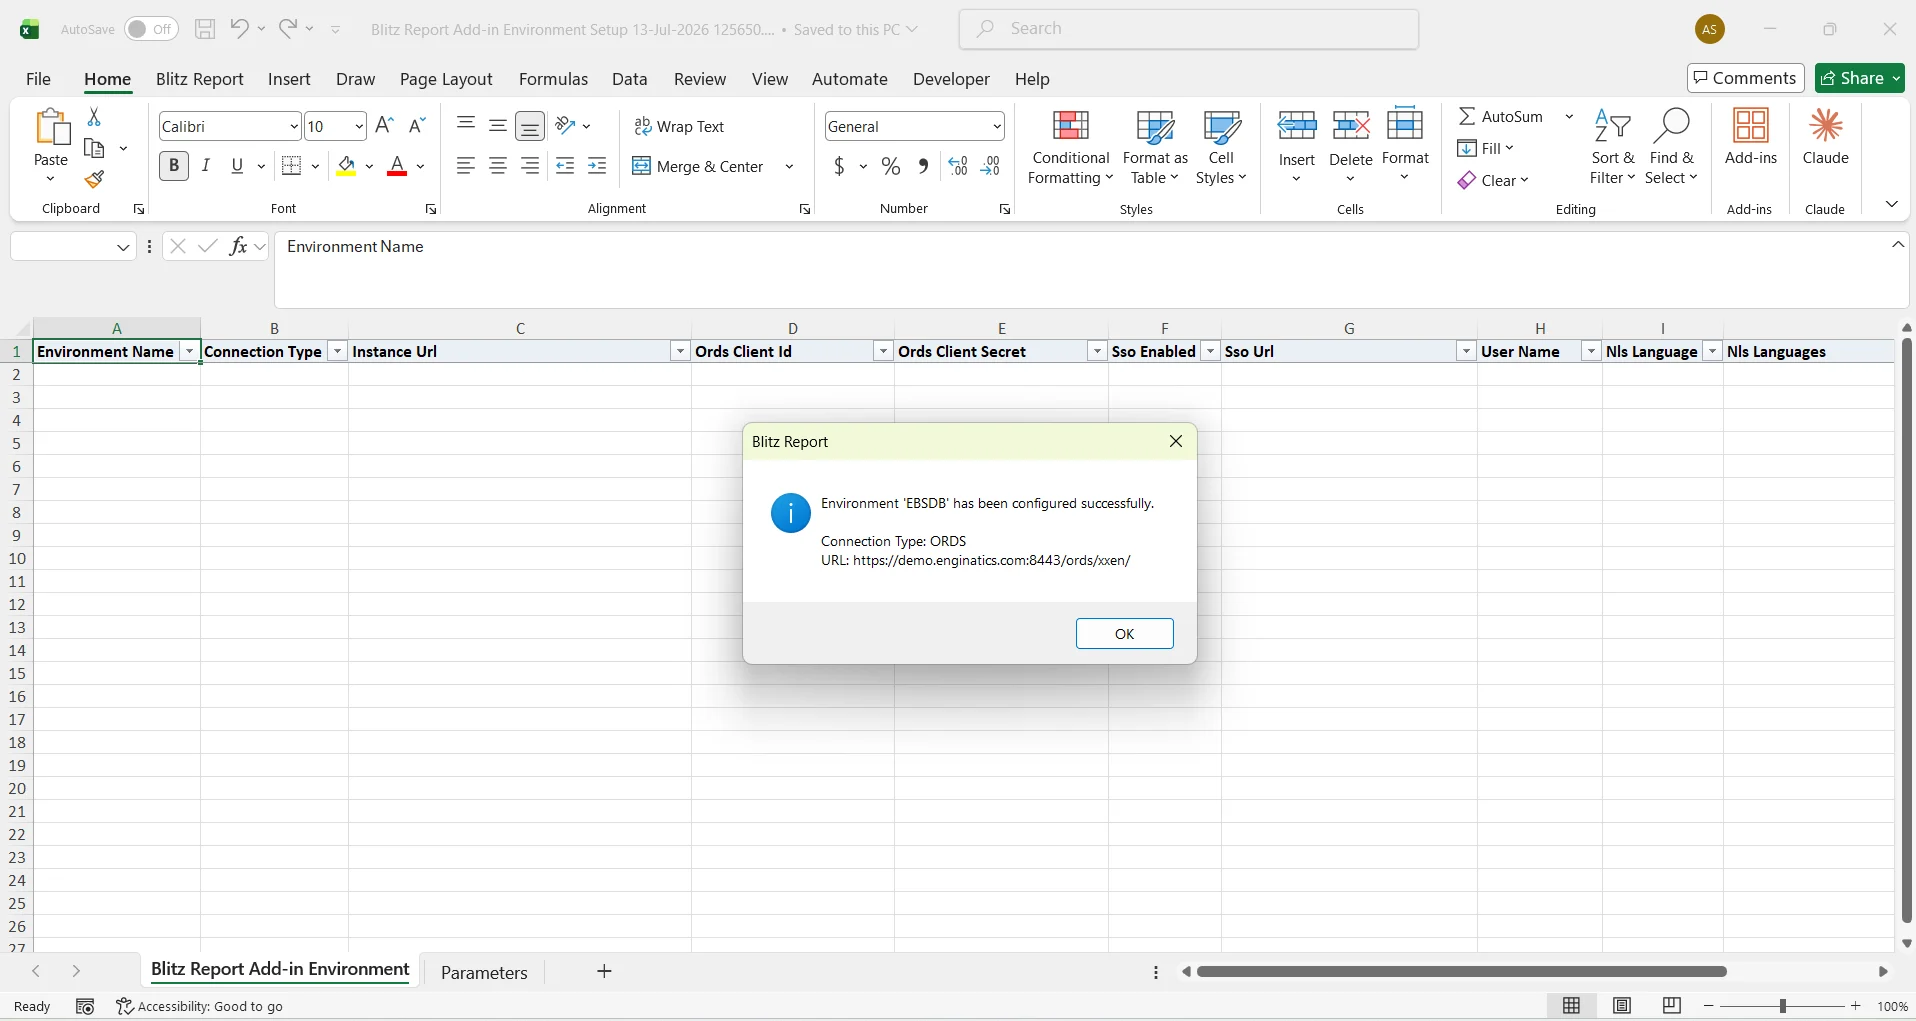
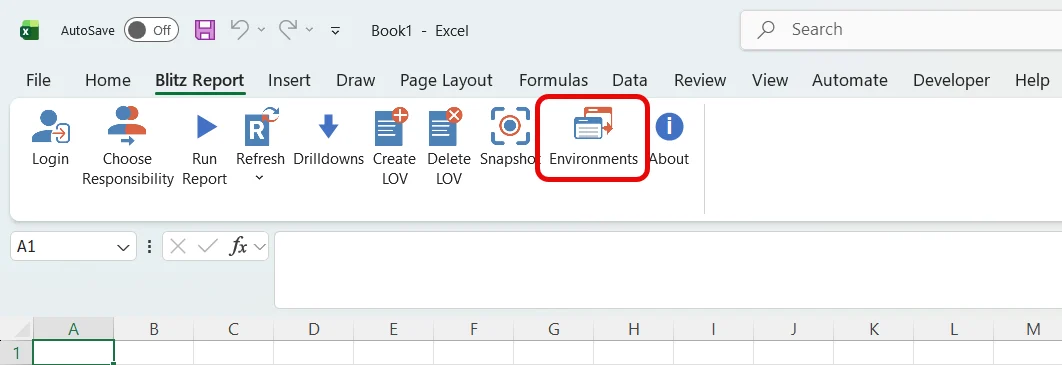
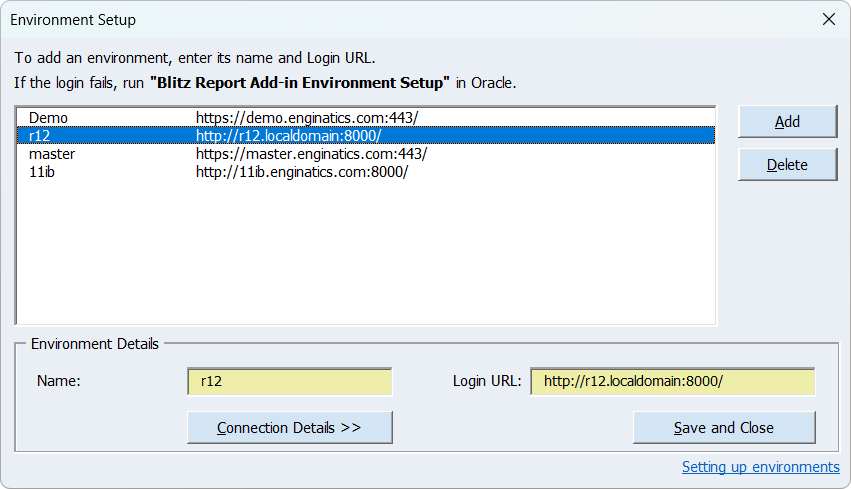
The add-in can connect to several EBS environments, for example production and test instances. To add one, click Environments, then Add, and enter a name and the Login URL, the address of the EBS login page. The first login fills in the connection details. If the login fails, run the Blitz Report Add-in Environment Setup report in EBS and open its output file on a PC with the add-in installed: the environment settings from the file are imported automatically.
Where your IT department manages the environments (installation guide section 6.10), the Environment Setup lists them read-only and you can only set your user name and language there. To add an environment, ask your IT department.
The Environments button opens the Environment Setup form.
3.3 Logging in
Click Login and select the environment to connect to. The EBS login page, including single sign-on, opens in your default browser: sign in and click Connect on the page that follows. Where the administrator has set Blitz Report Excel Login Method, the login opens in a window inside Excel instead, or the add-in asks for your EBS user name and password. After login, select the responsibility to work under. The responsibility can be switched at any time via Choose Responsibility.
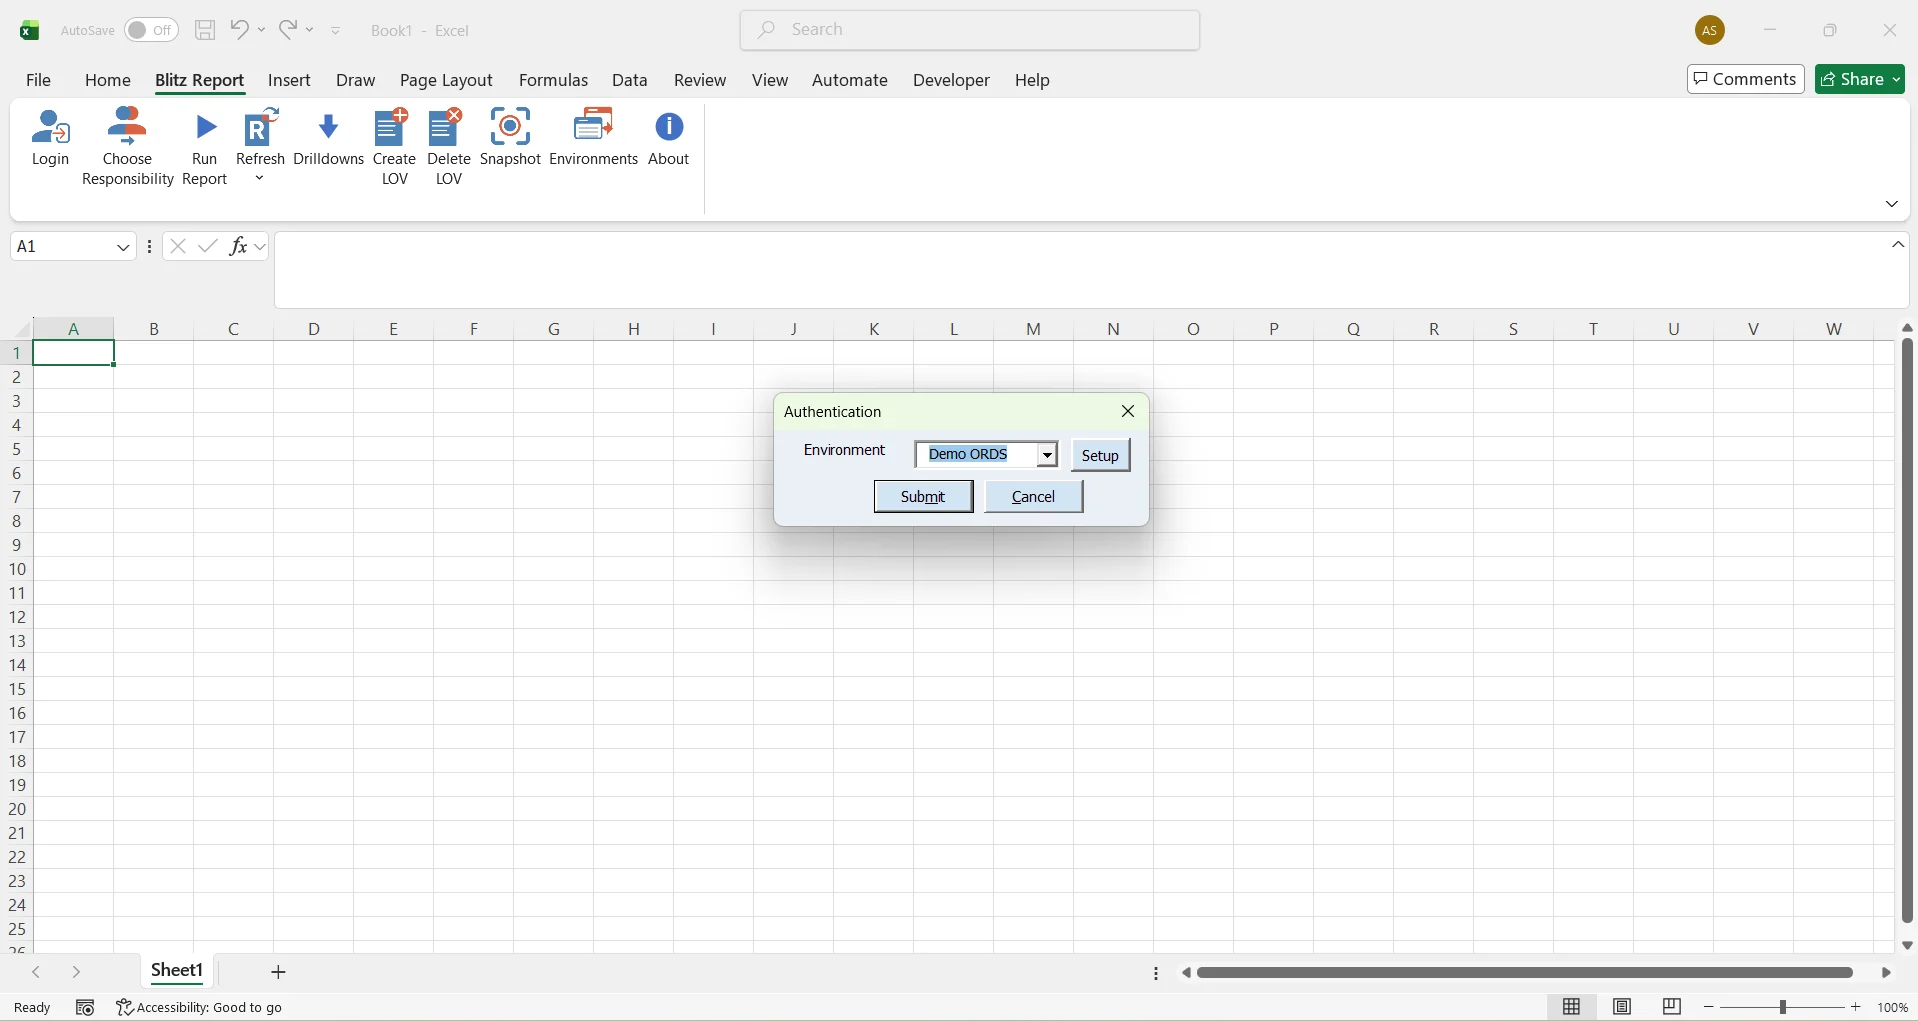
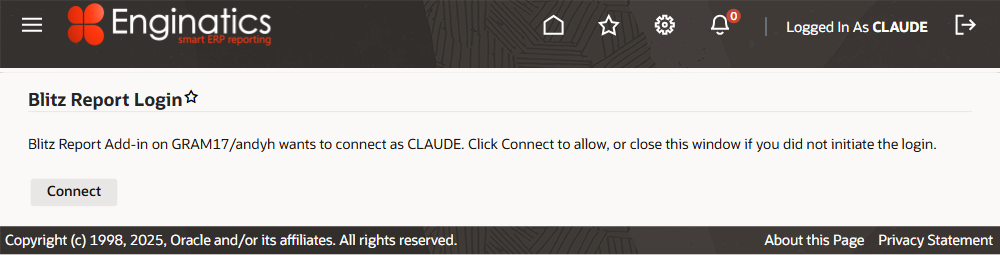
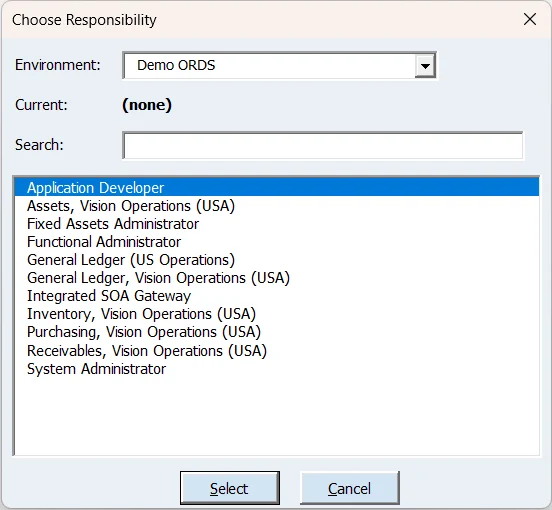
After a successful login, the ribbon shows the full set of functions.
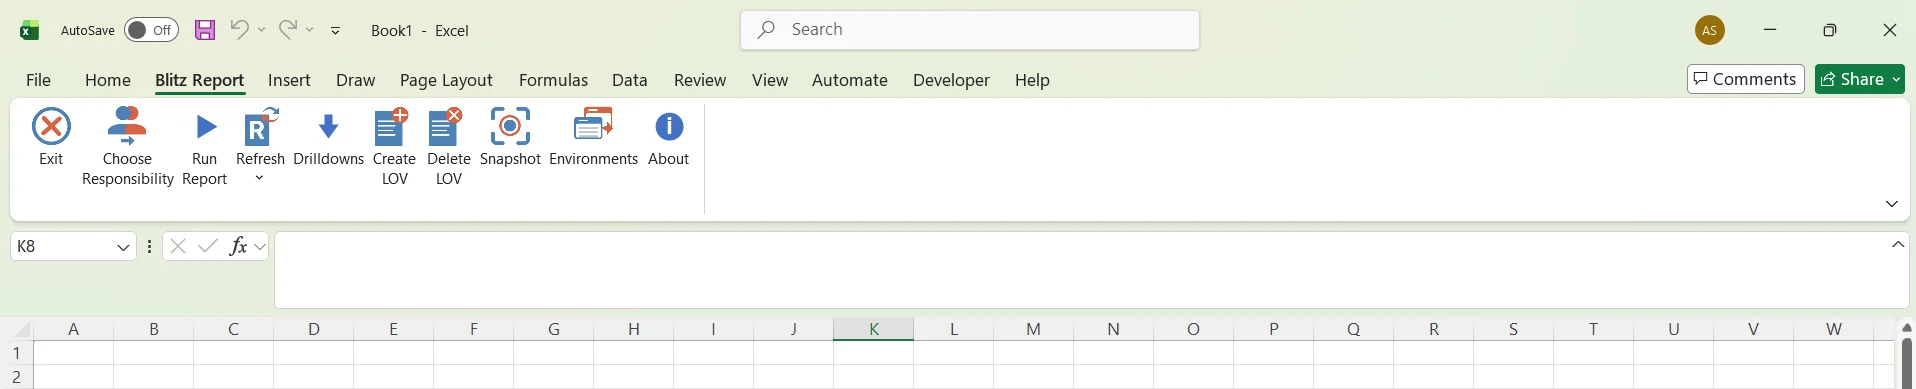
3.4 Upgrading the add-in
After login, the add-in compares its build with the version available on the connected environment. When a newer version is available, it offers to upgrade: click Yes to download and install the new version, then close all Excel windows. The installer finishes on its own and the new version loads the next time Excel starts. To upgrade at a later time, click Upgrade on the About form.
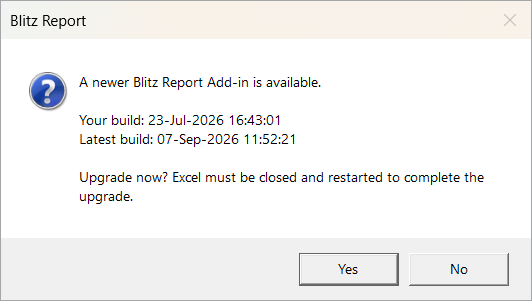
If the upgrade cannot be started automatically, for example on an older server version, download the latest version via Actions > Download Blitz Report Add-in on the Blitz Report form and follow the same steps as in Installing the add-in. There is no need to uninstall the previous version: the installer replaces the file and the registration.
On a PC where the installer script is blocked, close Excel and copy the new ‘Blitz Report.xlam’ over the existing file in the add-ins folder, as described in step 1 of the manual installation. The add-in is already registered, so the remaining steps are not needed.
3.5 Running reports
Click Run Report to open the run screen. Select a category or search for a report by name, then enter the parameter values. The same list of values, validation and parameter dependency logic applies as in the EBS run screen.
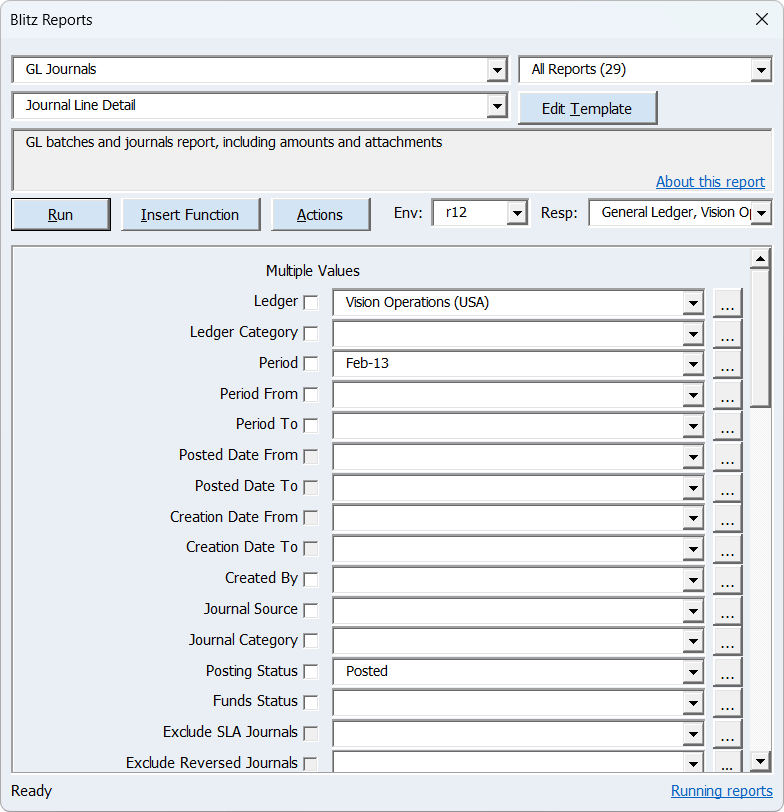
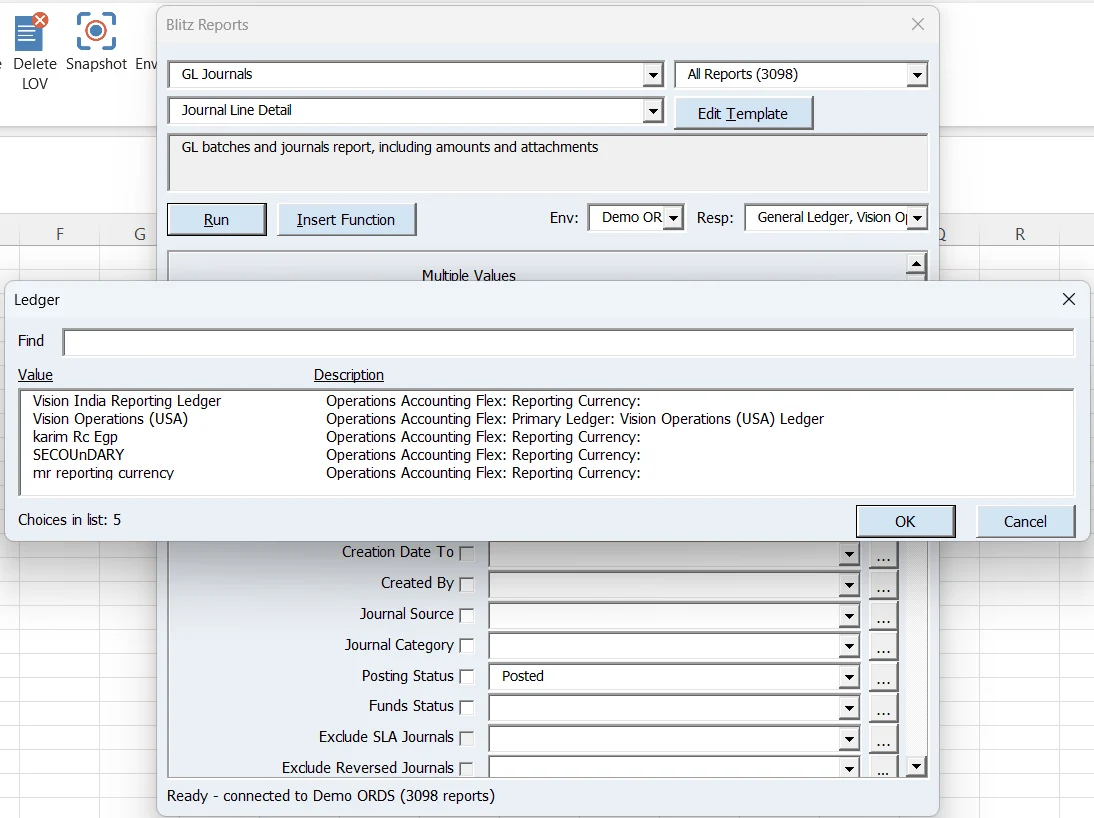
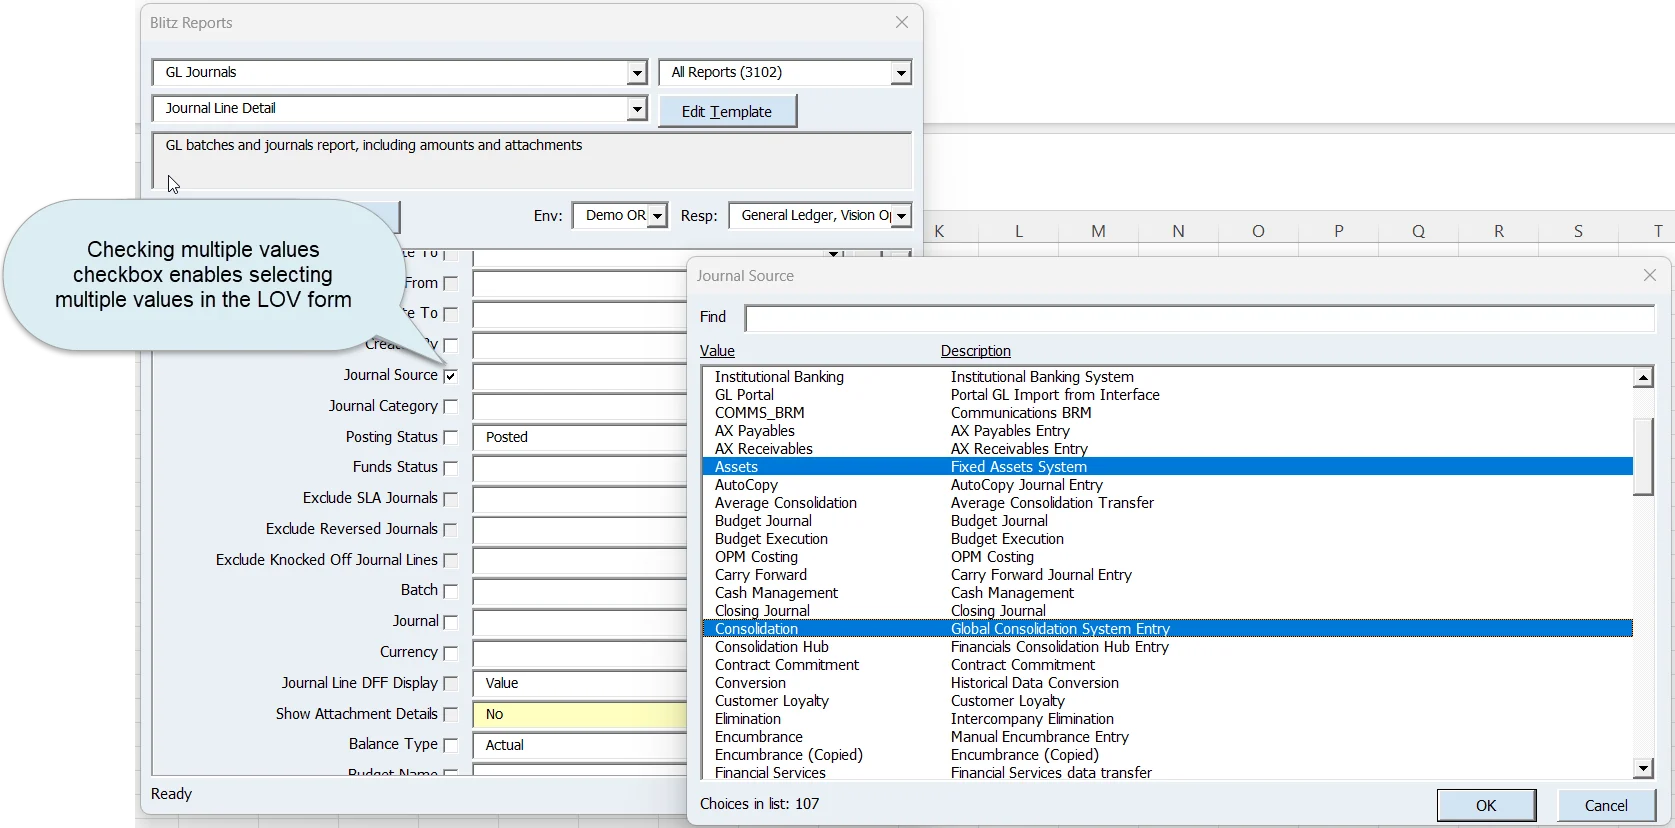
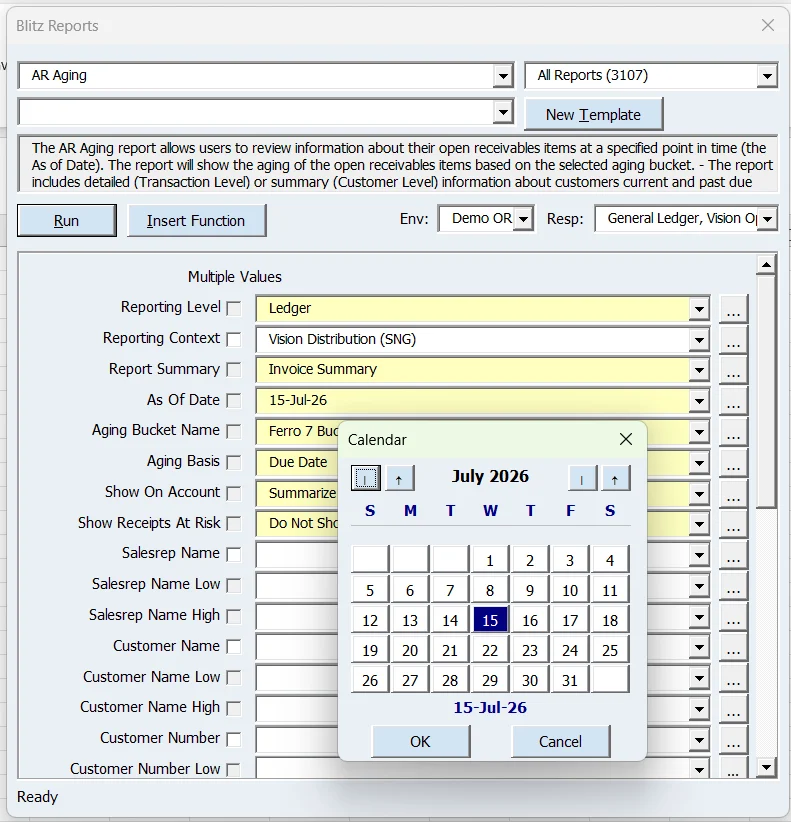
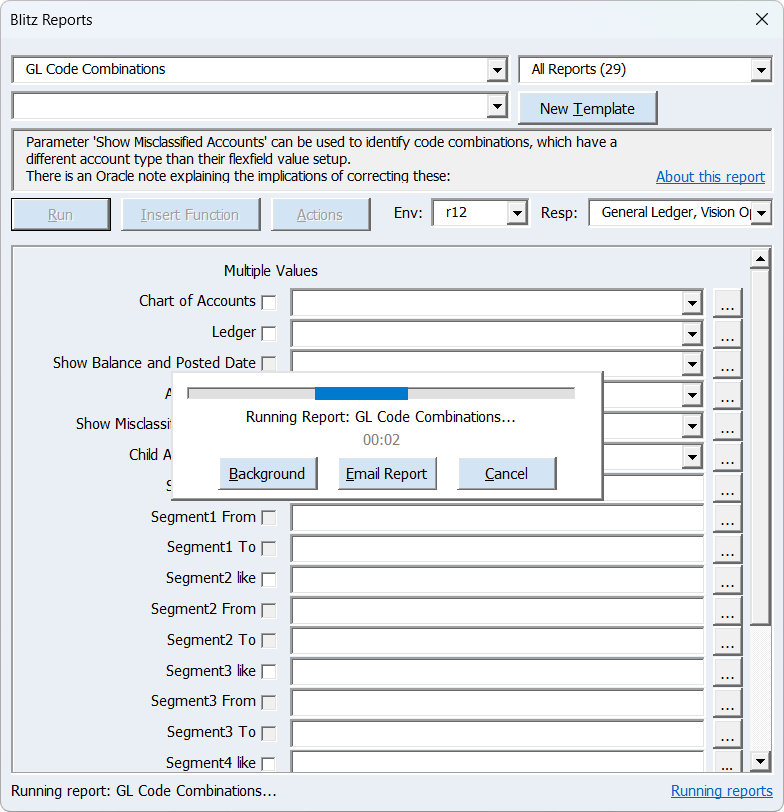
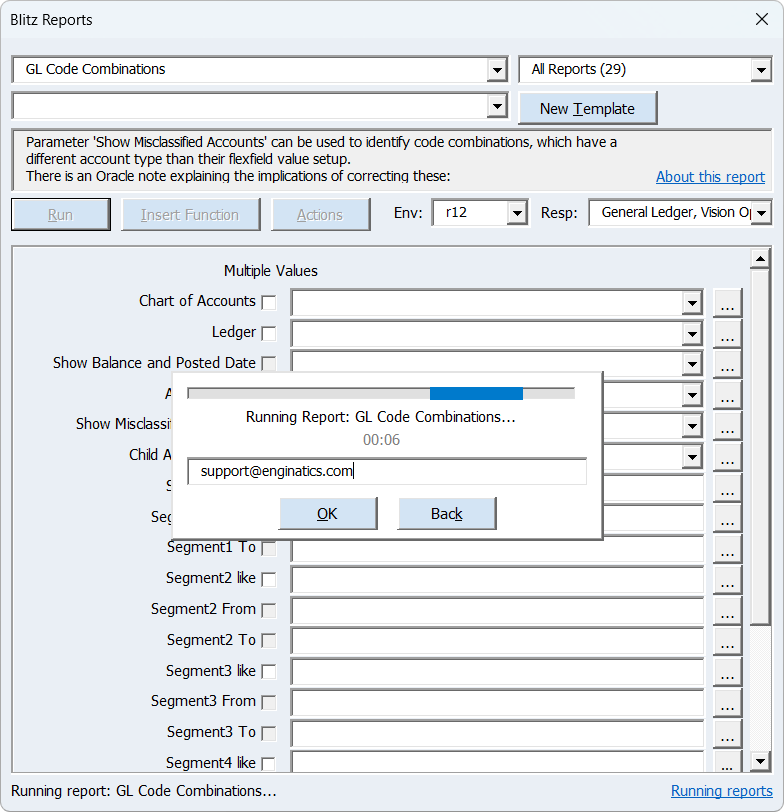
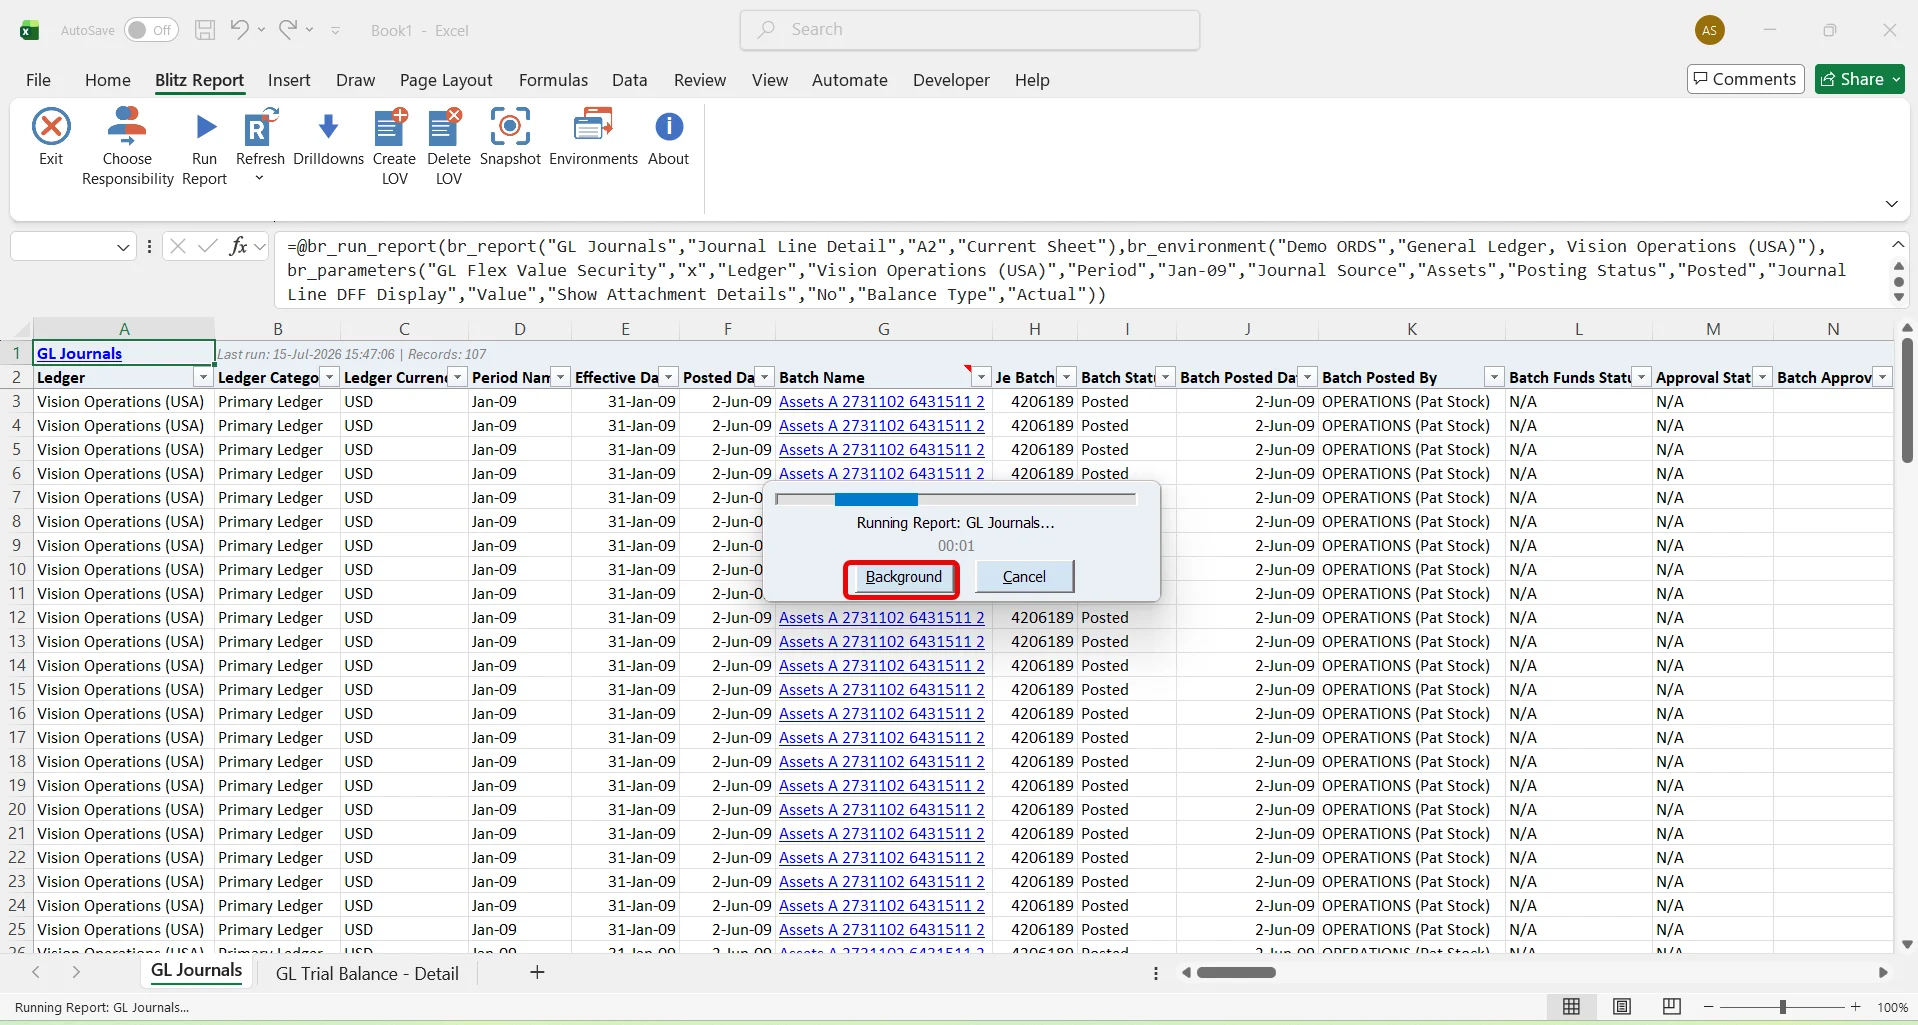
List of values fields support wildcard search and multiple value selection, and date parameters offer a calendar picker. The prompted conditions of the selected template follow the report parameters and are entered the same way, see Template conditions. Run writes the report into the current sheet at the selected cell, and Insert Function writes only its br_run_report formula. The Actions menu saves and clears parameter defaults, and clearing the report name searches templates across all reports. While the report runs, a progress bar shows the elapsed time. Background lets the report finish while you keep working (Background and parallel runs), and Email Report submits the report as a request that emails its output, like the Email option of the EBS run screen: enter the addresses and click OK, and the request number is shown.
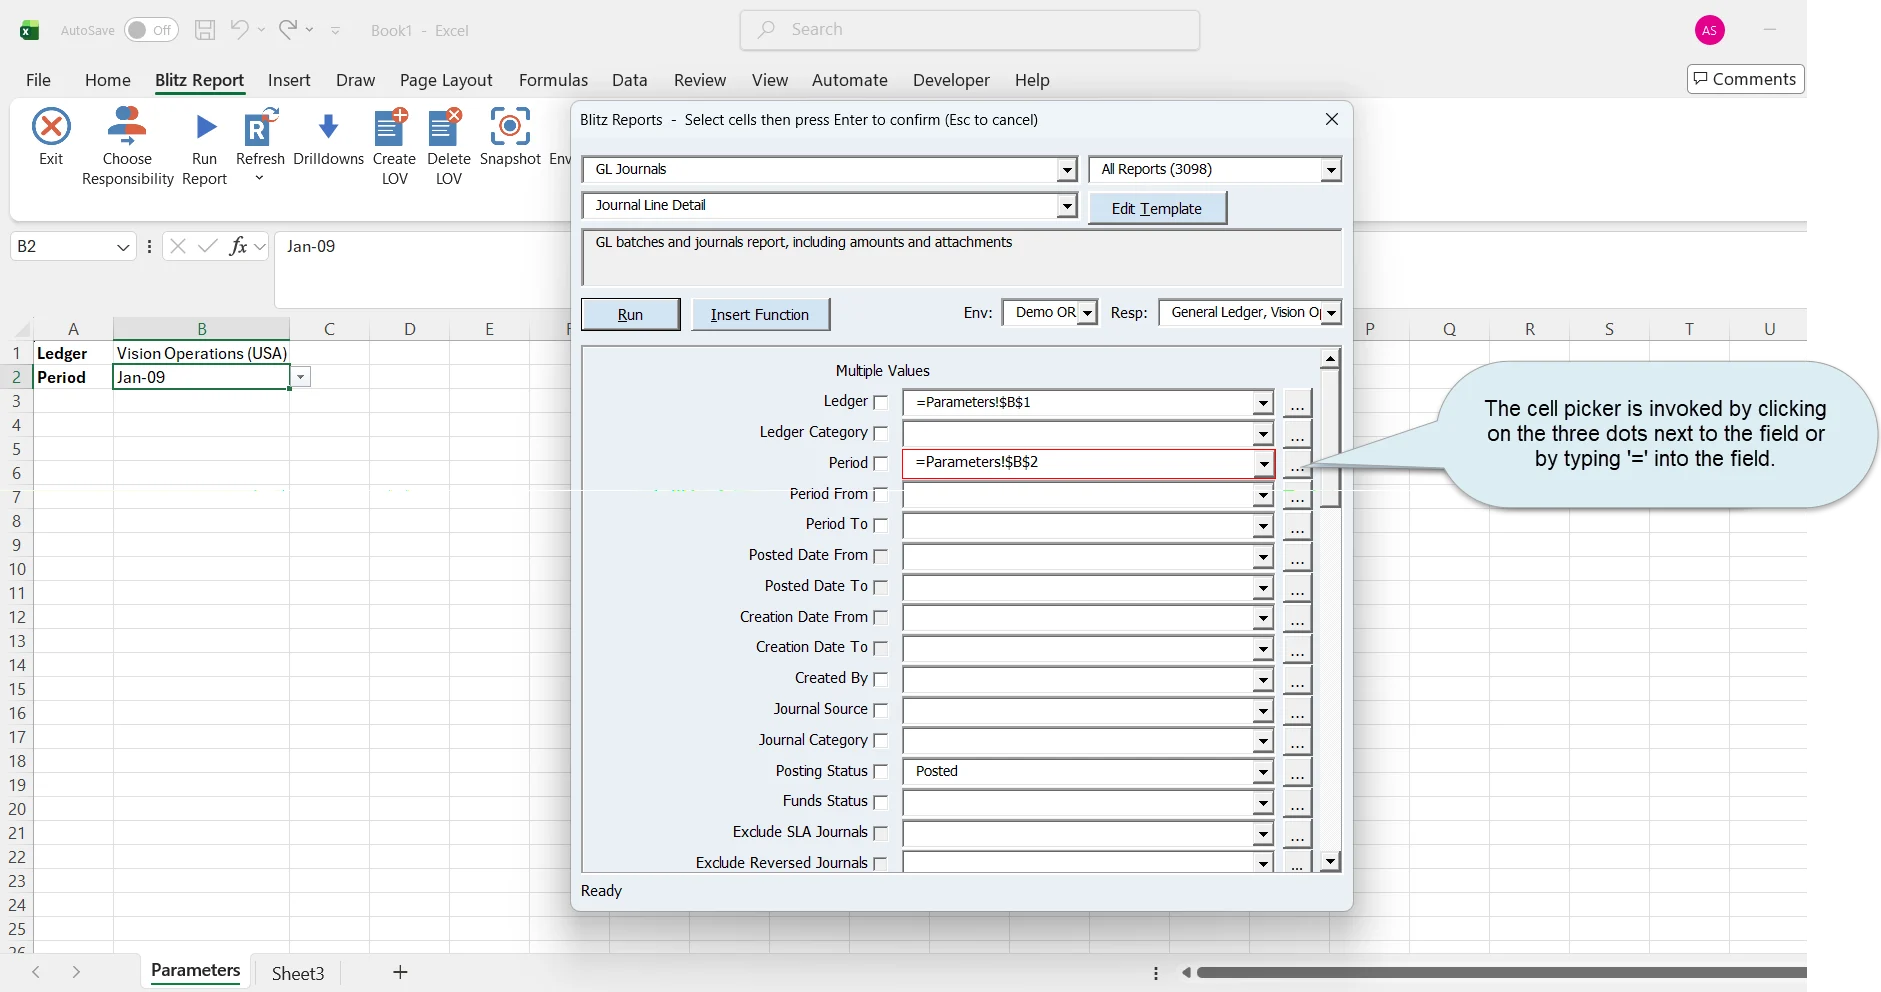
Parameter values can also be taken from worksheet cells. Click the three dots next to a parameter field, or type = into it, then select a cell on the worksheet. The parameter shows a cell reference such as =Parameters!$B$1, and every refresh runs the report with the values currently entered in the referenced cells.
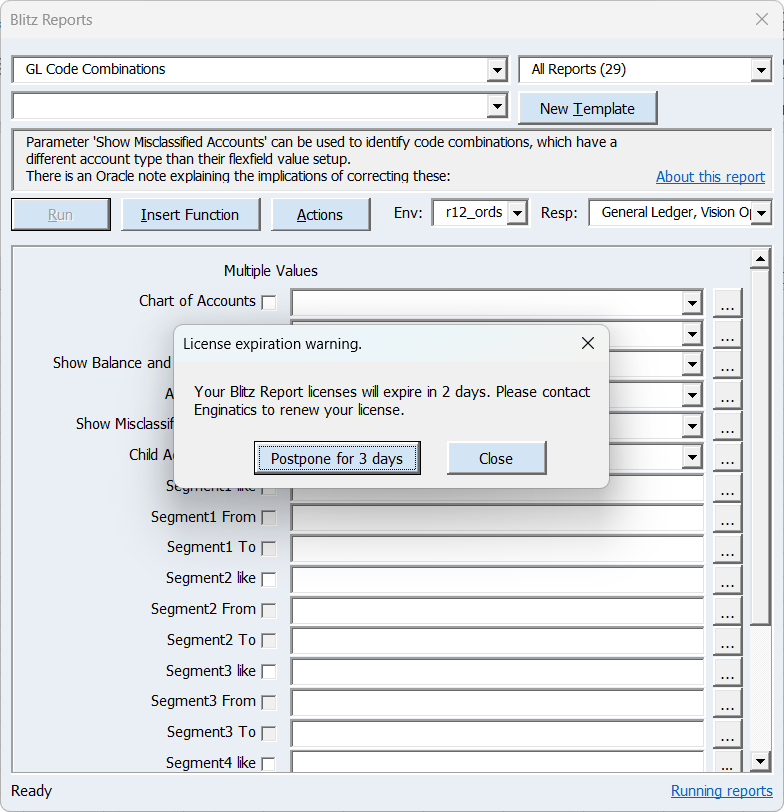
If the Blitz Report license expires within the warning period or has expired, a message appears when the run screen opens, as in the Blitz Report setup window of EBS, and can be postponed for three days.
3.6 Refresh and the br_run_report formula
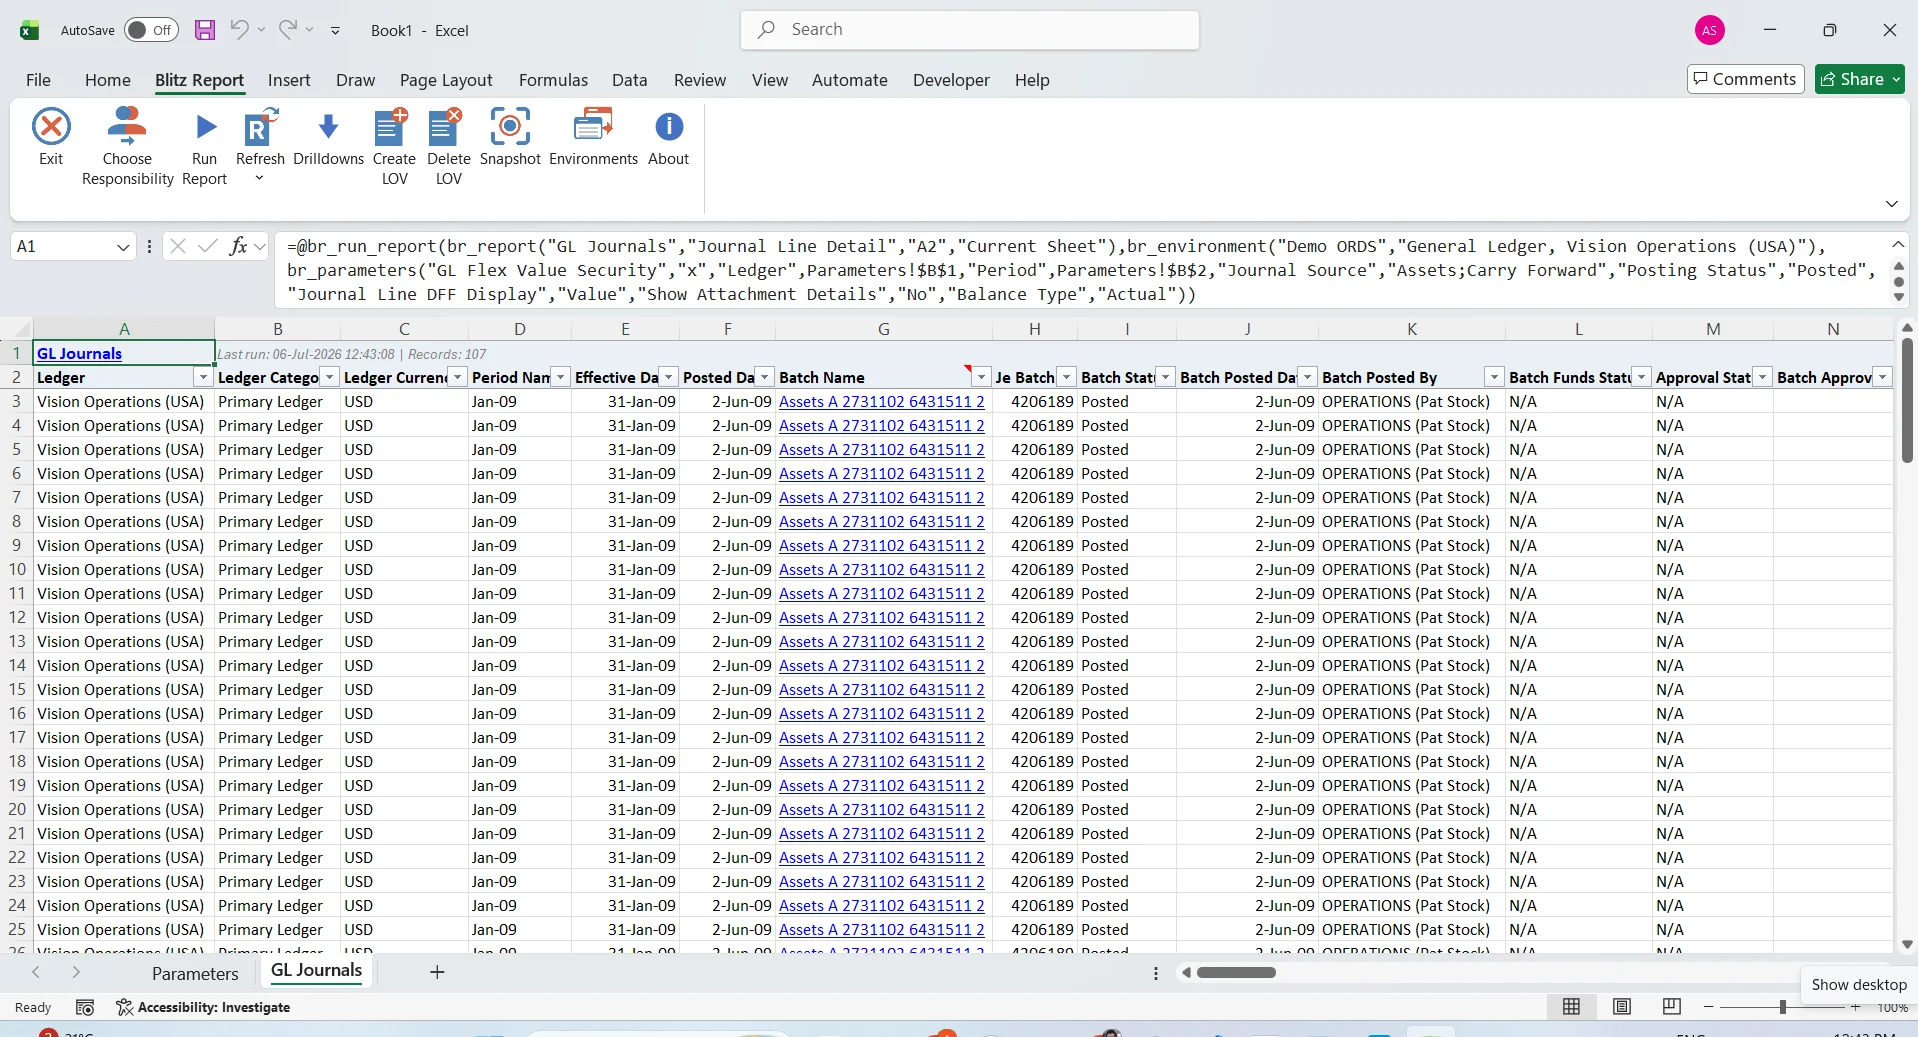
Each report result is anchored by a br_run_report formula in the top left cell of the output range. The formula stores the report name, environment, parameter values and template, which makes the workbook refreshable: the same report can be re-run with the stored parameters at any time.
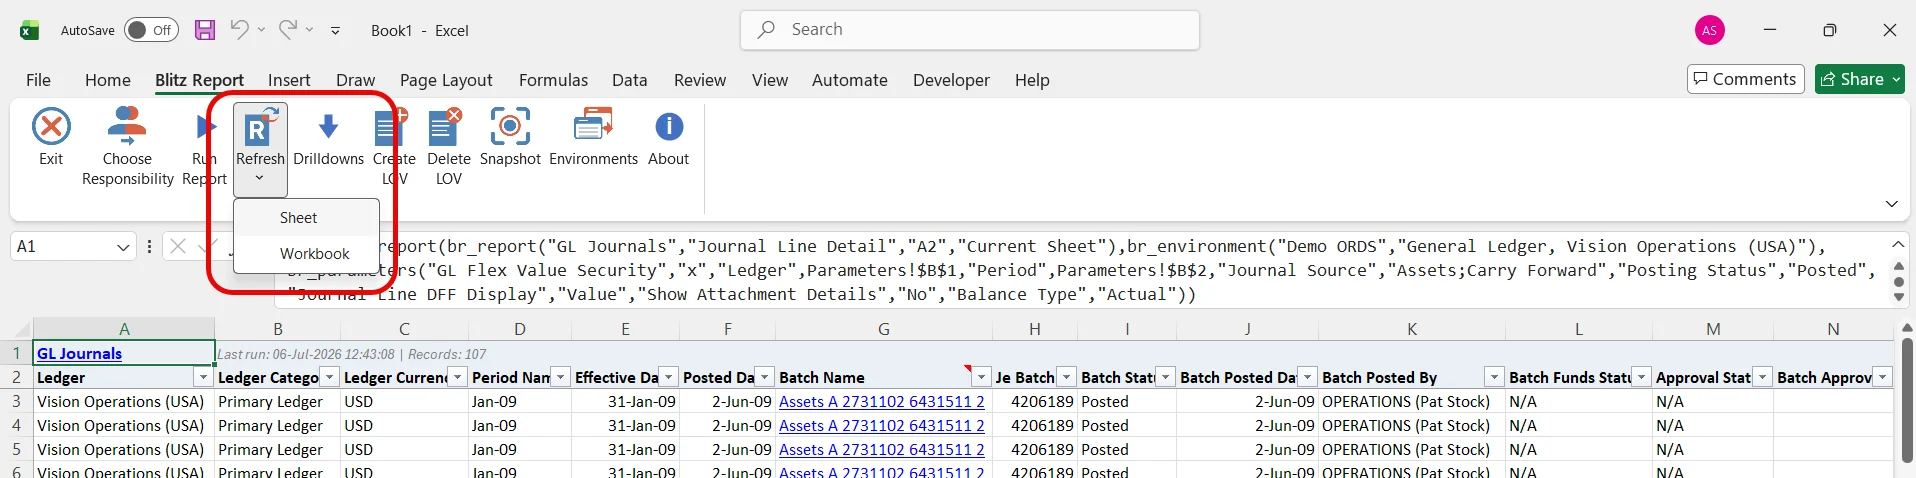
Refresh re-runs either all reports on the active sheet or in the whole workbook. Saved workbooks open with the last retrieved values, so they can be shared with colleagues: anybody with the add-in and access to the environment can refresh the data, while recipients without the add-in simply see the saved values. Note that drilldown sheets are snapshots of the drilled data and are not refreshed.
3.7 Background and parallel runs
Long running reports do not block Excel. Reports can be sent to the background, and several reports can run in parallel while you continue working in other sheets or workbooks. The progress of all running reports is shown, and each result is written to its target location as soon as it completes.
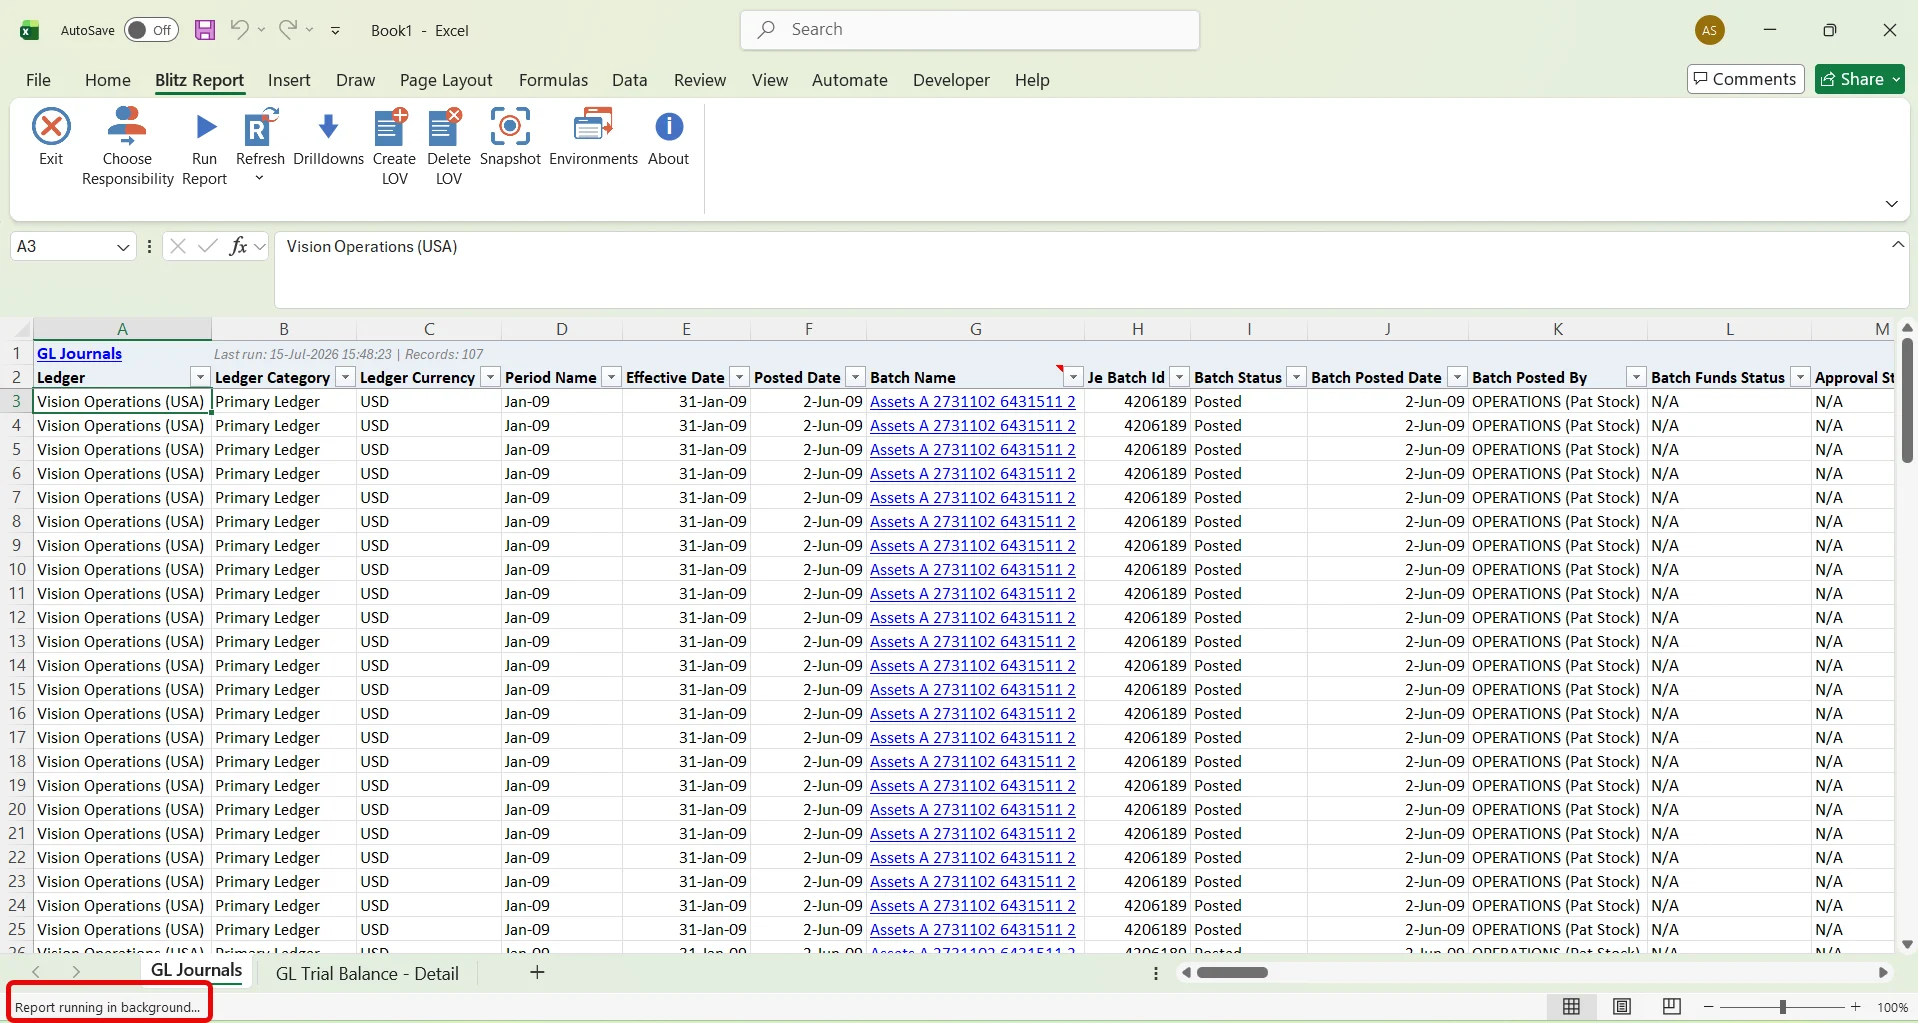
3.8 Drilldowns
Drilldowns navigate from a summary report to a detail report, for example from journal batches to the account analysis of their lines. The values of a drilldown column show as links: double-click a link to run the child report for that row. Its output opens on a new sheet, from which you can drill further. Drilldown sheets are snapshots and are not refreshed.
To drill from several rows at once, select them and choose the drilldown from Drilldown to in the Drilldowns ribbon group, or right-click them and choose Execute Drilldown. Rows that carry more than one drilldown list one entry per drilldown column and child report, on the right-click menu under Drilldown to. The child report then runs for all selected rows, and its output is combined on one sheet per child report.
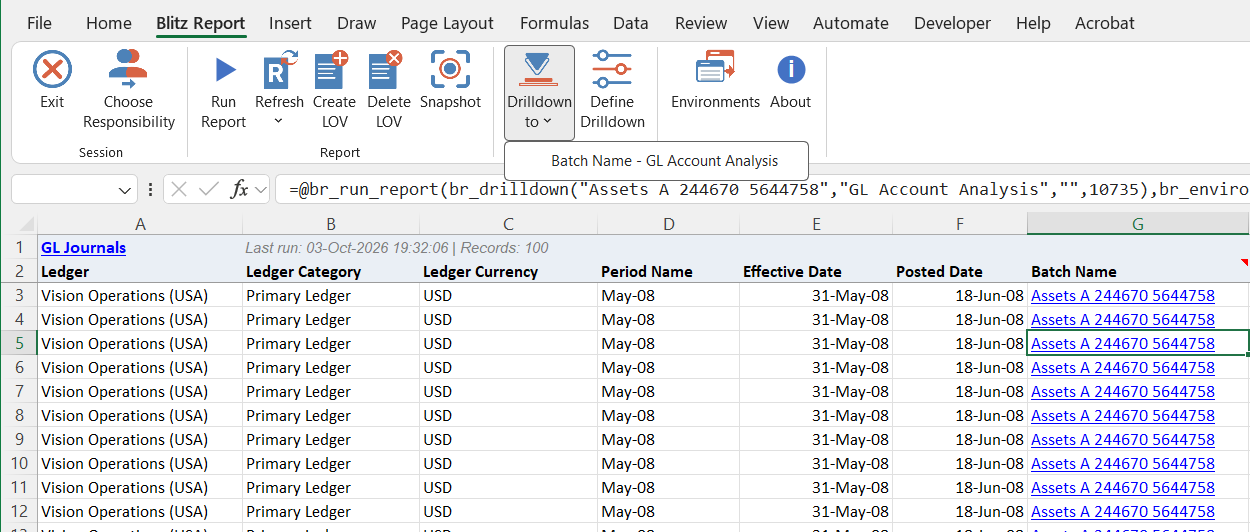
Defining a drilldown
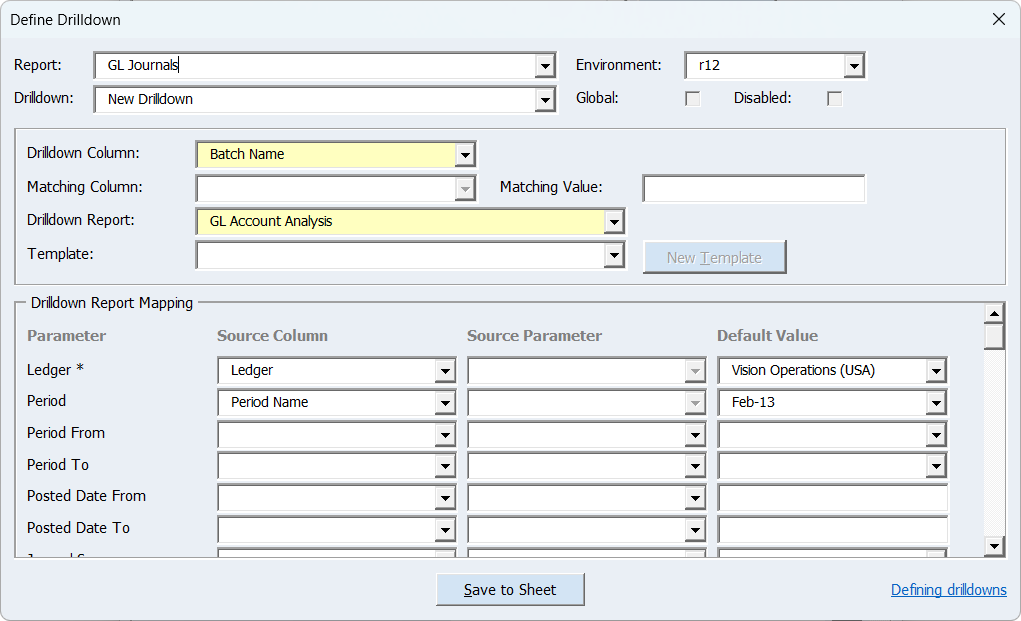
Select a cell in the column that should carry the links and click Define Drilldown in the Drilldowns ribbon group. The form opens on the sheet’s report with that column as Drilldown Column, or with the drilldown already defined on it. To show the links in a column of their own, select the empty column to the right of the report instead: Save to Sheet then adds an Execute Drilldown column.
- Report and Environment: the parent report and the environment whose drilldowns are shown.
- Drilldown: New Drilldown, or an existing drilldown of the report to change or delete. Drilldowns saved in the sheet are marked (Sheet), disabled ones (Disabled).
- Global: ticked, the drilldown is stored for all users of the report; unticked, it is saved in this sheet only.
- Disabled: keeps a global drilldown in the setup without offering it to anybody.
- Drilldown Column: the column whose values become links.
- Matching Column and Matching Value: restrict a global drilldown to the rows whose Matching Column value, or Drilldown Column value if no Matching Column is set, matches the Matching Value, with % as wildcard. Several drilldowns on one column can so lead to different reports, for example Invoice rows to an invoice report and %Credit% rows to a credit memo report. A blank Matching Value matches every row.
- Drilldown Report and Template: the child report and the template of its output. New Template, or Edit Template once a template is selected, opens the template editor for the child report.
- Drilldown Report Mapping: one row per parameter of the child report, required ones marked *. A parameter takes the value of a Source Column in the clicked row, of a Source Parameter of the parent report’s run, or a fixed Default Value. As on the run screen, the default of a dependent parameter follows the parameter it depends on.
Global and sheet drilldowns
With Global ticked, Save stores the drilldown in the Blitz Report setup, and every user who runs the report gets its links. Global drilldowns are saved by users with Blitz Report Access User Admin, Developer or System; for other users Global is not available.
With Global unticked, Save to Sheet writes the drilldown into the column on the current sheet and closes the form. Any user can save a sheet drilldown. It is saved with the workbook, a refresh extends it to new rows, and it takes precedence over a global drilldown on the same column.
To change a drilldown, select it in the Drilldown list; Save or Save to Sheet becomes available once its definition differs from the saved one. Saving a sheet drilldown with Global ticked turns it into a global drilldown. Delete removes the drilldown from the setup or from the sheet, and a report column shows its plain values again.
3.9 Cell lists of values
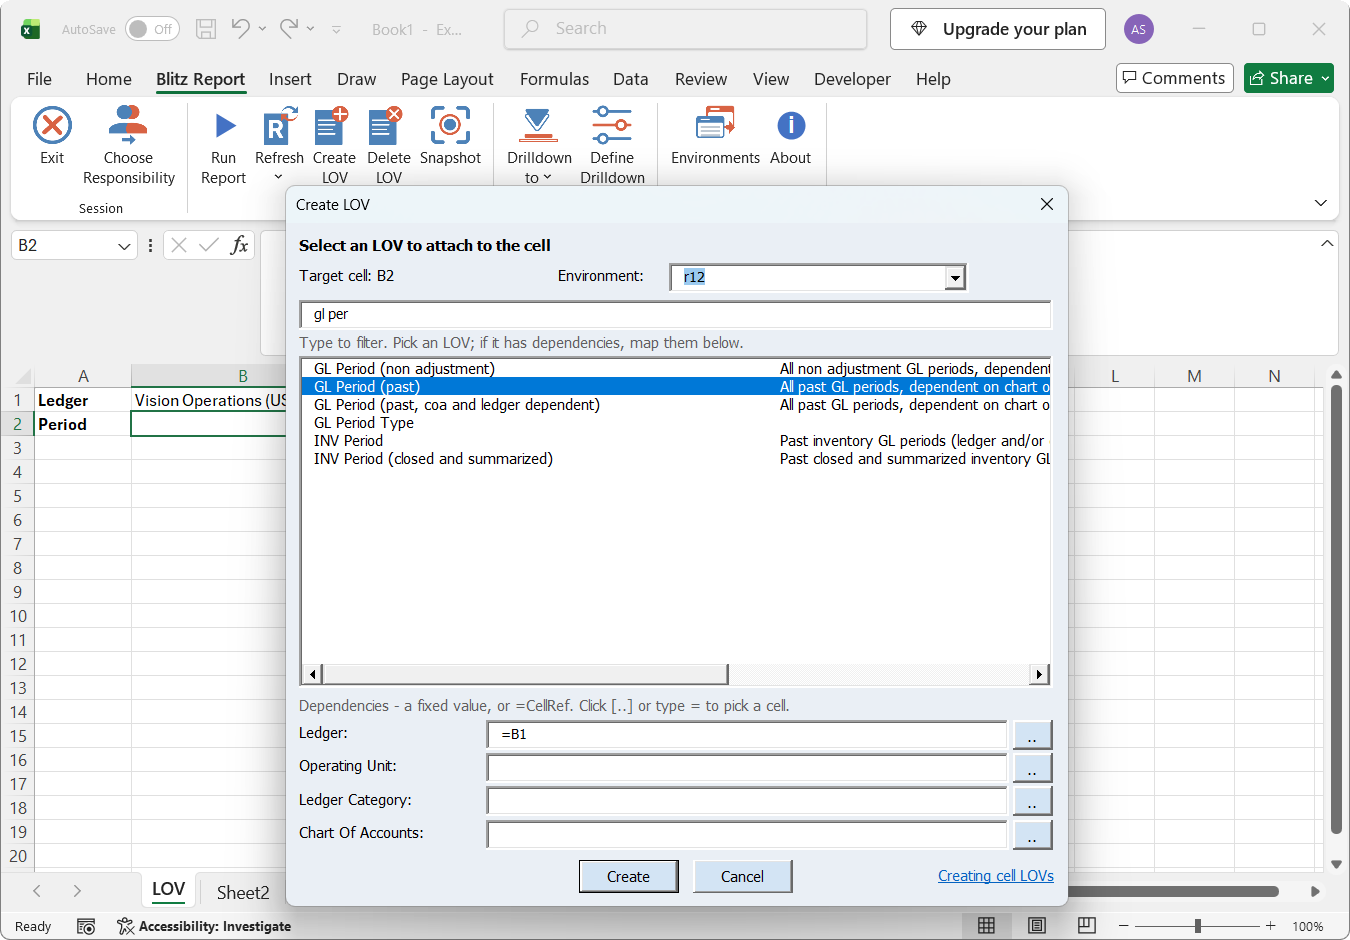
Any shared Blitz Report list of values can be attached to a worksheet cell for guided data entry, for example when preparing data for an upload. Select a cell and click Create LOV to pick the list from the catalogue. Double-clicking the cell then opens the list of values to select a value. Dependent lists are supported, so a value picked in one cell can filter the list of another. Delete LOV removes the attachment from the active cell.
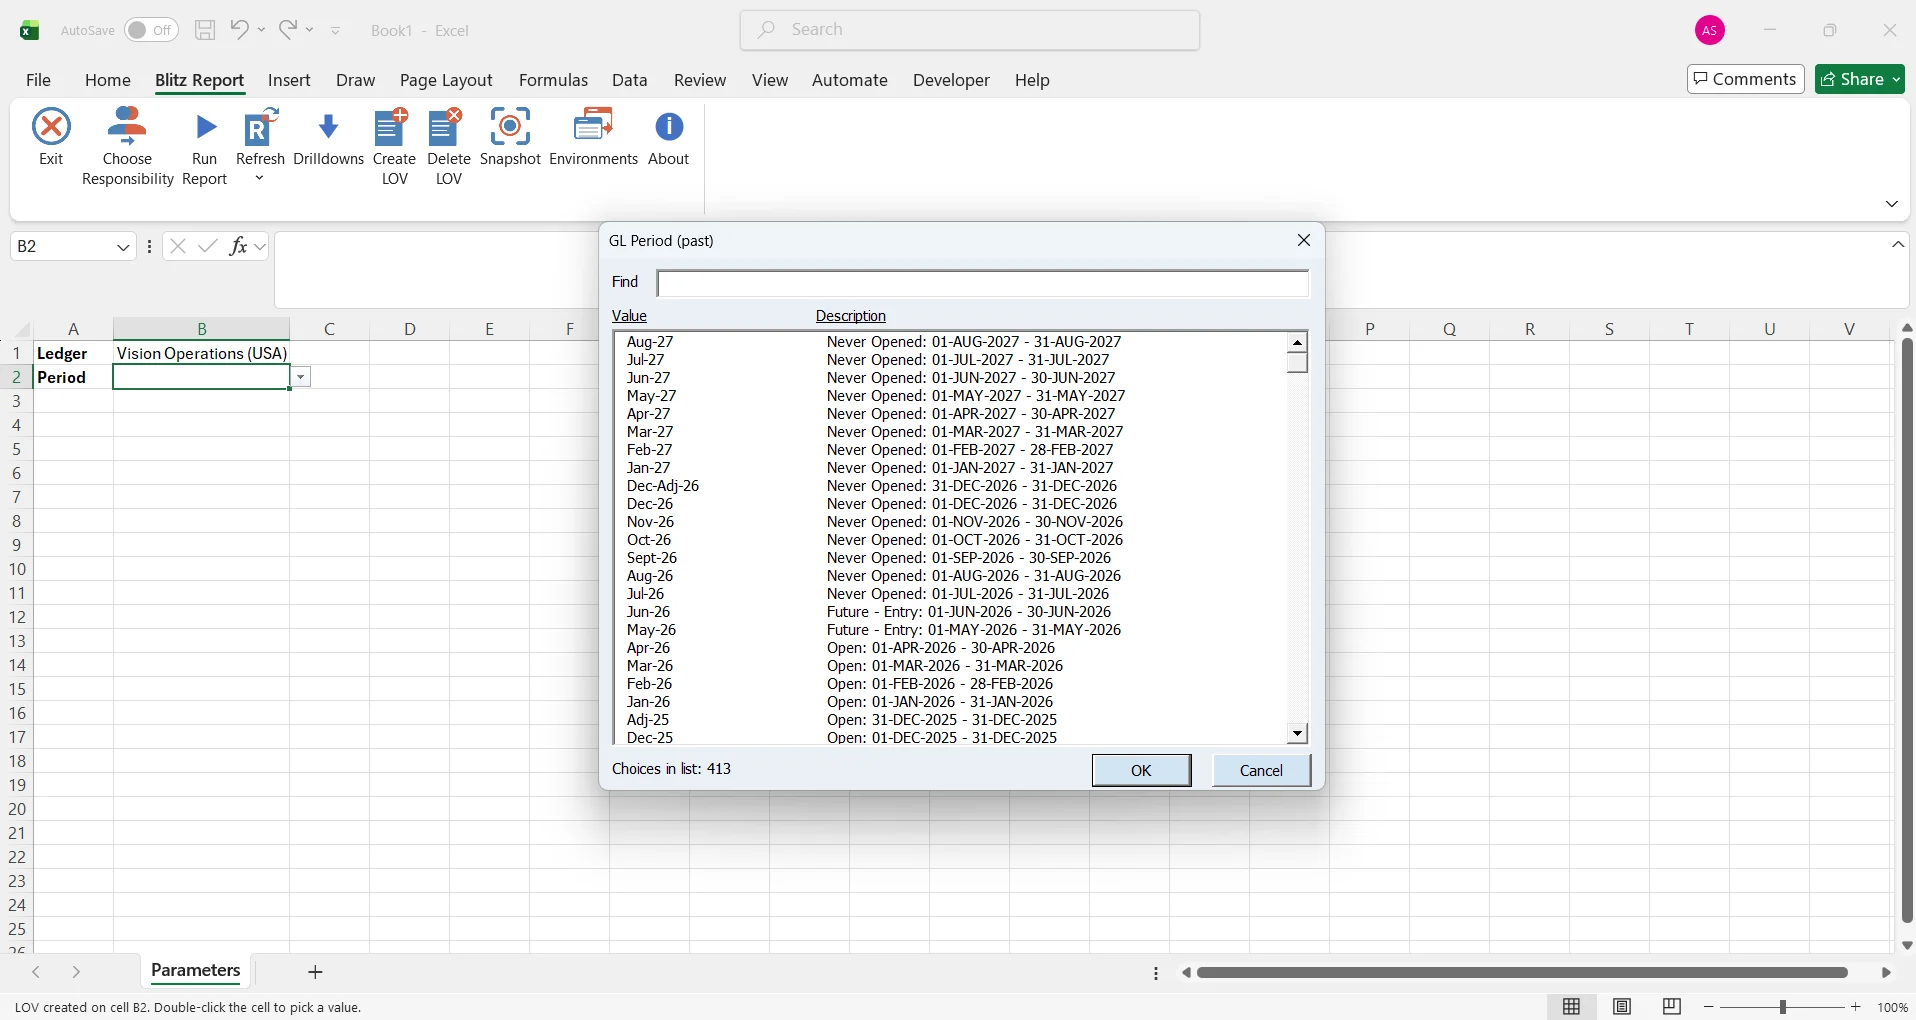
3.10 Snapshot
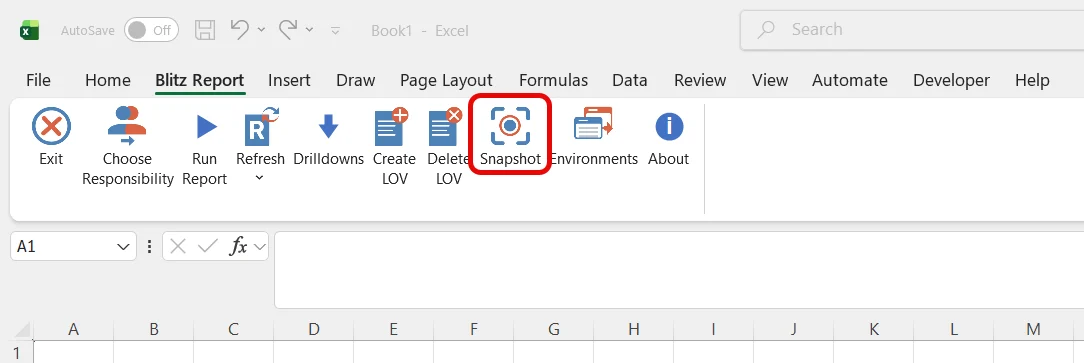
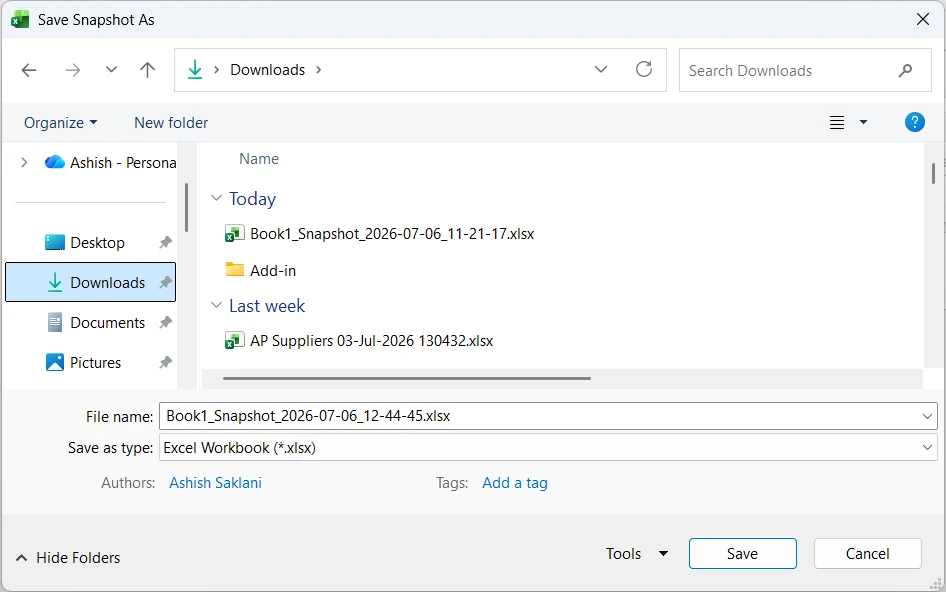
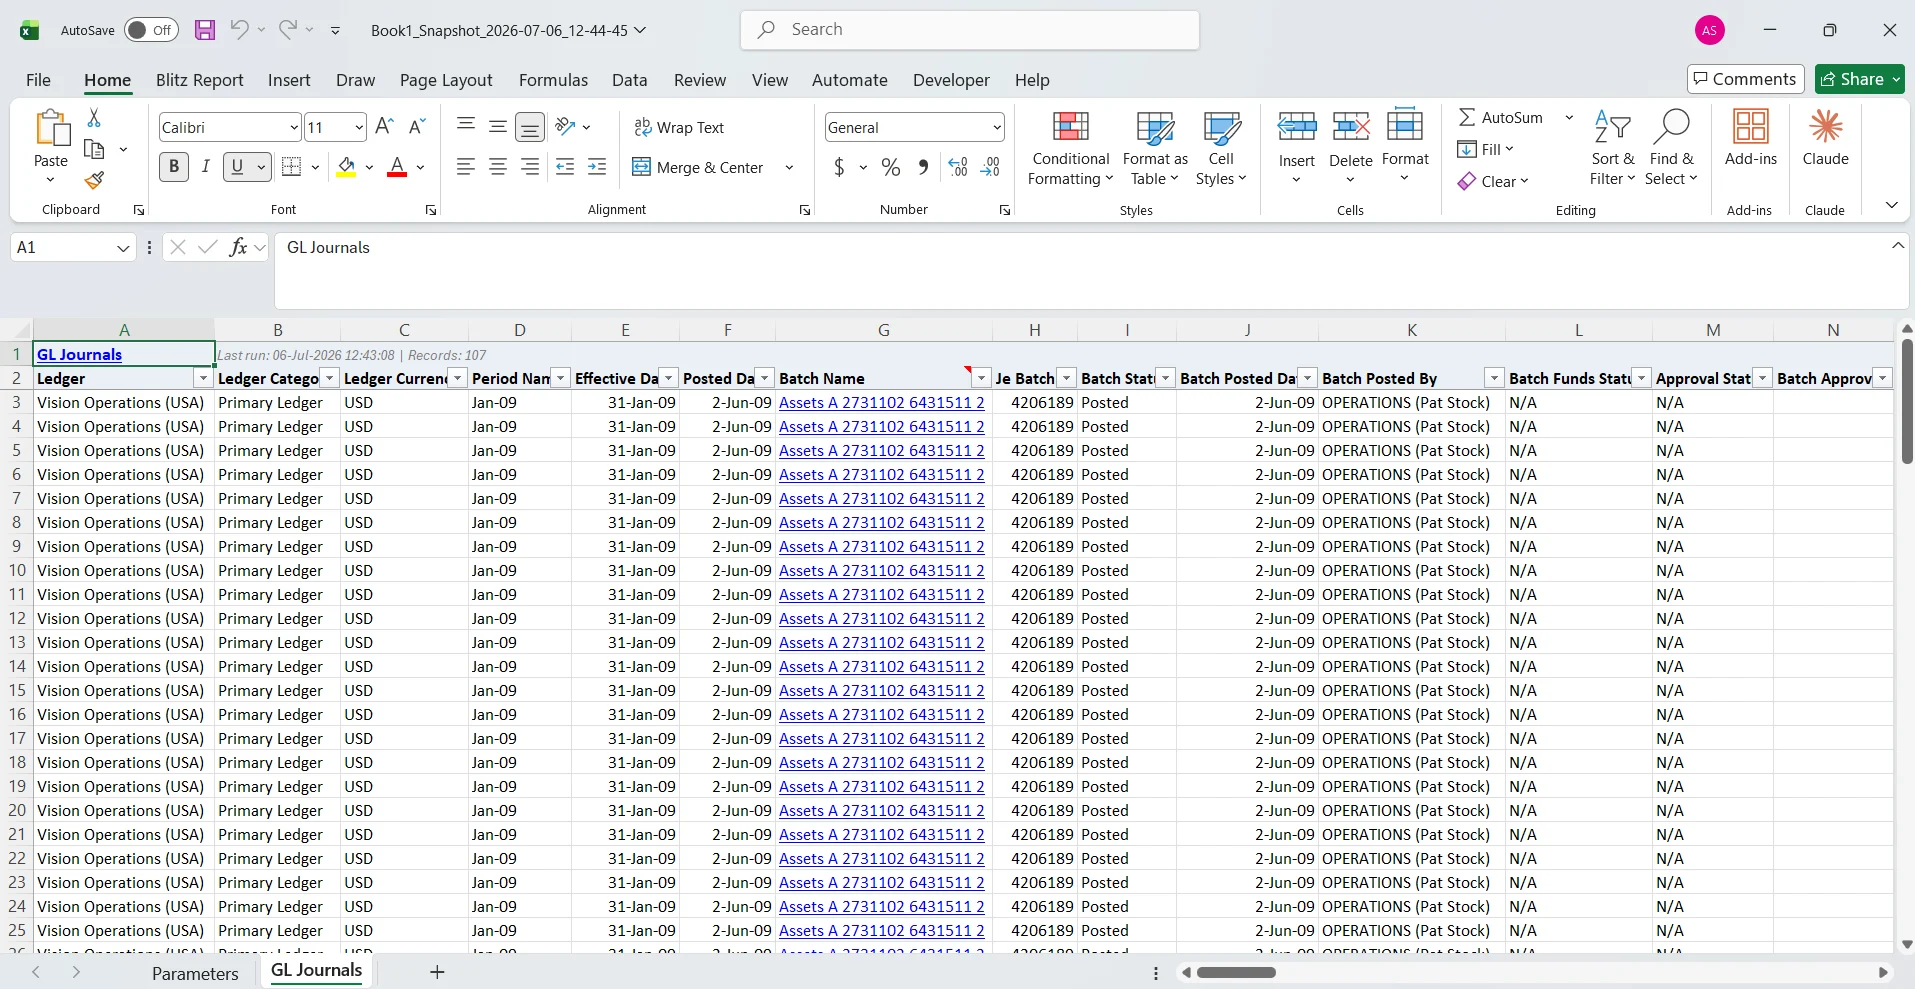
Snapshot creates a copy of the workbook with all Blitz Report formulas converted to plain values. Use it to share results with recipients who should see the data exactly as retrieved, without the ability to refresh, or who do not have the add-in or access to the environment.
3.11 Templates
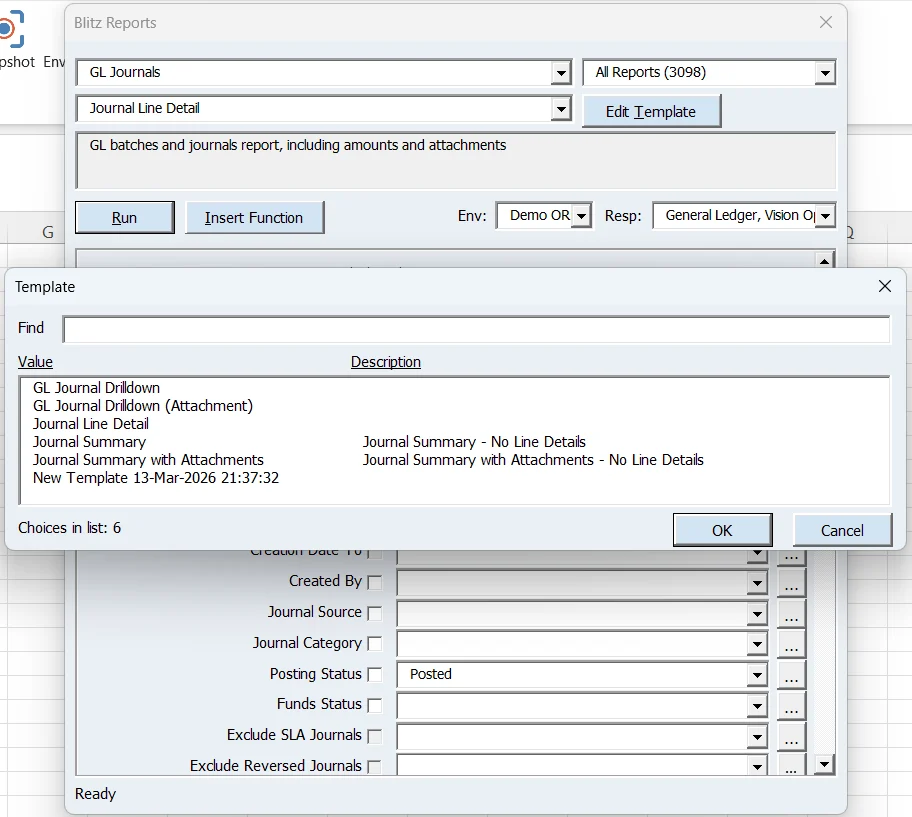
Reports can be run with any of their templates, which control the column layout, formatting and pivot tables of the output. The template is selected on the run screen before running the report, and templates can also be created and edited directly from the add-in, subject to the user’s Blitz Report access level. Where a template has been restricted for the user or their responsibility, only the restricted templates of that report are offered. Templates are shared in the Sharing section of the template screen, see Template sharing.
3.12 Uploads
Blitz Uploads are started in the same way as reports: Run Report lists uploads together with reports, and running an upload builds an upload sheet in the current workbook instead of a report output, with the existing records downloaded into it when the Upload Mode is ‘Create, Update’. The sheet remembers the environment it was created on, so a workbook can hold upload sheets for different environments.
Whenever an upload sheet is active, the ribbon shows the Upload group, labelled with the sheet’s environment, with the Autofill, Upload Attachments, Validate and Upload buttons, and hides the report functions that do not apply to an upload sheet, such as Refresh, Drilldowns and Snapshot. Upload workbooks downloaded from the Blitz Report form in EBS are recognised as well: opened with the add-in installed, they show the same group with Validate and Save in place of Validate, which validates the rows and saves the file so that it can also be uploaded through the Blitz Report form.
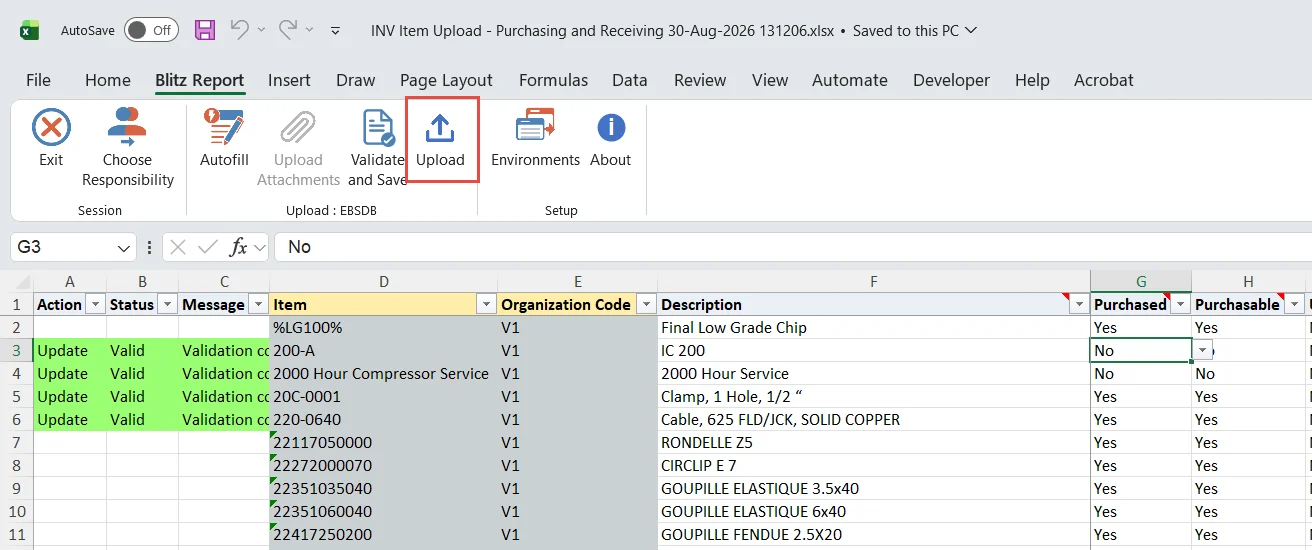
Validate checks the entered rows without writing anything to the database and sets each row’s Status to Valid or Invalid, with the reason in the Message column. Upload then sends the rows with Status Valid to Oracle EBS, after a summary of the rows that would be skipped, and follows the run through preparation, transfer, processing and result retrieval. While the run is processed, Background lets you continue working, and Email Result emails the result workbook to the addresses entered instead: the request number is shown, the sheet stays as it is, and the next click on Upload loads the result into it. The outcome is written back to the sheet: every row receives its final Status and Message, the sheet tab turns green, and a run info cell next to the data records the run date and record count. With the setting Upload Result on New Sheet on the About screen, the result is written to a copy of the sheet named ‘<sheet name> Result’ instead and the entered data stays unchanged. If the upload request fails, the error is shown with a View Log button that opens the request log. An upload interrupted before its result was fetched, for example by closing Excel, is resumed with the next click on Upload, and rows with errors can be corrected and uploaded again from the same sheet.
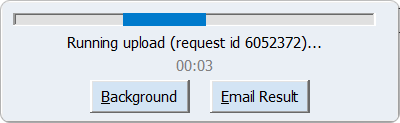
A list of values, a validation or a default that takes more than a second to fetch shows the progress window with a Cancel button, which leaves the value as typed. Entering data, the Action and Status columns, lists of values, Autofill, validation and attachments work the same on add-in sheets and in the downloaded upload template and are described in Uploading data.
3.13 Language
The language for report data and lists of values defaults to Automatic, which uses your EBS session language, and can be set to a specific installed language per environment.
3.14 AI integration
AI assistants that work inside Excel, such as Claude in Excel and Microsoft 365 Copilot in Excel, can use Blitz Report through worksheet functions of the add-in. With them, an assistant can:
- list your environments, responsibilities and reports, and the parameters, parameter values and templates of a report
- run reports into the workbook and analyze their output
- open an upload, fill and validate its rows and upload them
- build Blitz FSG financial statements, refresh them and drill from balances to journals and subledger transactions
The assistant works only with the environments you are logged in to, under your responsibilities and Blitz Report security, so log in before you ask it to work with an environment.
Skills teach an assistant how to carry out a task with Blitz Report. Enginatics provides a free library of skills, with instructions to install them in Claude in Excel or Microsoft 365 Copilot in Excel, on the AI Skills page. They cover running reports and uploads, finding the right report for a question, period close readiness, subledger to GL reconciliation, financial statement variance analysis, AP holds, duplicate payments and collections, and general analysis such as anomaly detection, forecasting and dashboards. Skills that change data in Oracle EBS, such as releasing AP holds, ask for your confirmation before they upload. Ask the assistant in plain language, for example “is GL ready to close for this period” or “analyze my AP holds”.
3.15 About and diagnostics
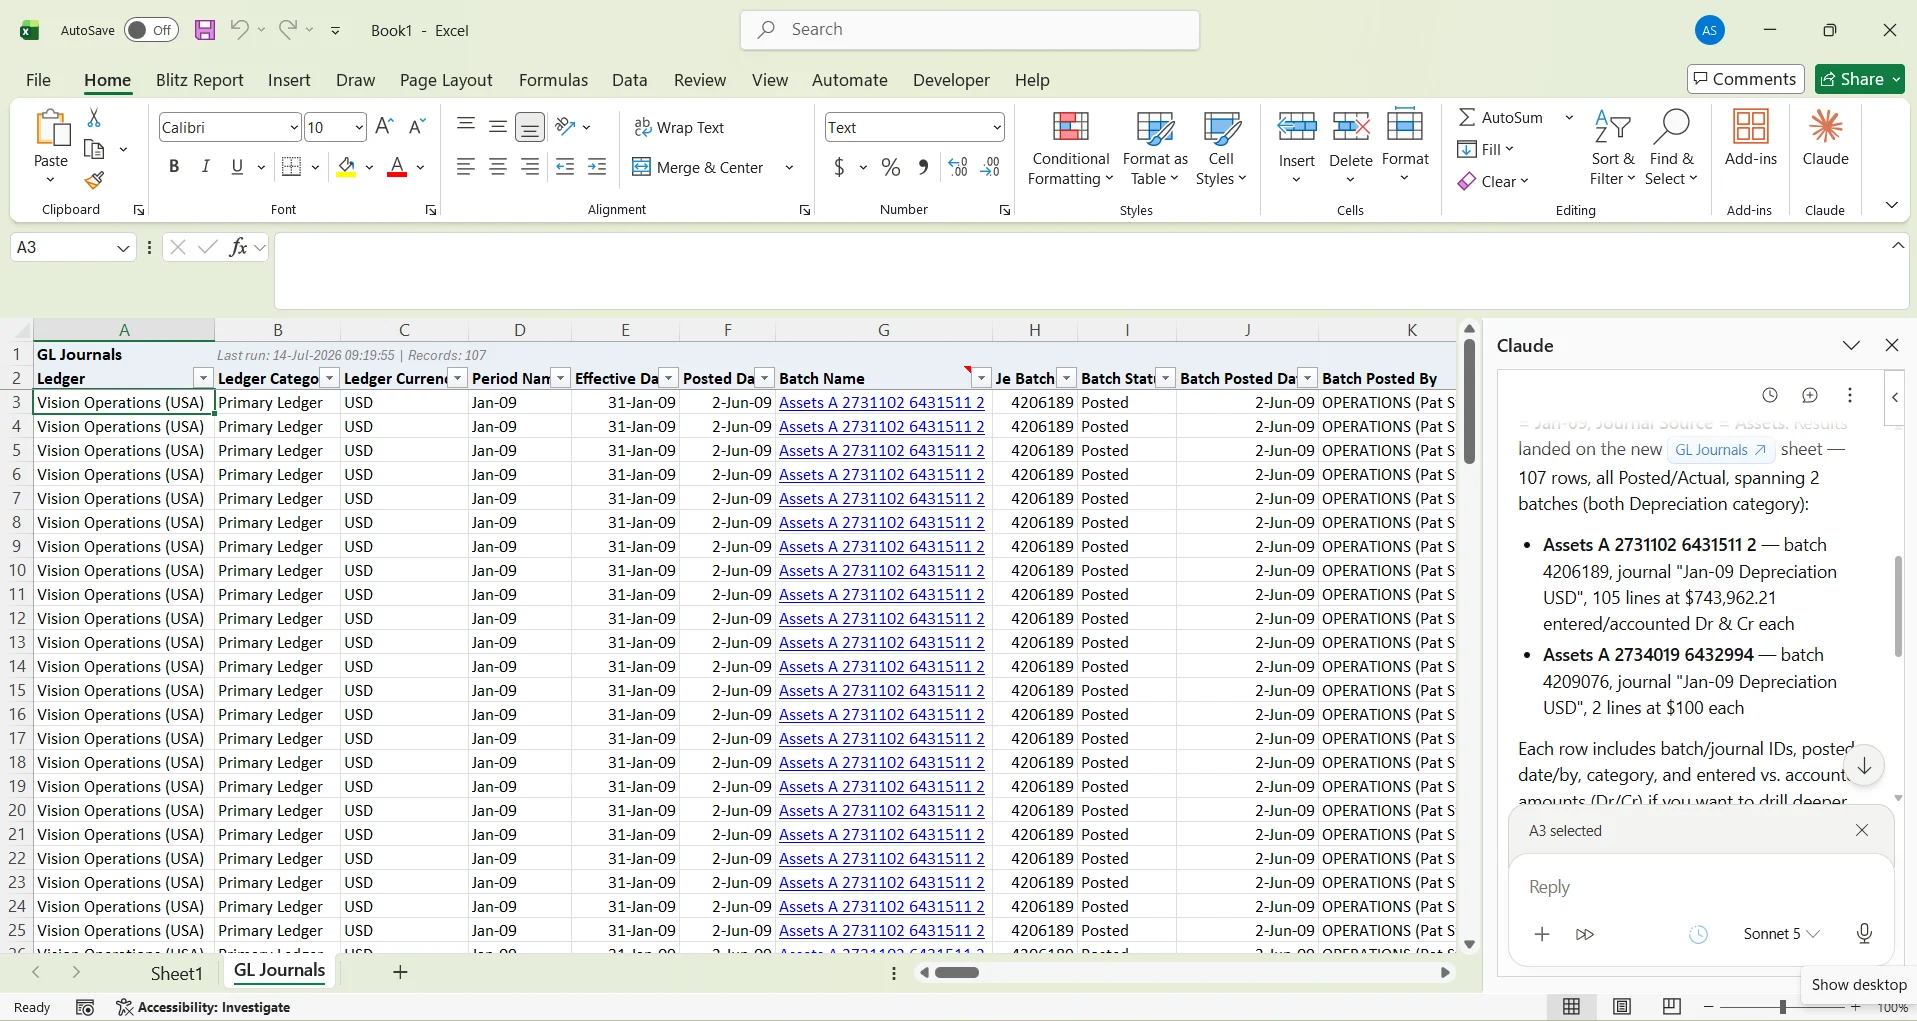
The About button shows the add-in build date and the Blitz Report version of the connected environment. The Debug flag writes a diagnostic log file, whose location is shown next to the flag, which support may ask for when analyzing an issue. The Confirmation Messages flag shows additional confirmation messages while working with the add-in.
4 Web browser
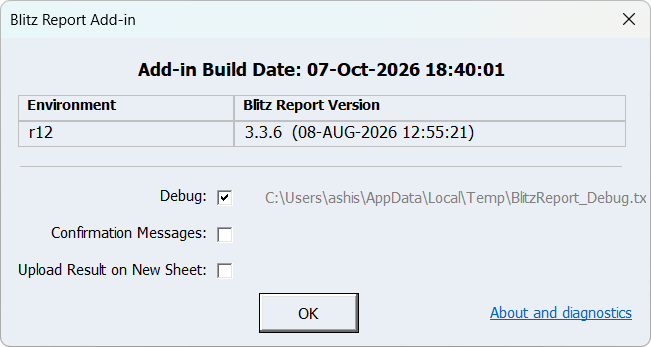
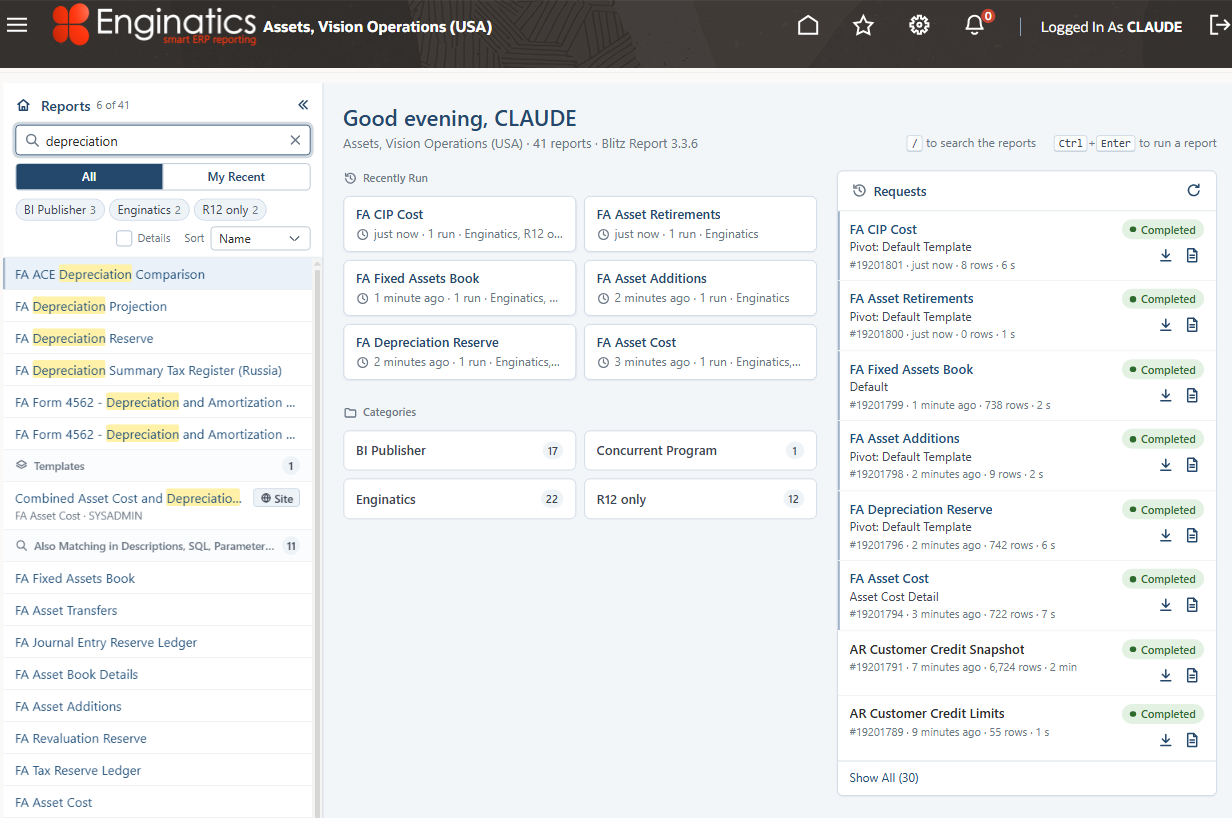
Blitz Report Web is the browser based user interface for users who work in the Oracle E-Business Suite web applications rather than in Oracle Forms. It is opened through the menu function ‘Blitz Report (Web)’ and offers report execution, templates and Excel file upload.
4.1 Running reports
Finding a report
Words typed into the search field above the report list, which the / key moves to, filter the report names; Enter opens the highlighted report and Down moves into the list. After a short pause, a search text of three or more characters is also looked up in report descriptions, parameters, templates and SQL: matching templates are listed under Templates and open their report with that template, and further matching reports follow. The search for any text within the report SQL, such as part of a column name, follows while the focus stays in the search field or the list, or starts with Search the Report SQL.
The category buttons restrict the list to the selected categories, as does a category on the start page or in a report’s header.
Selecting a template
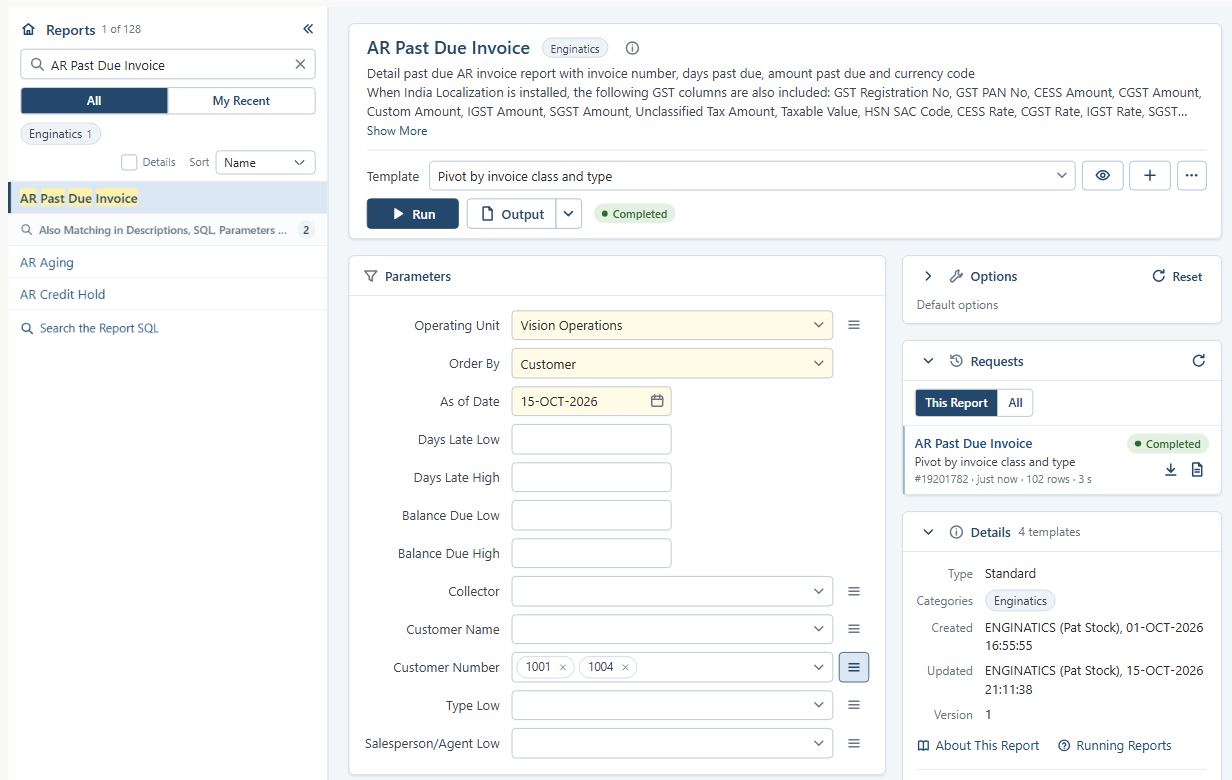
Picking a template applies its parameter defaults, excluded parameters and conditions, and the report opens with it the next time. Edit and New open the template editor. With Show All Templates set in the Preferences window of the Blitz Report form, the list offers the templates of all reports, and a template of another report opens that report.
Parameters
Parameters offer the same lists of values, dependencies and multiple values as the Forms run screen, and a yellow background marks a required parameter. Up and Down move to the previous or next parameter as Tab does, skipping greyed parameters. Enter opens a parameter’s list of values filtered by the typed text, where Up and Down move and a second Enter picks the highlighted value. In a date or date-time parameter, Enter opens the calendar on the typed date, where the arrow keys move between days and Enter picks one. Escape closes a list or calendar, and F9 or Alt+Down also opens it.
The list icon next to a parameter (Multiple values) switches it to multiple values, and so does pasting several values, for example from Excel cells. Enter then ticks or unticks the highlighted value of the list, and closing the list applies the selection; a parameter without a list takes each typed value with Enter. Backspace removes the last value.
The prompted conditions of the selected template follow the parameters under Template Conditions. A report that needs an inventory organization asks for it in an Inventory Organization field above its parameters.
Running and output
Run, or Ctrl+Enter in any field, submits the report as a background concurrent request. When a request submitted on the page completes, its output is downloaded, or for PDF opened in a new browser tab (where the browser blocks pop-ups, a notification offers Open instead), and a failed request shows its message. While the page is in a background browser tab, the download waits until you return to it.
Options and actions
The Options card holds the runtime options. Reset returns the options and the template to their defaults. In Output File Name and Server File Name, and in Server Output Directory unless it is restricted to approved locations, the token button, F9 or Alt+Down lists the tokens.
The Actions button (…) next to the Template field saves and clears user and template parameter defaults, copies, exports and imports templates, downloads the Blitz Report Excel Add-in, and opens the report in the Blitz Report setup window of Oracle Forms.
4.2 Templates
The pencil next to a template in the Details card also opens the editor. For a template you may not change, Edit reads View and opens it read-only; Copy makes your own copy and the editor continues with it, see Template owner. The editor saves every change at once. Close returns to the report with the template selected, as does the browser’s Back button. A new template is a draft until it differs from the report, and Remove + Close deletes a draft you leave unchanged.
Double-click, F9 or Alt+Down in the Name field lists the templates of the report; picking one closes the open template and opens the picked one.
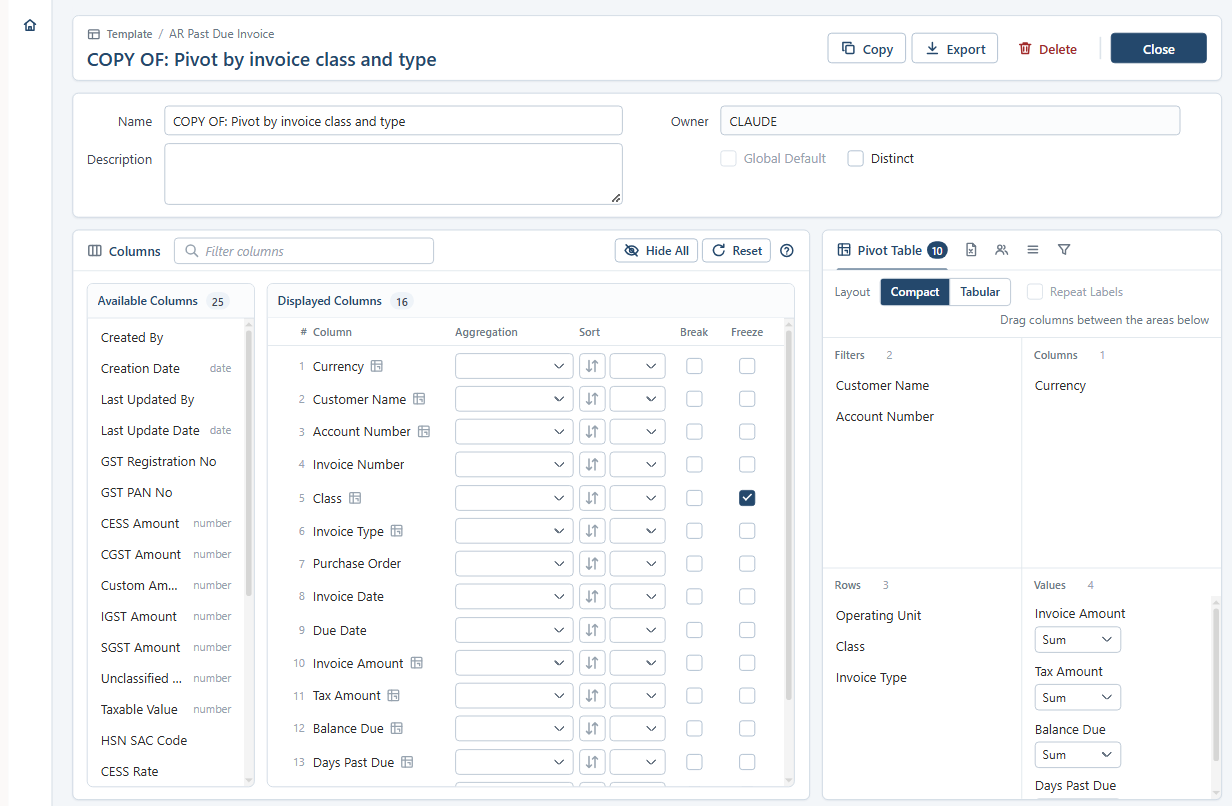
Columns
The help button of the Columns card lists how to show, hide and move columns with the mouse and the keyboard. A column shown by double-click is inserted after the selected displayed column, a click on a column’s number moves it to a position you enter, and the / key moves to the filter field. The column properties, such as Aggregation and Sort of a report or Required and Default Value of an upload, are described in Template layout.
Tabs
Depending on the report type, the tabs Pivot Table, Excel Upload, Sharing, Parameters and Conditions work as described in Pivot table, Excel upload, Template sharing (with restricted templates), Excluded parameters (with locked parameters) and Template conditions. In the Pivot Table tab, an available column added to an area is displayed as well, and double-click or Delete removes a field from its area.
4.3 Uploading Excel files
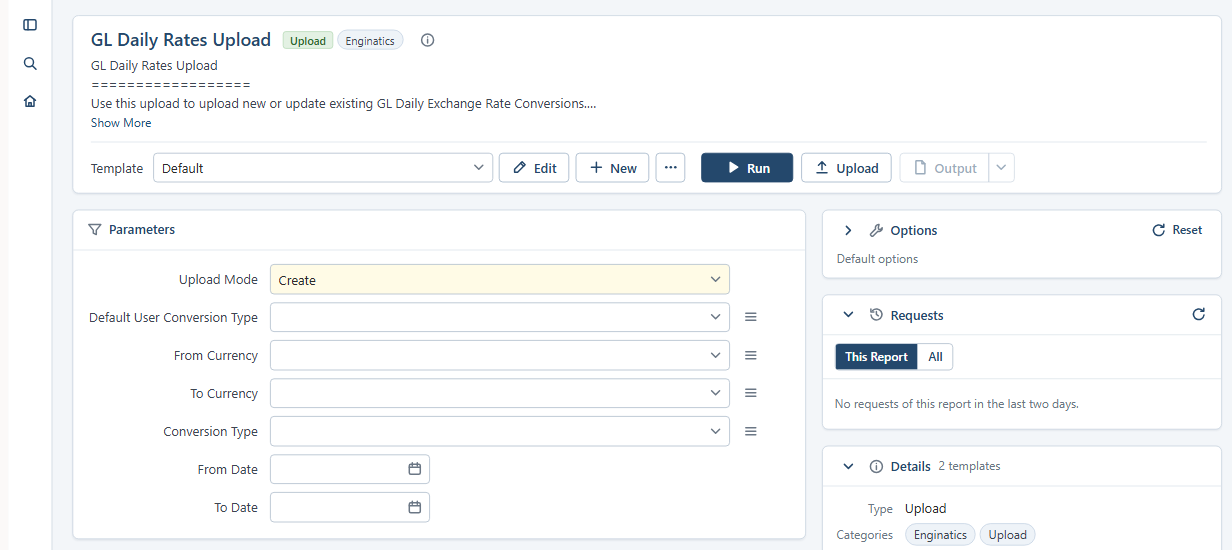
The run screen of an upload shows Upload next to Run. Run downloads the upload’s Excel workbook for data entry, prepared as the Upload Mode and the other parameters define, see Downloading the upload template. Upload submits the filled workbook (.xlsx or .xlsm) with the selected template as a background request, and so does dropping the file on the run screen after a confirmation. When the upload completes, its result file with the Status and Message of every row is downloaded, see Uploading the data; if no record is valid, a message says so instead.
5 Uploading data
Blitz Uploads create, update and delete Oracle E-Business Suite data from Excel workbooks. Each upload guides data entry with the same lists of values as the corresponding Oracle form and writes the data through standard Oracle APIs, which enforce the same business rules as the form. This chapter describes how to use an existing upload; how to develop new uploads is covered in Upload development in the Developer Guide.
5.1 Upload workflow
There are two ways to start an upload. In Excel, press Run Report in the Blitz Report ribbon and select an upload: the upload sheet is created in your workbook, ready for data entry. Alternatively, download the upload’s Excel template from Blitz Report and open it in Excel.
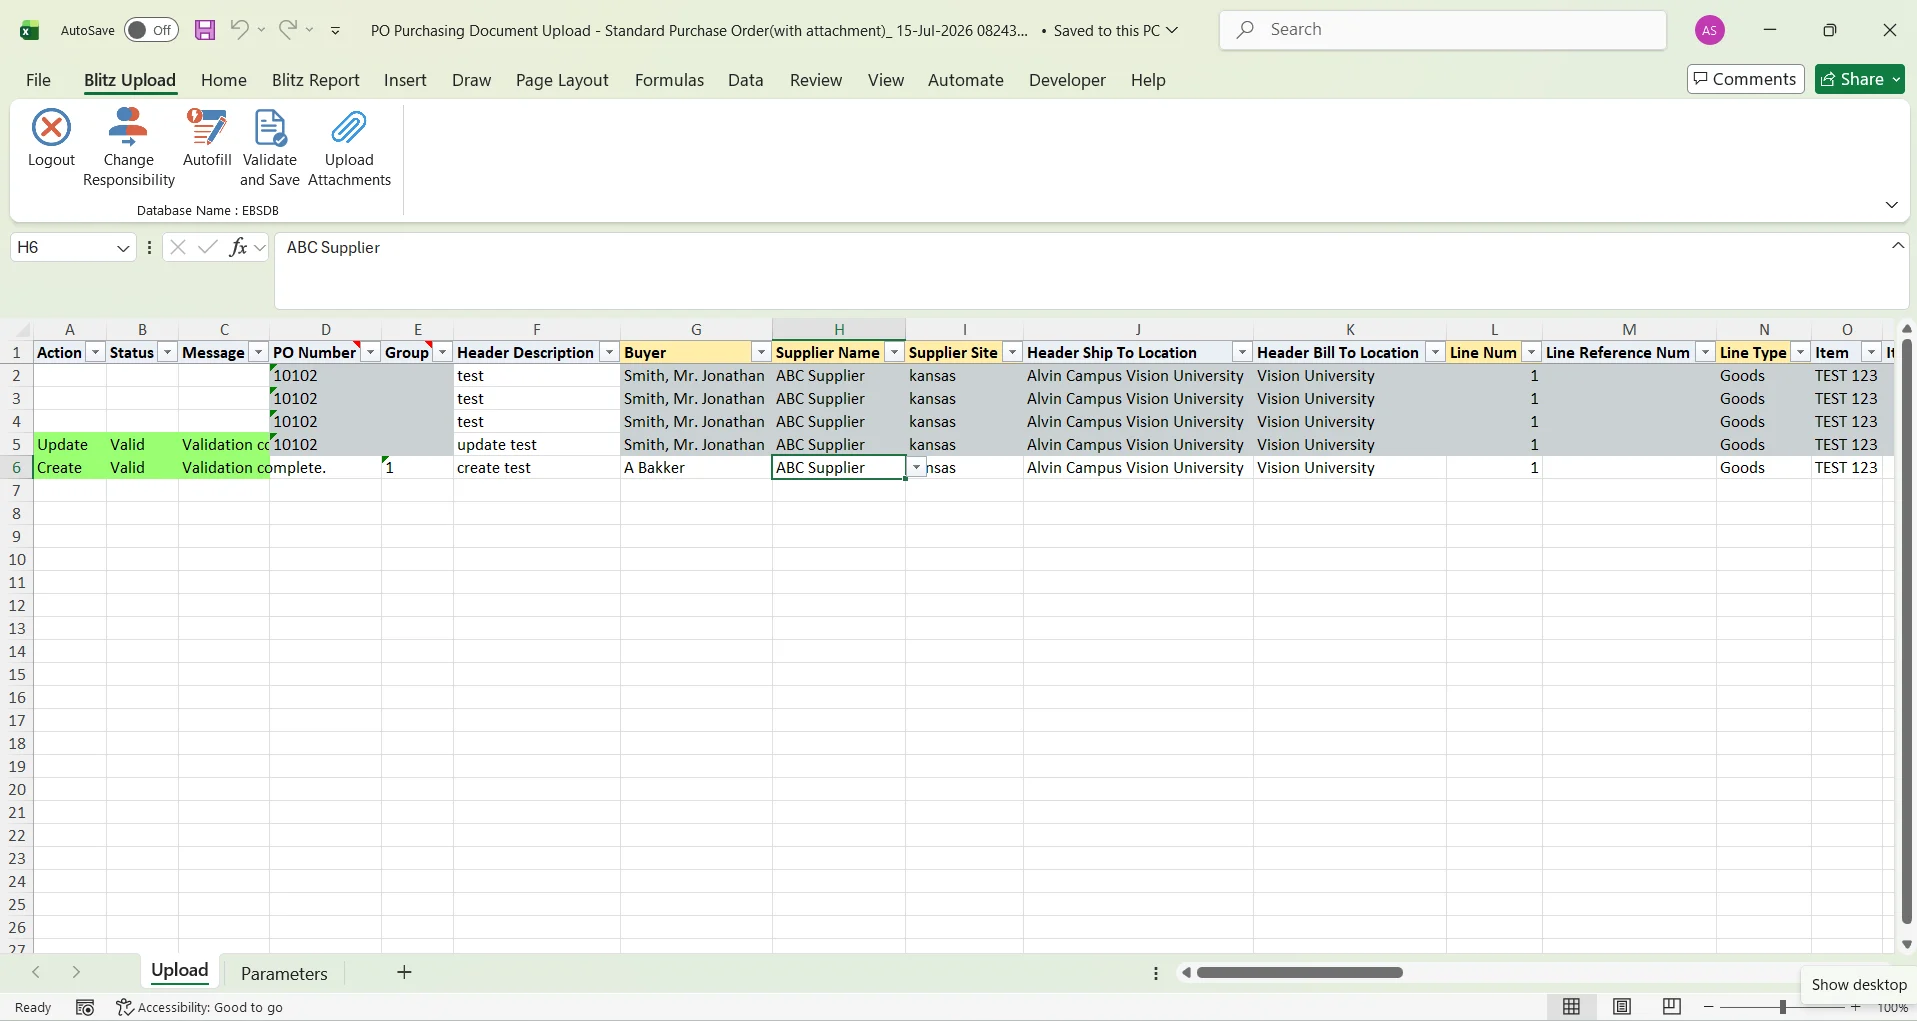
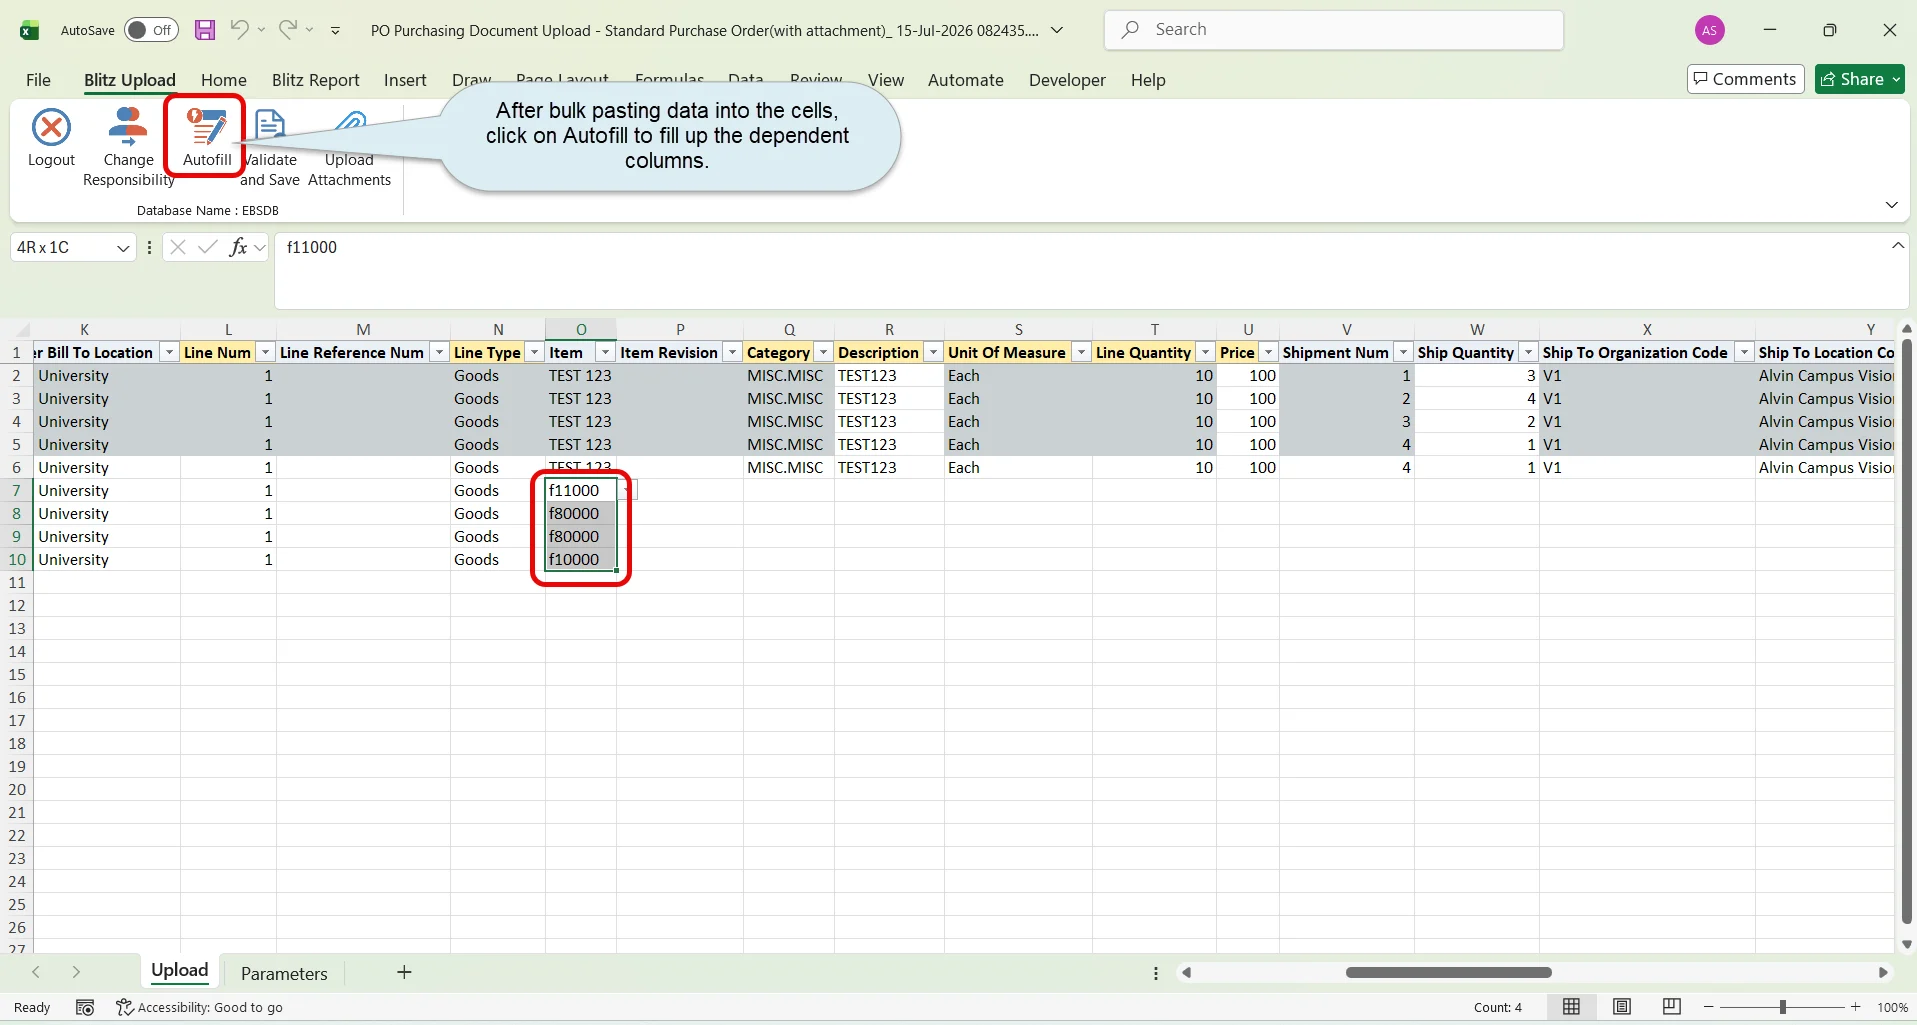
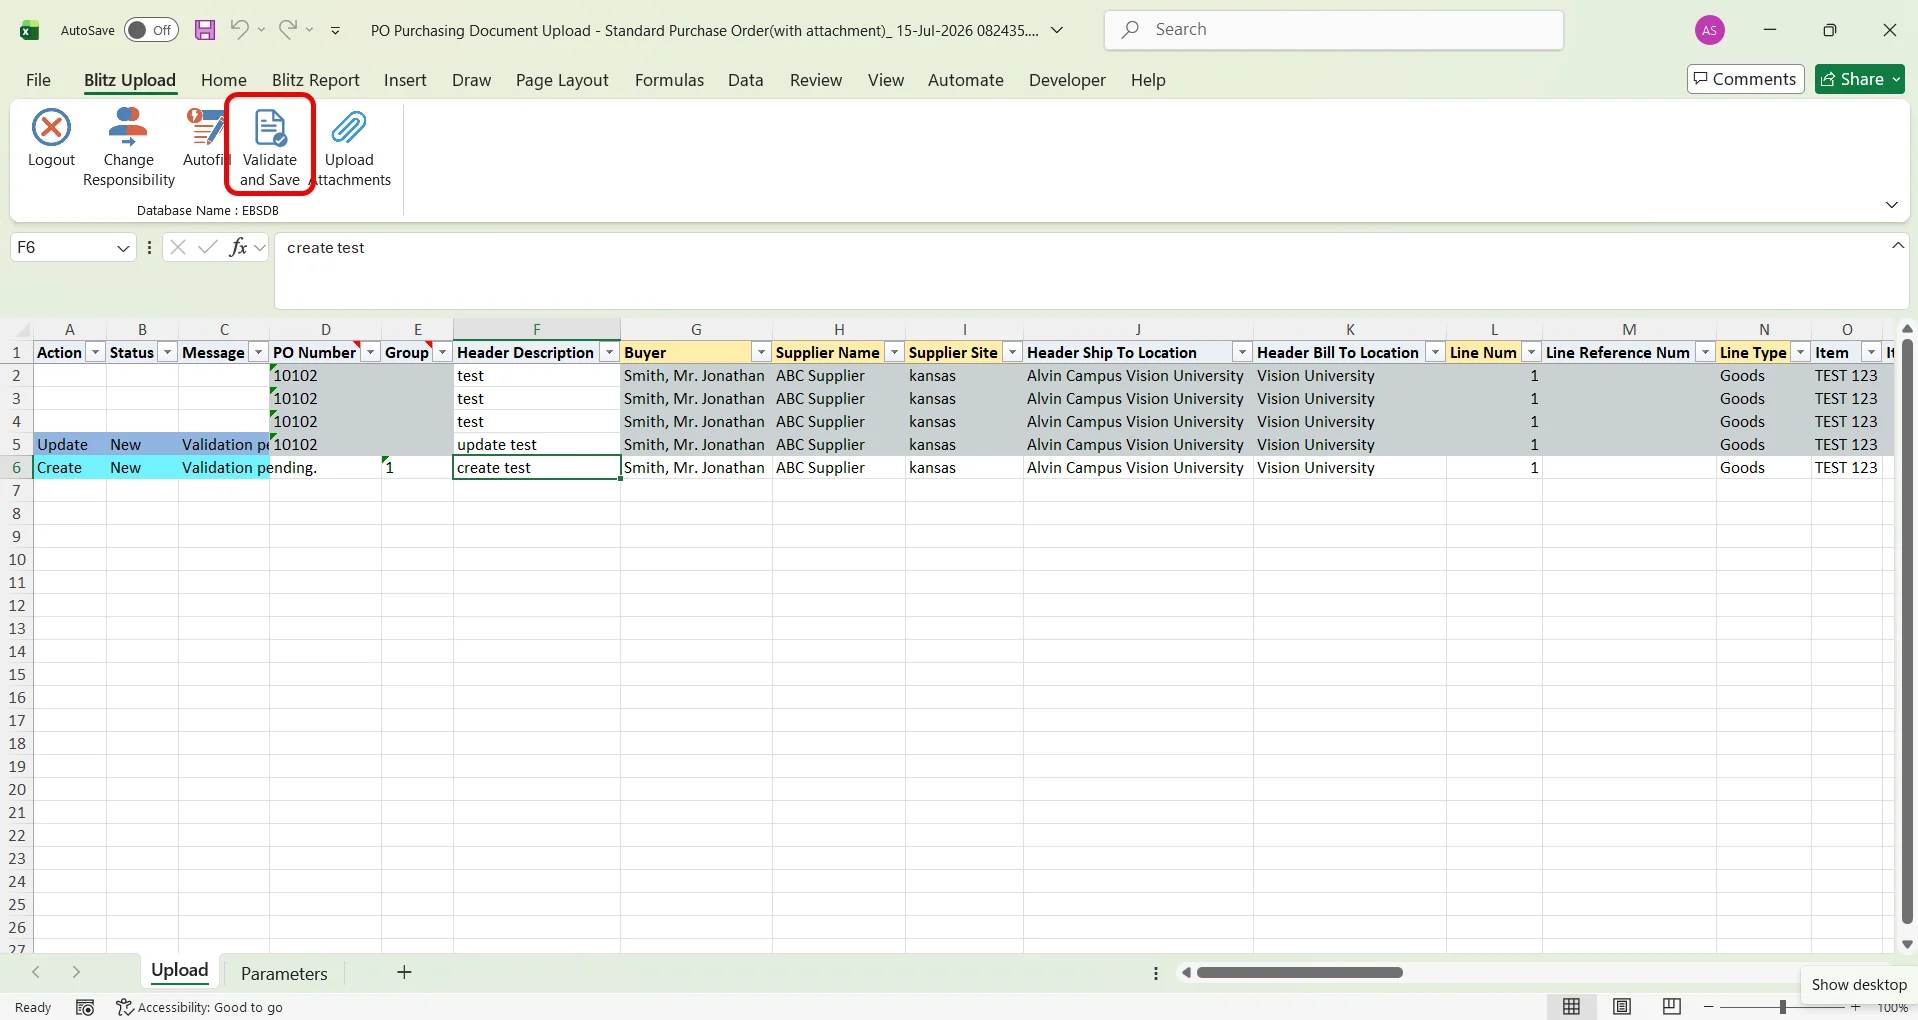
Enter or modify the data in the sheet, then press Validate and Save in the Blitz Report ribbon. The ribbon also provides the Autofill and Upload Attachments buttons, and every data row shows its state in the Action, Status and Message columns.
The data is then applied to Oracle EBS in one of two ways: directly from Excel with the Upload button in the Blitz Report ribbon, which is the easiest way for smaller data sets, or by uploading the whole Excel file through the Upload button on the Blitz Report form, which is recommended for larger data sets because the upload runs as a concurrent program in the background and you can carry on working in Excel while it runs.

5.2 Downloading the upload template
Uploads are started like reports, from any Blitz Report user interface. The Upload Mode parameter controls what the template is prepared for: ‘Create’ downloads an empty template for entering new records, and ‘Create, Update’ additionally downloads the existing records selected by the other parameters, so they can be modified and uploaded back. The template’s conditions restrict which existing records are downloaded. Open the downloaded workbook in Excel with the Blitz Report Excel Add-in installed.
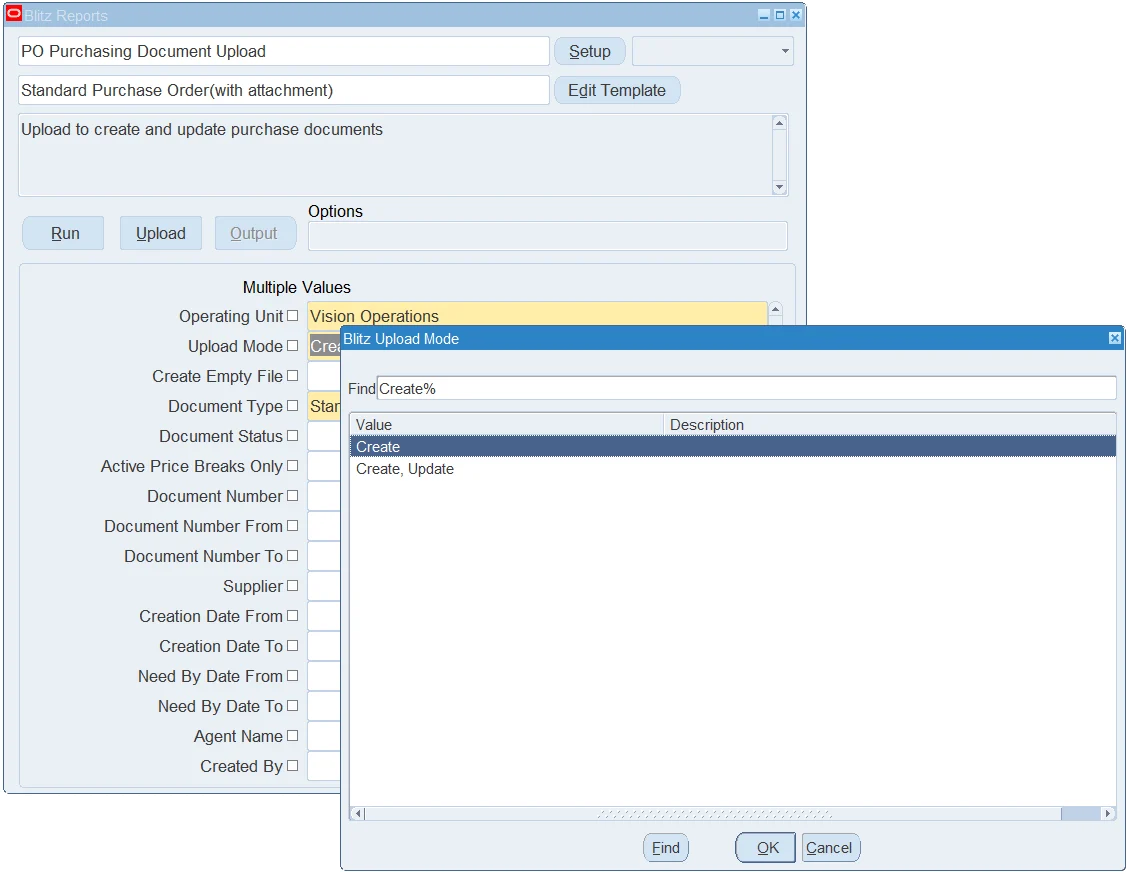
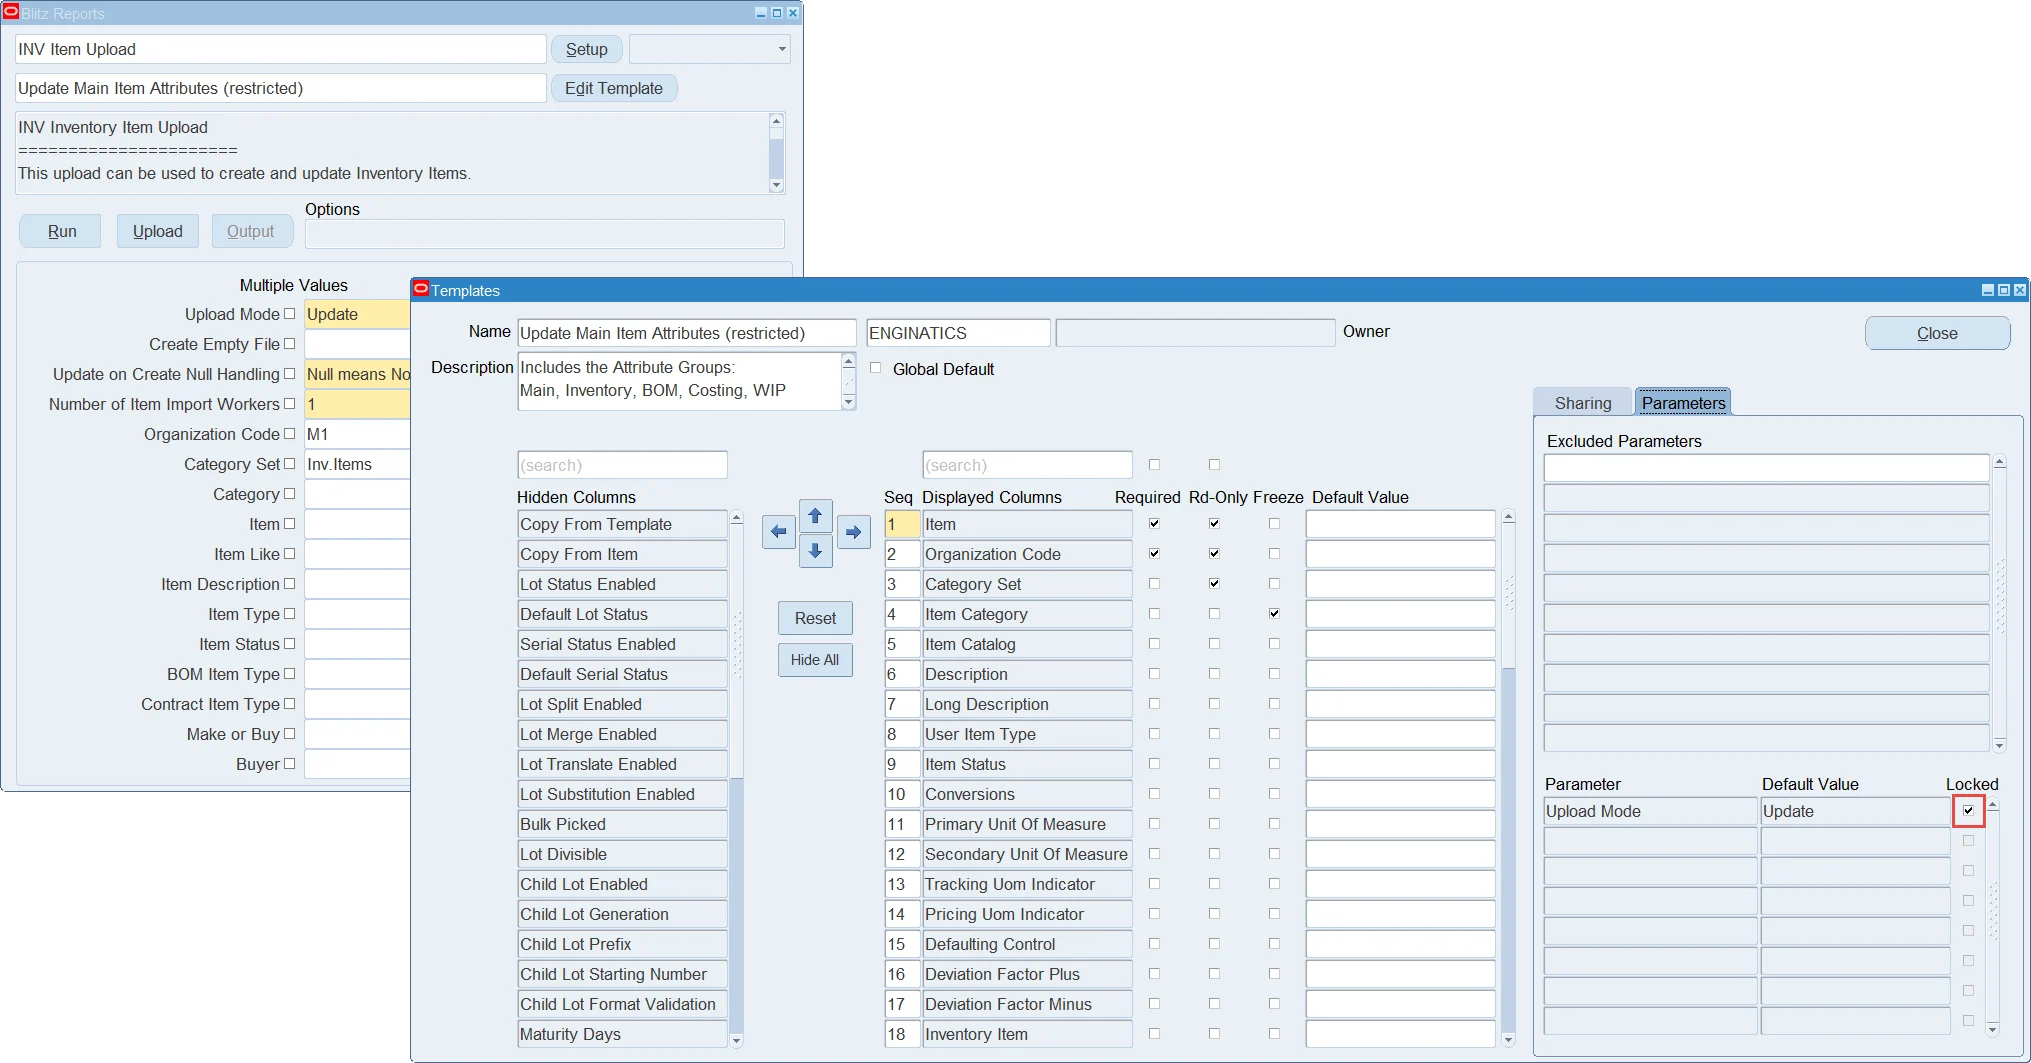
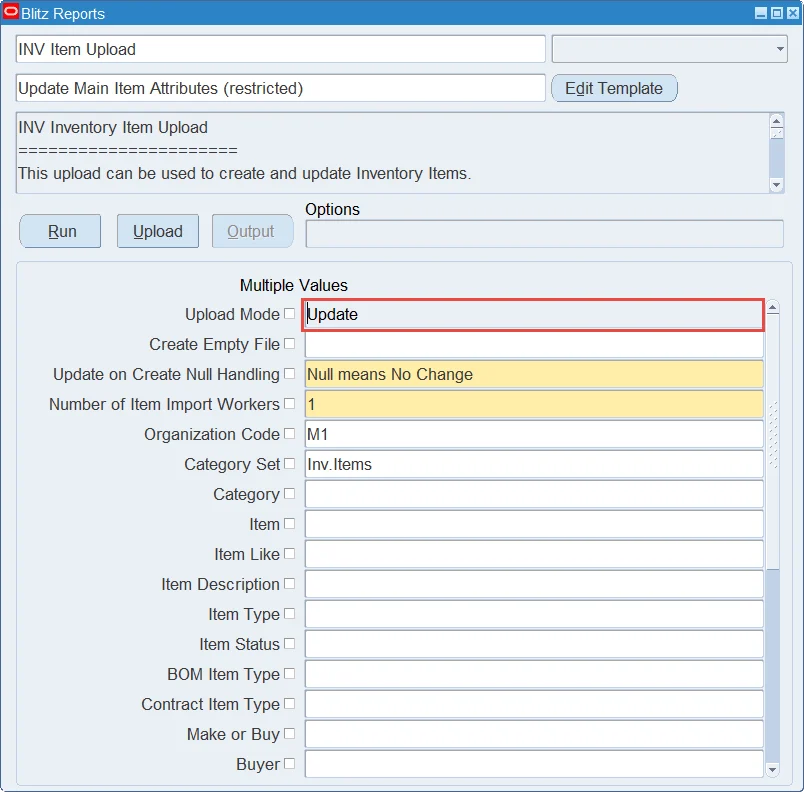
Parameters can be locked by a template. A locked parameter is shown greyed out on the run screen and its value cannot be changed, so the upload always runs with the value defined in the template, for example a fixed Upload Mode so that a template can only be used to update existing records and not to create new ones. A locked value overrides the user’s own saved parameter defaults and it is enforced when the upload is submitted, including from the Excel add-in and through the API, so it cannot be bypassed. Locked values are stored against a template together with its other parameter defaults.
5.3 Entering data
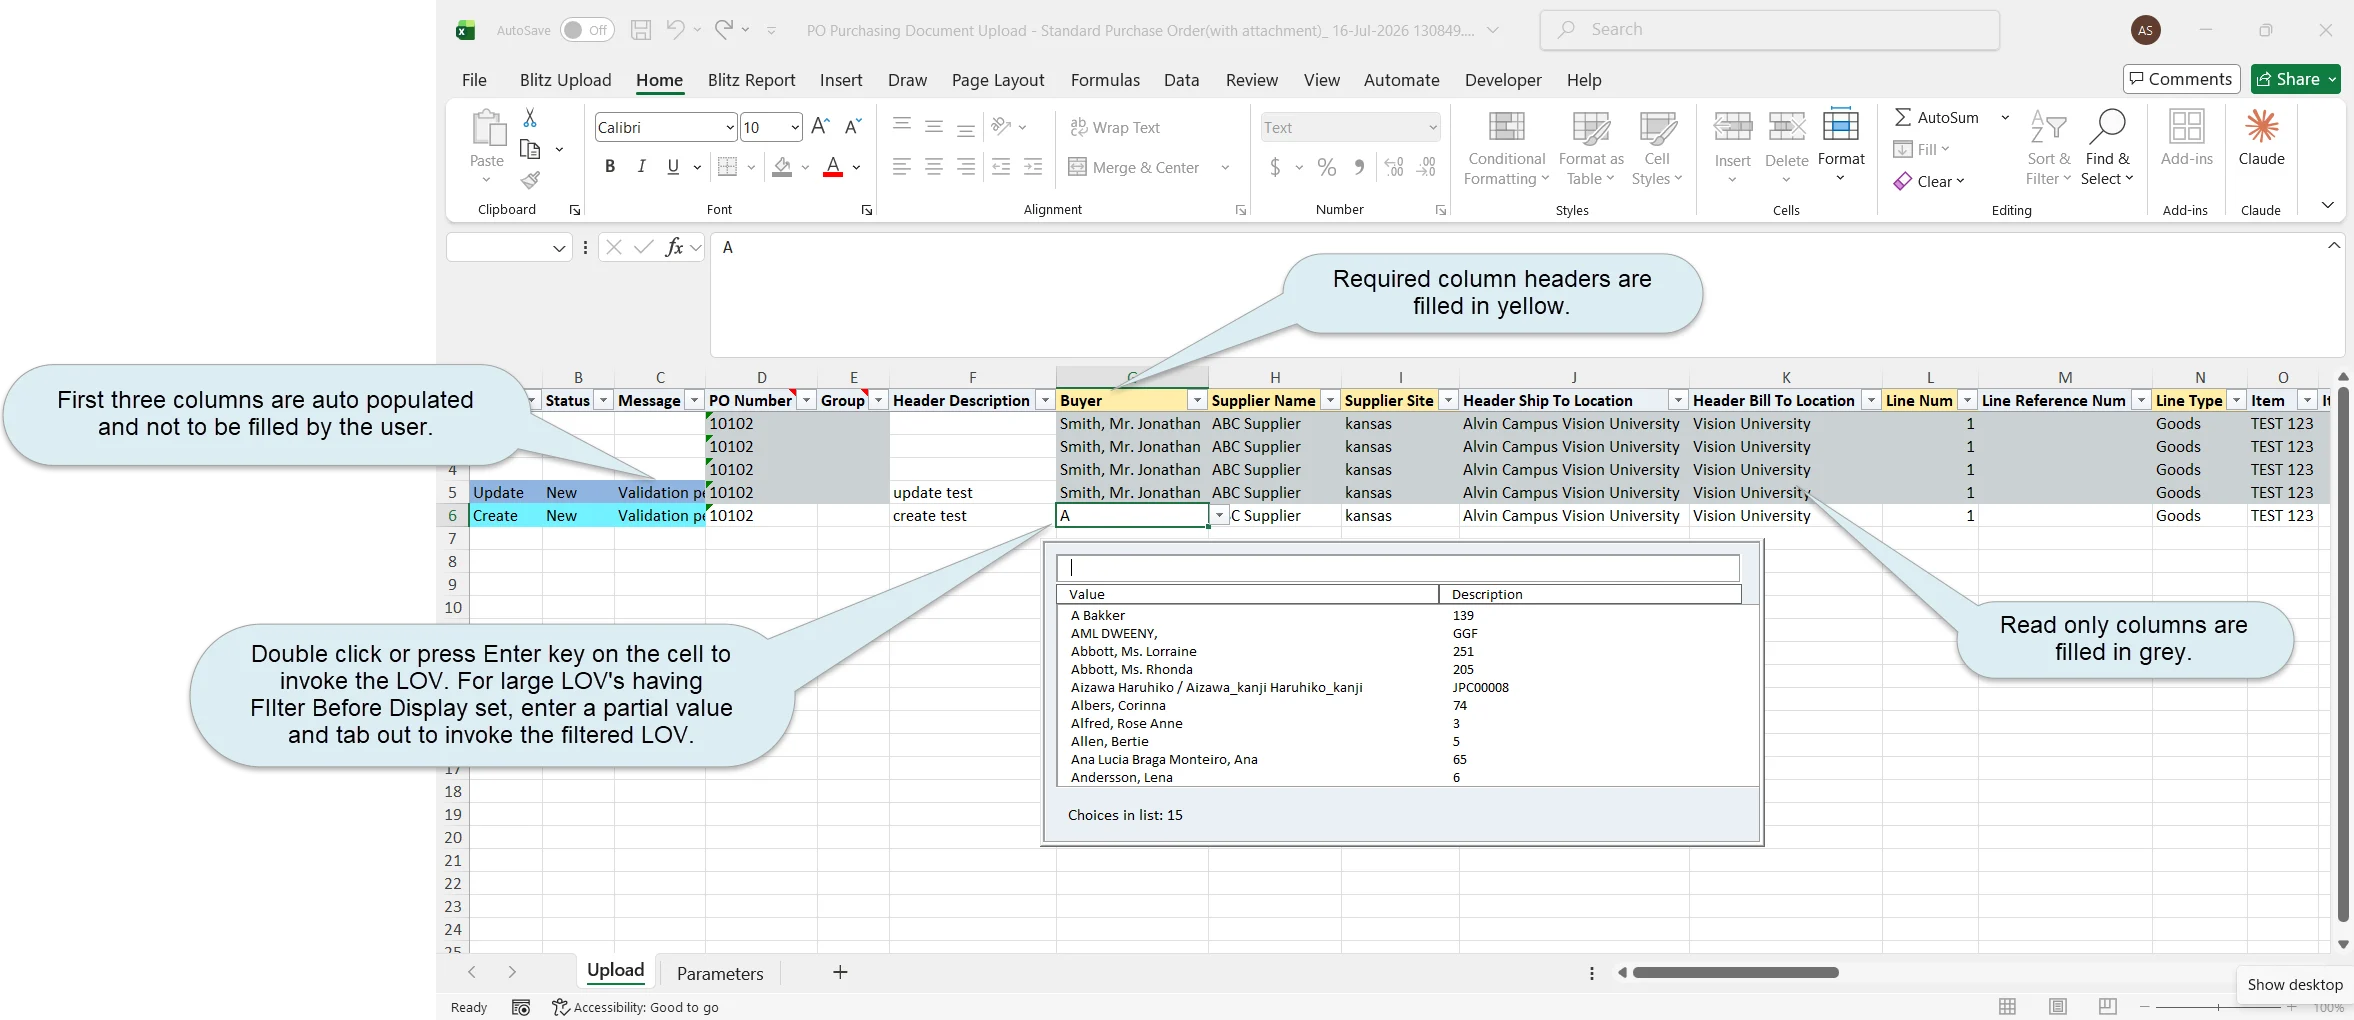
Type new rows, paste them from another file, or modify downloaded rows. The first three columns of every upload sheet, Action, Status and Message, are populated automatically and are never entered manually. Action shows what will happen to each row: Create for newly entered rows, Update for downloaded rows in which a cell was changed, and Delete where the upload supports record deletion. Status and Message carry each row’s validation and processing outcome, for example Valid after a successful validation, or Error together with the reason a value was rejected. Changed cells are tracked automatically so that only modified columns are applied on update.
Required columns must be populated before a row can be processed; their column headers are highlighted in yellow. Rows with missing required values are reported during validation, and the Message column lists the columns that still need to be filled.
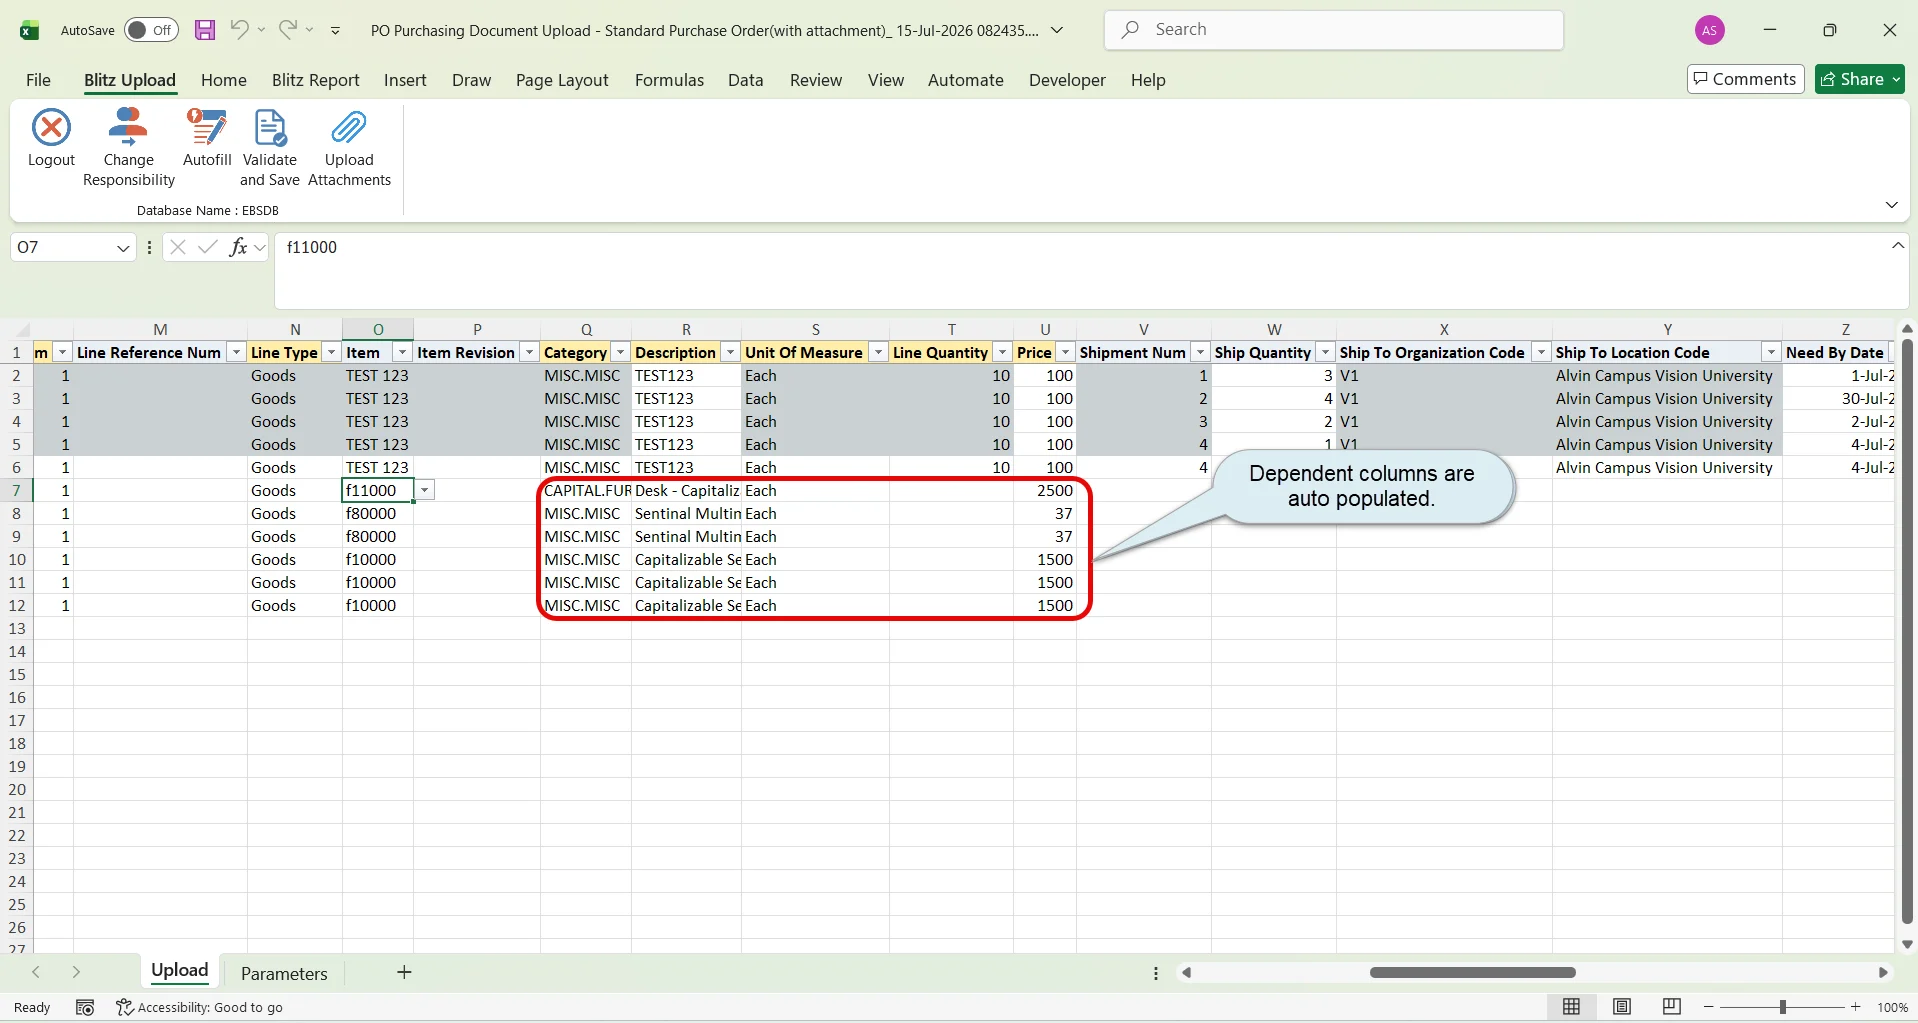
Read only columns protect values that cannot be changed on existing records, and their data cells are filled in grey. Their downloaded values cannot be modified, while entering a value on a new row is still possible where the value can be set at creation time. Columns that are derived from other columns, such as an item description, are also read only and are filled in automatically.
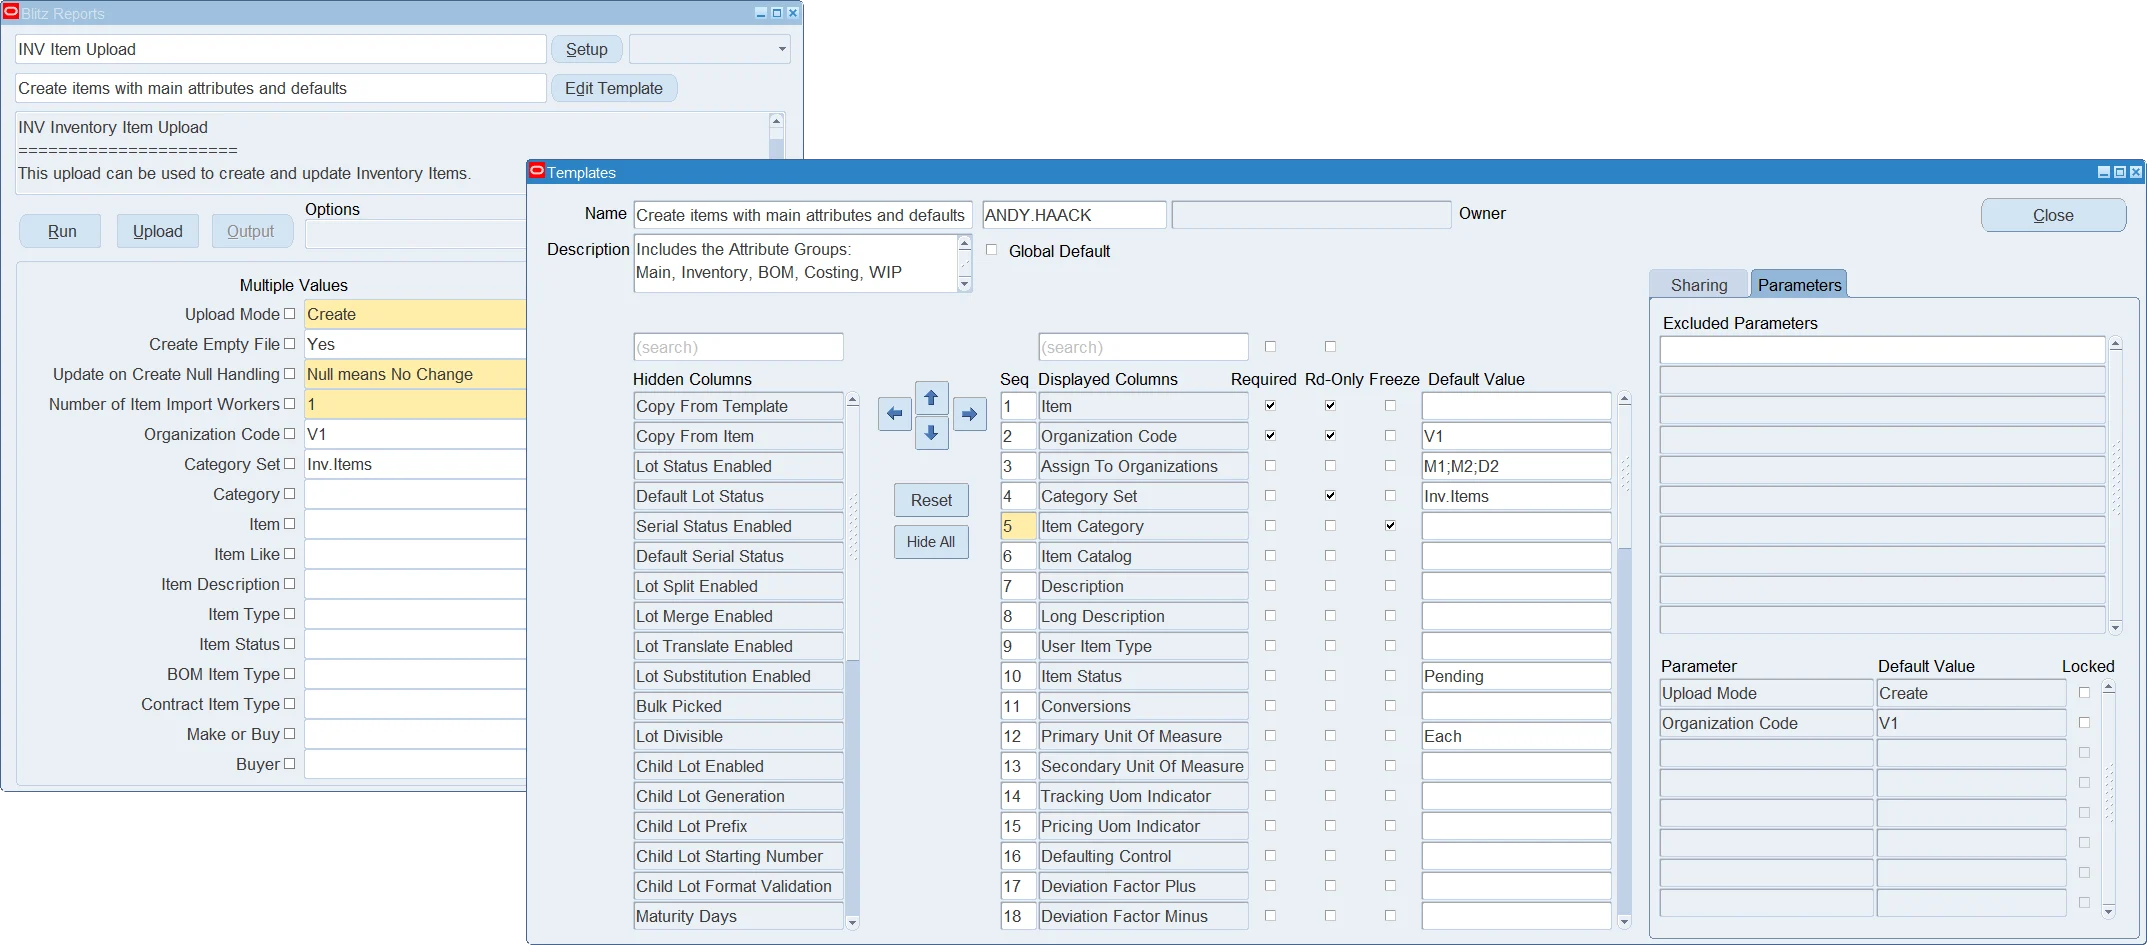
The template used to create the workbook can pre-fill columns as well. A column with a default value is populated in every new row, and where the template fixes the value the cell is read only and filled in grey. Where the template defines a set of allowed values, the first value is used as the default and the column’s list of values only offers the allowed values, which keeps the entered data within what the template permits. Panes are frozen at the column marked in the template, so the leading columns stay visible while scrolling to the right.
Many columns show an explanatory comment when hovering over the column header, and technical columns used internally by the upload are hidden at the right end of the sheet.
Columns with a list of values open their picker on double-click, Enter, or by choosing Open list… from the cell’s dropdown arrow. Dependent columns are filtered by the values already entered in the row, for example a subinventory list restricted to the entered organization. The Autofill button fills default values and dependent column values for the entered rows in one call, which saves typing for columns that follow from what is already entered. Date and number columns use the column’s data type and format, and wrong entries are reported during validation.
5.4 Validating the entered data
Log in via the ribbon, then click Validate and Save. This performs a basic validation of the entered rows: it checks that all required columns are populated and runs any additional Excel validations defined for the upload, then saves the workbook. Nothing is written to the database in this step. Each row’s validation outcome is written back to its Status and Message columns, and rows with missing or invalid data show what needs to be corrected.
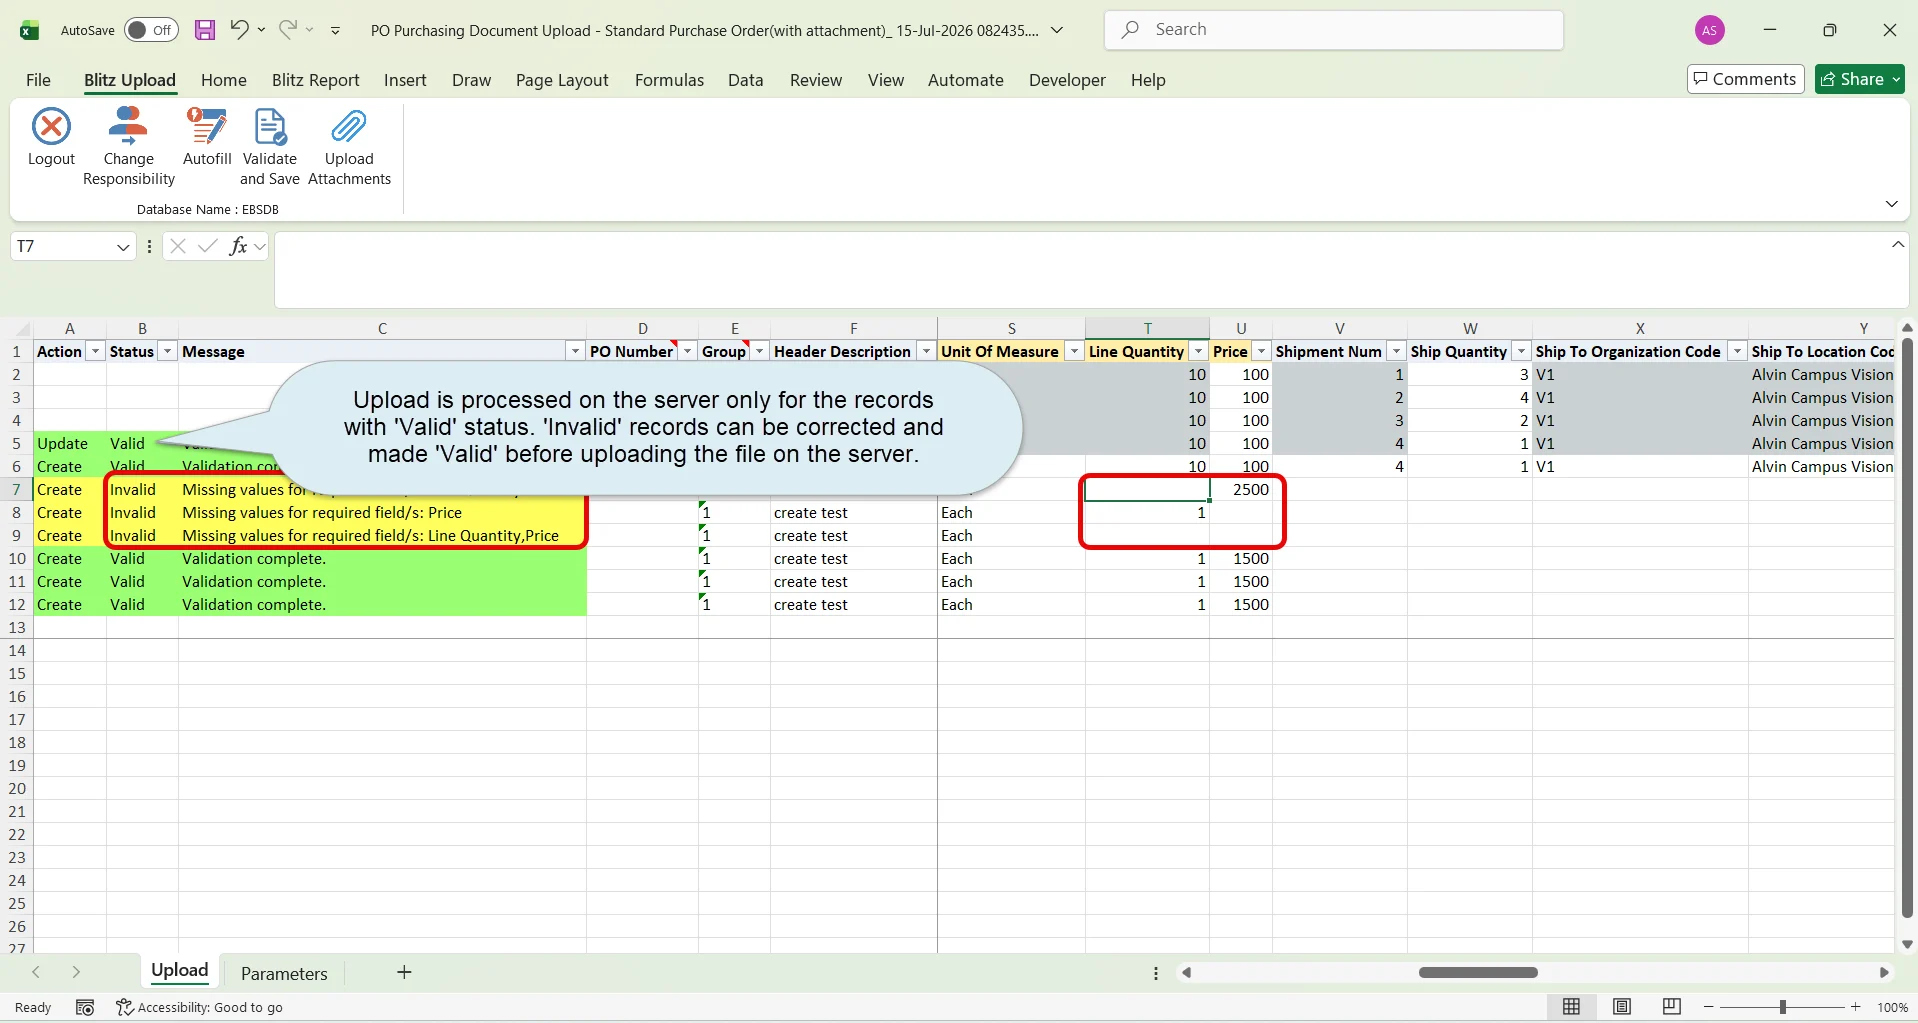
Correct the reported cells and click Validate and Save again until all rows show Valid.
5.5 Uploading the data
There are two ways to apply the validated data to Oracle EBS. Both run the same upload concurrent program, which processes every row through the upload’s API calls or interface table processing, and both perform the full validation against the Oracle business rules, going far beyond the basic checks made in the workbook, so that only rows that pass are written to the database.
Upload directly from Excel. Press Upload in the Blitz Report ribbon. The rows of the open worksheet are sent to Oracle EBS straight from Excel and the result is written back into the same sheet, so there is no file to save, browse for or open. This is the easiest way to upload smaller data sets.
Upload the whole Excel file on the Blitz Report form. Select the upload, press the Upload button, choose the file and submit it. This is recommended for larger data sets: the upload runs as a concurrent program in the background, so you can carry on working in Excel while it runs. It is also how a workbook saved earlier or prepared while working offline is uploaded.
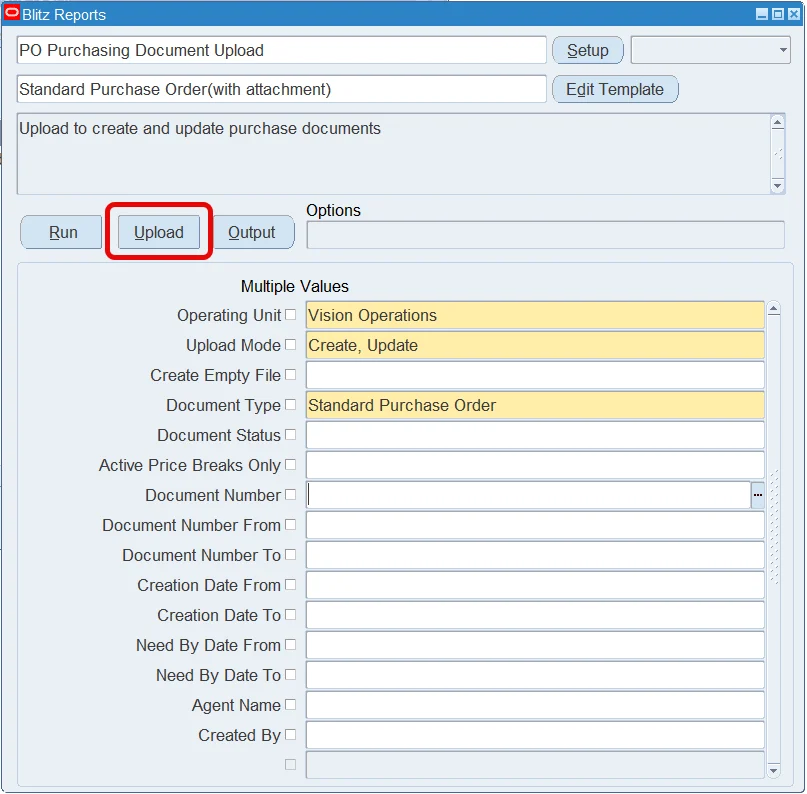
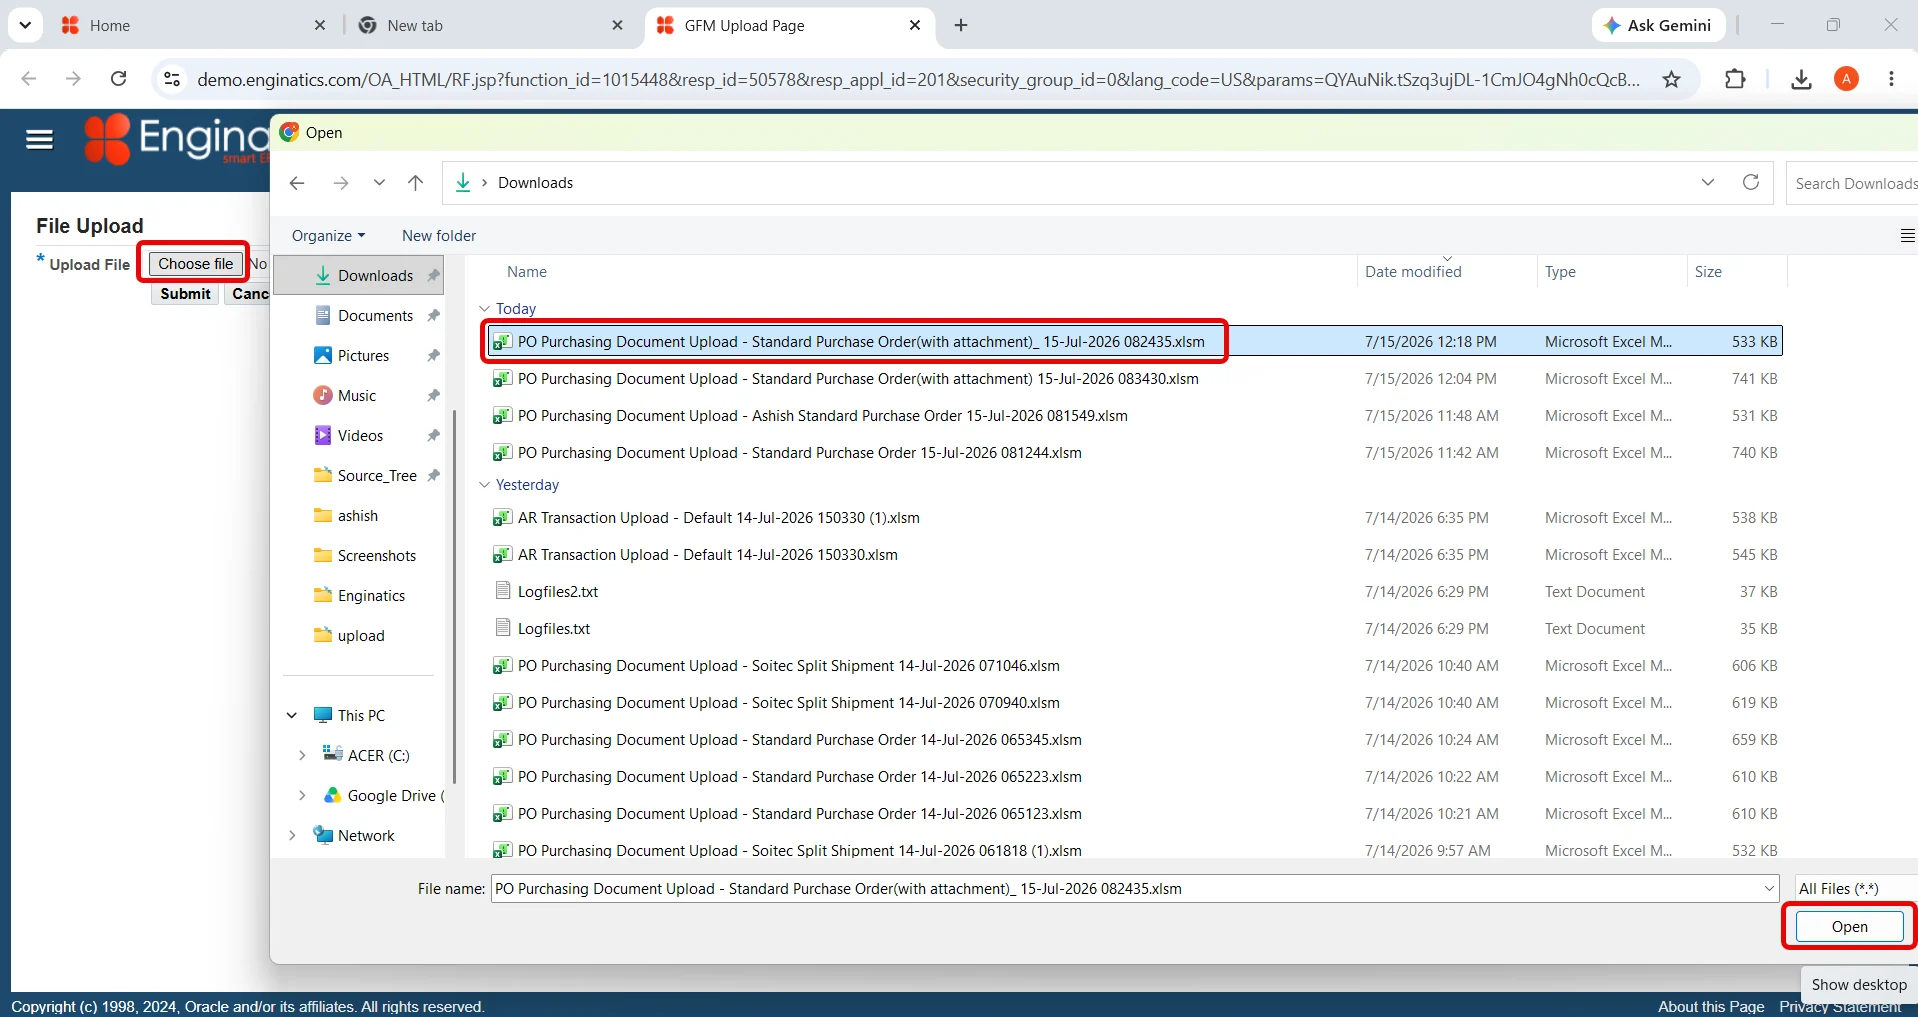
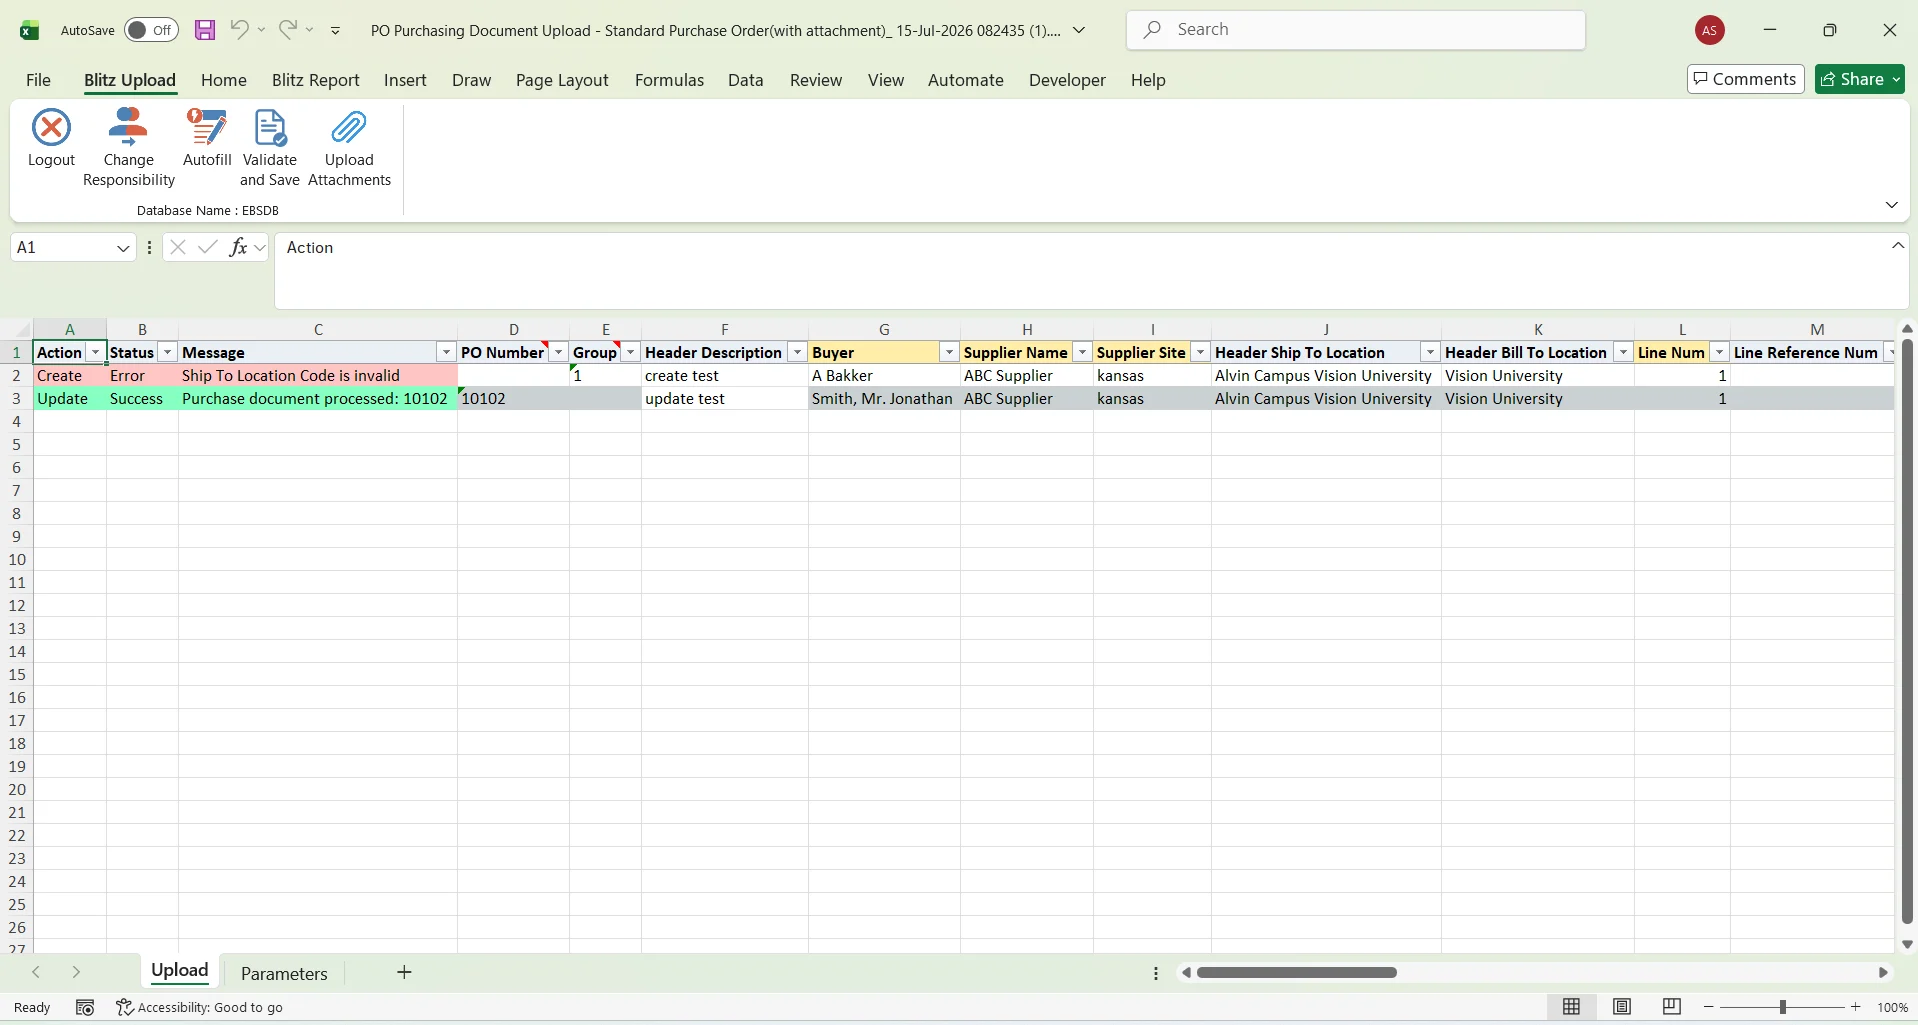
Every processed row comes back with its Status and Message, for example the created document, or the reason a value was not accepted. The direct upload writes the result into the worksheet, the file upload produces a result file. Rows with errors can be corrected and uploaded again.
5.6 Attachments
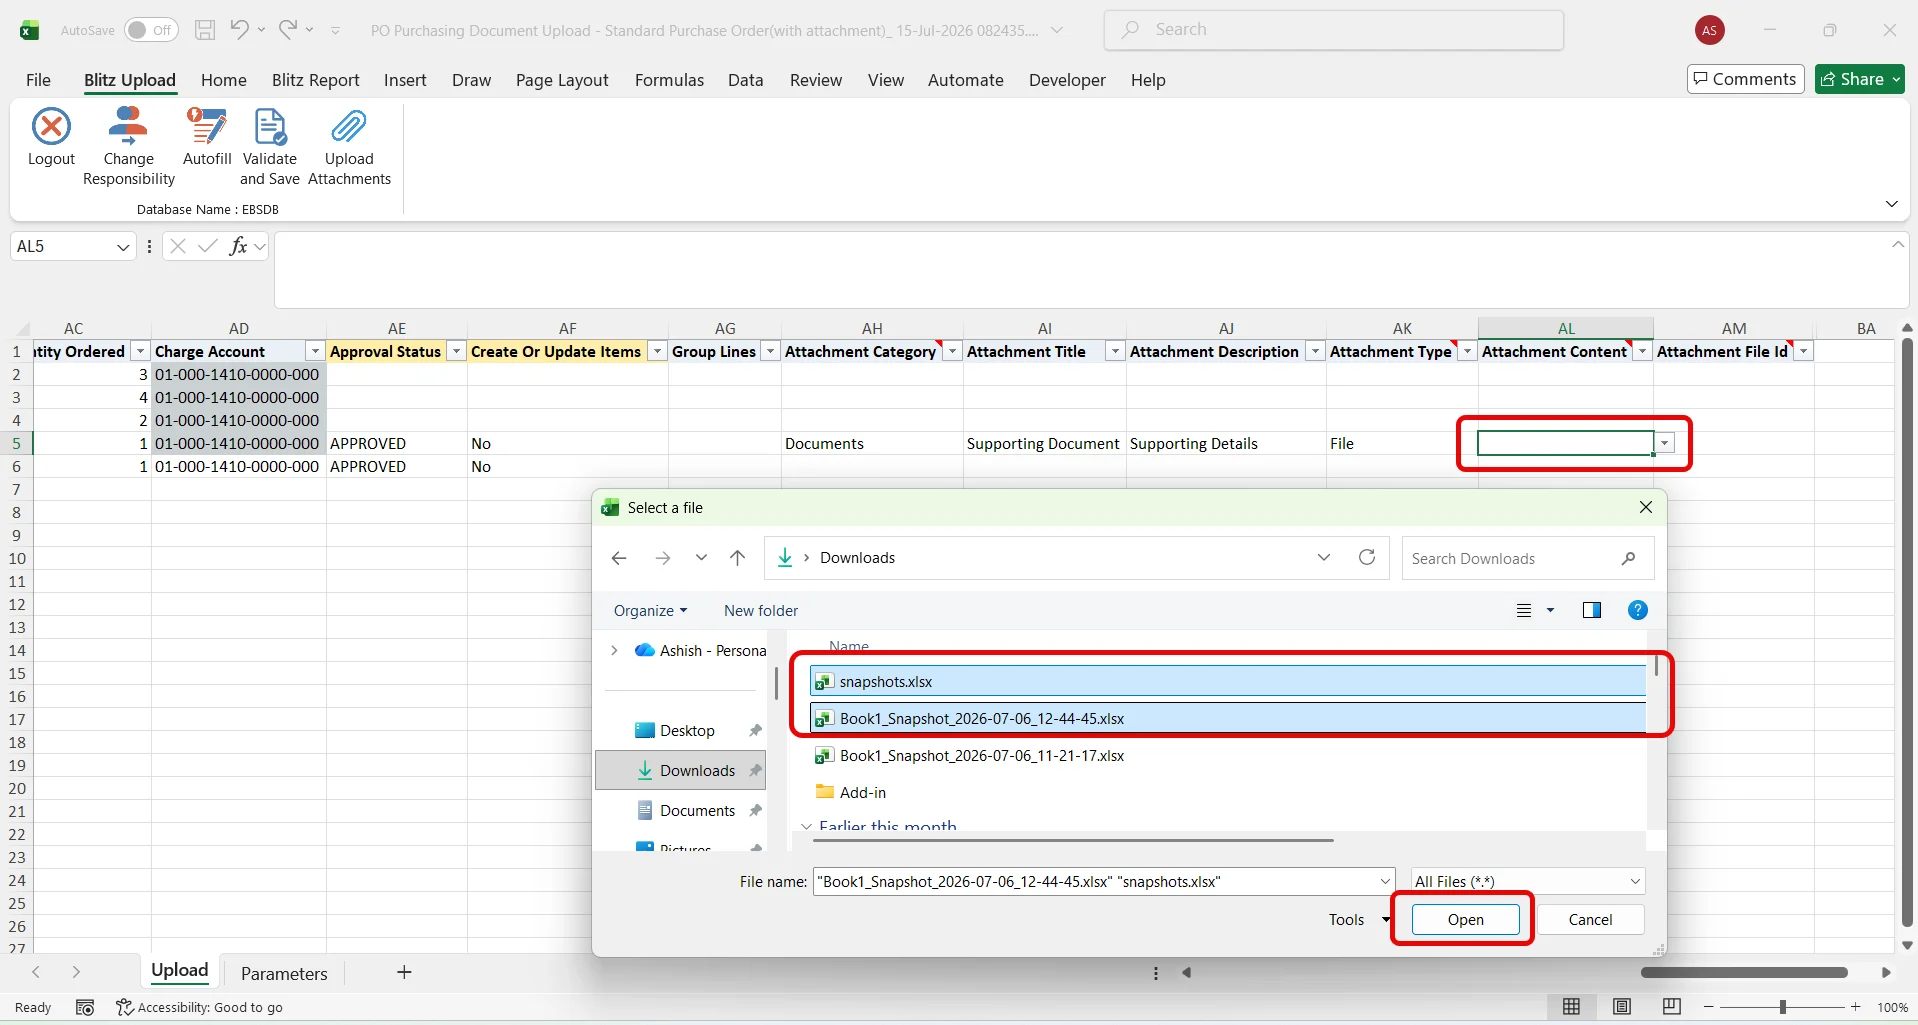
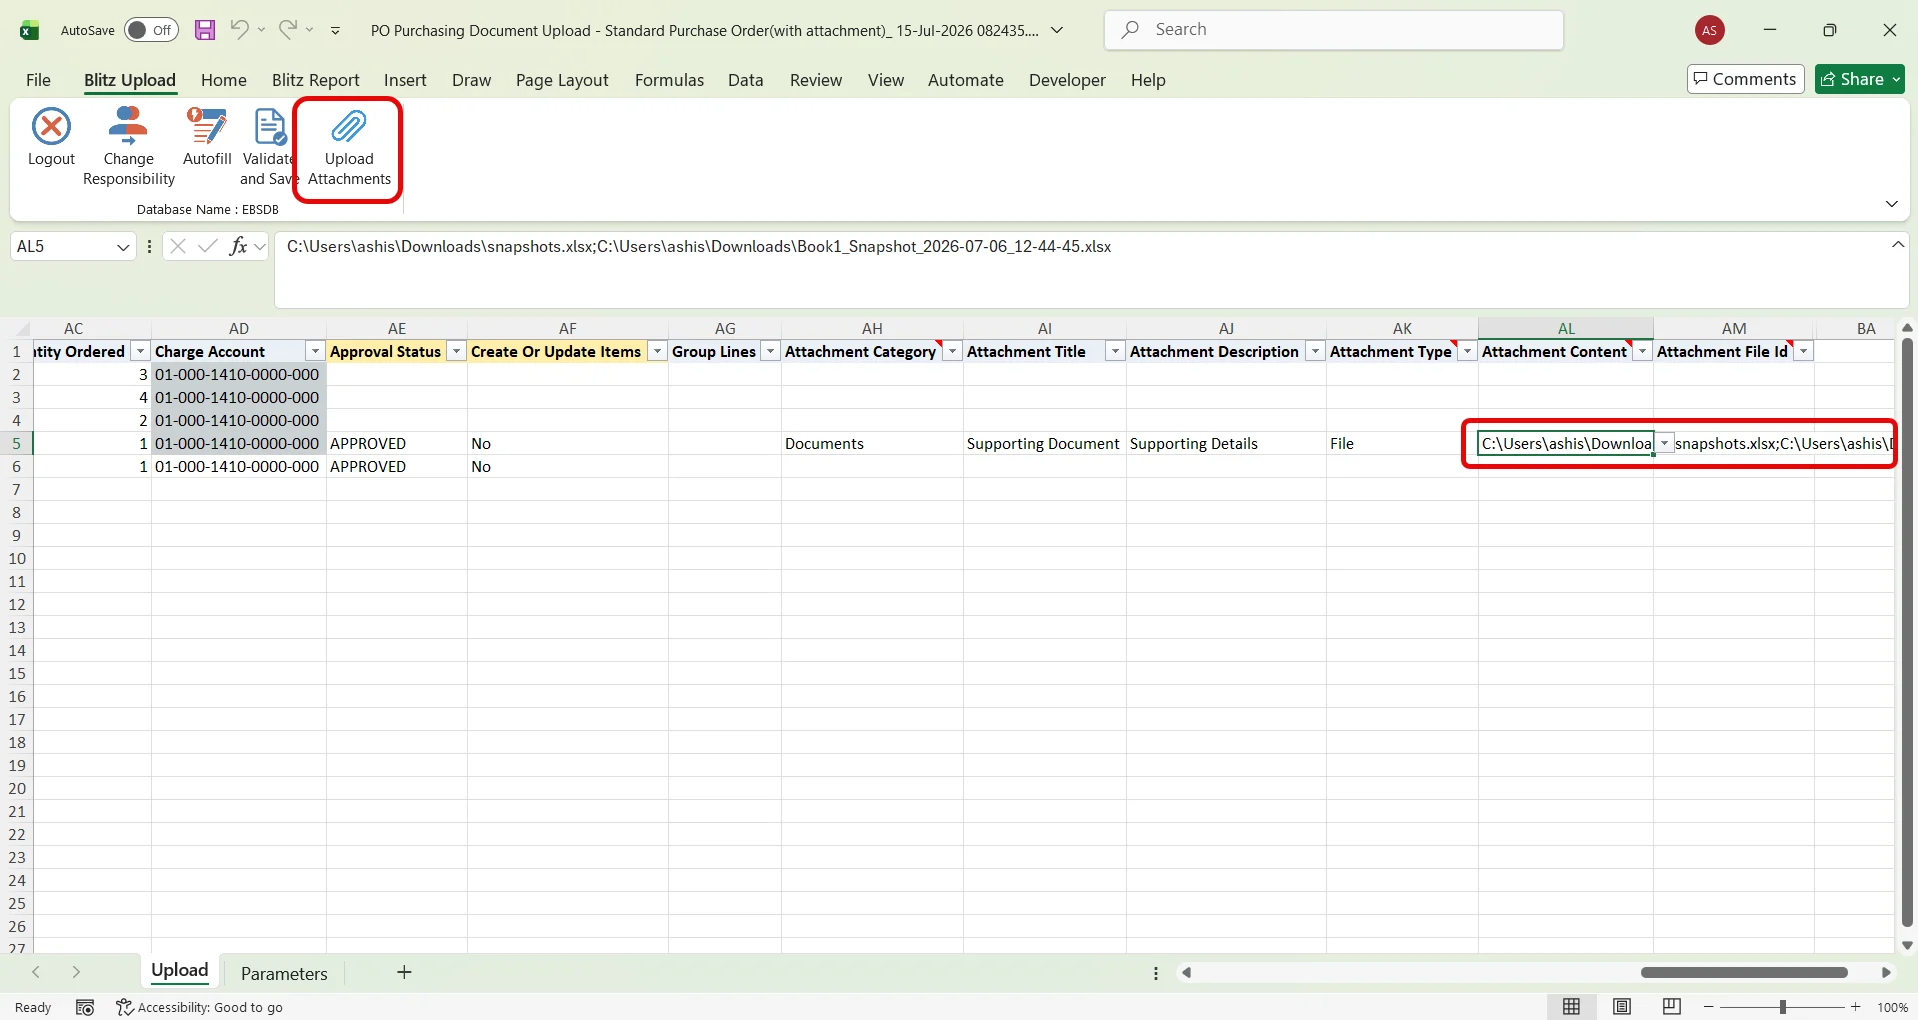
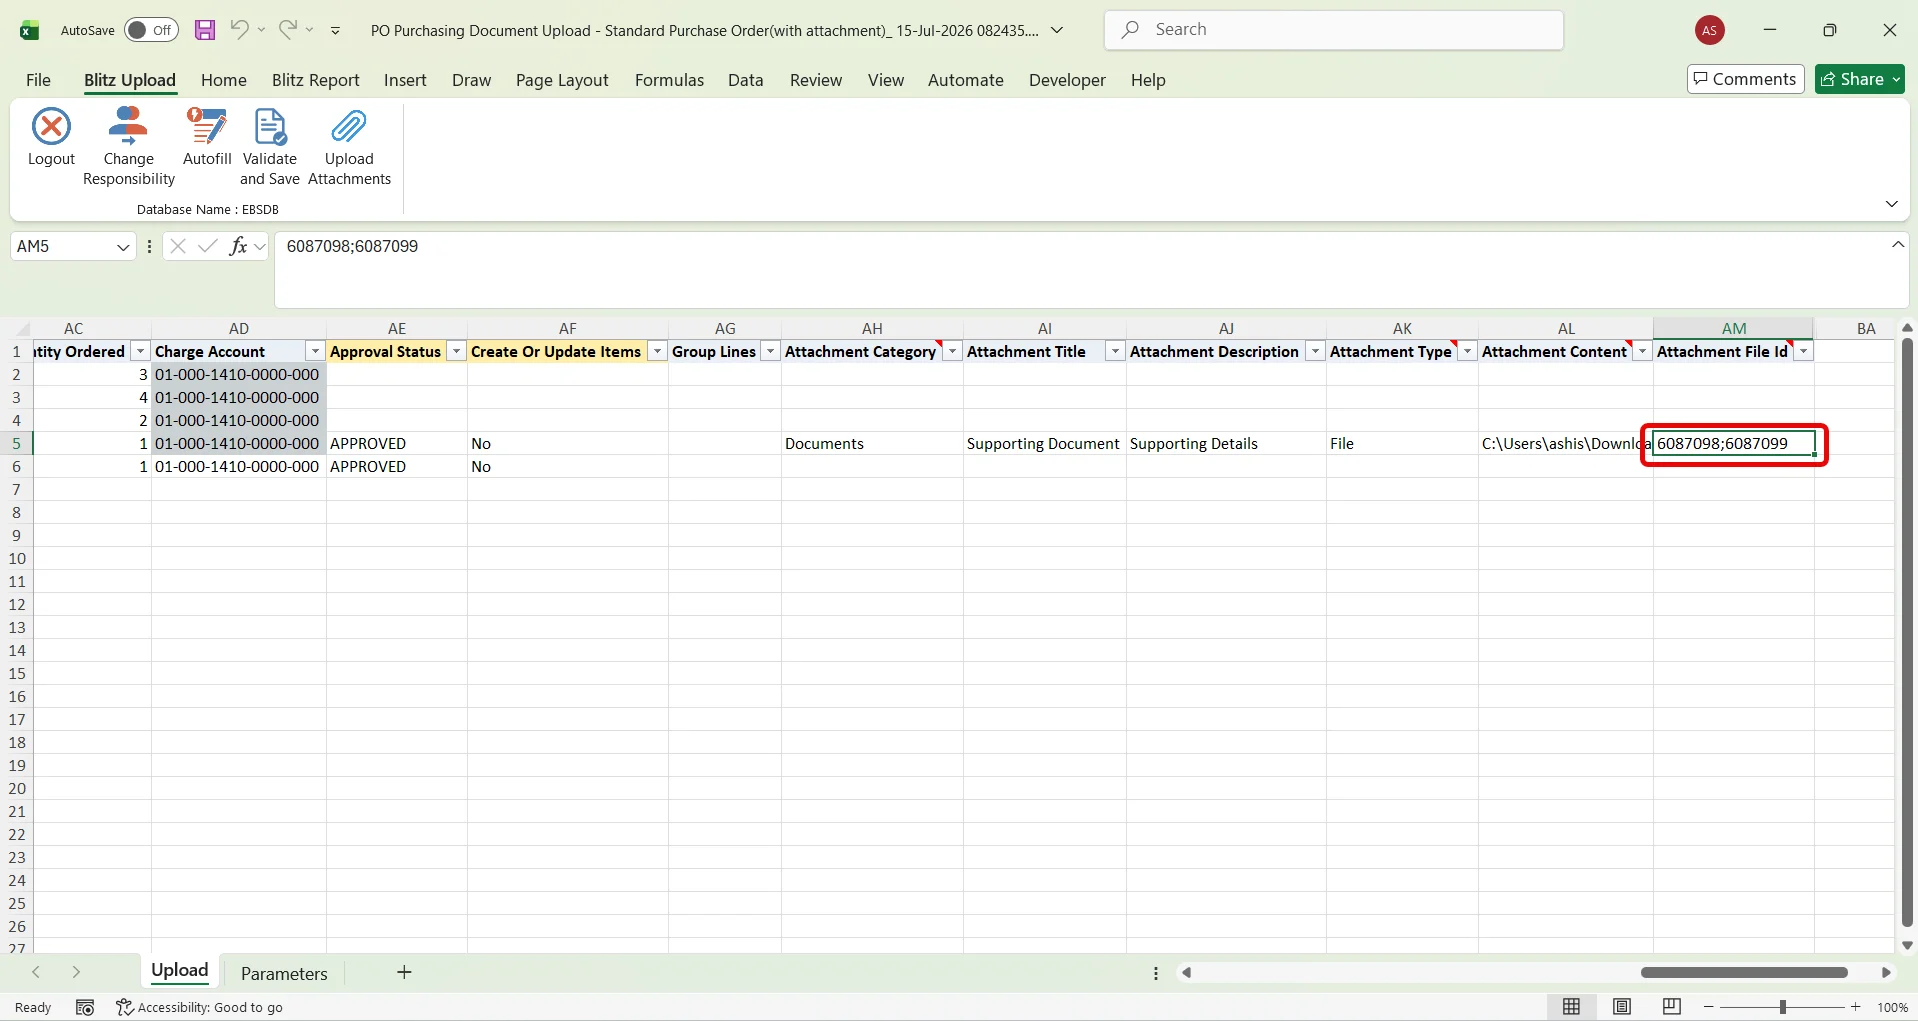
For uploads that support attachments, files can be attached to the uploaded records, for example scanned documents to created transactions. Enter the attachment details in the attachment columns, pick the files in the Attachment Content column, and click Upload Attachments. The files are stored against the records in Oracle EBS and the created file ids are written back to the sheet.
5.7 Scheduled uploads as an inbound interface
Besides interactive uploads from Excel, every Blitz Upload can also run unattended as an inbound interface. The Blitz Upload concurrent program can be scheduled with the standard EBS schedule options to pick up files from a server directory and process them automatically, so that other systems or users simply drop their upload files into a folder without logging in to Oracle EBS.
The schedule is defined with the following parameters:
| Parameter | Purpose |
|---|---|
| Report Name | The upload to process, for example AP Invoice Upload. |
| Template Name | Optional upload template defining the column layout of the incoming files. |
| Apps Tier File Directory | Directory path on the application server to pick up files from. Any network folder mounted on the application server can be used, and the result file is written back to the same directory. |
| File Name Starts With | Restricts processing to files starting with this text, so that several scheduled uploads can share the same directory. |
| Date Format, Numeric Format | Formats used to interpret date and number values in .csv and .xlsx files. |
| Email, Send email for error records | Sends the upload results to the entered email address. With Send email for error records set to Yes, emails are sent for files containing error records only. |
| Reprocess Error Files | Picks up previously failed files again, for example after correcting the cause of the error. |
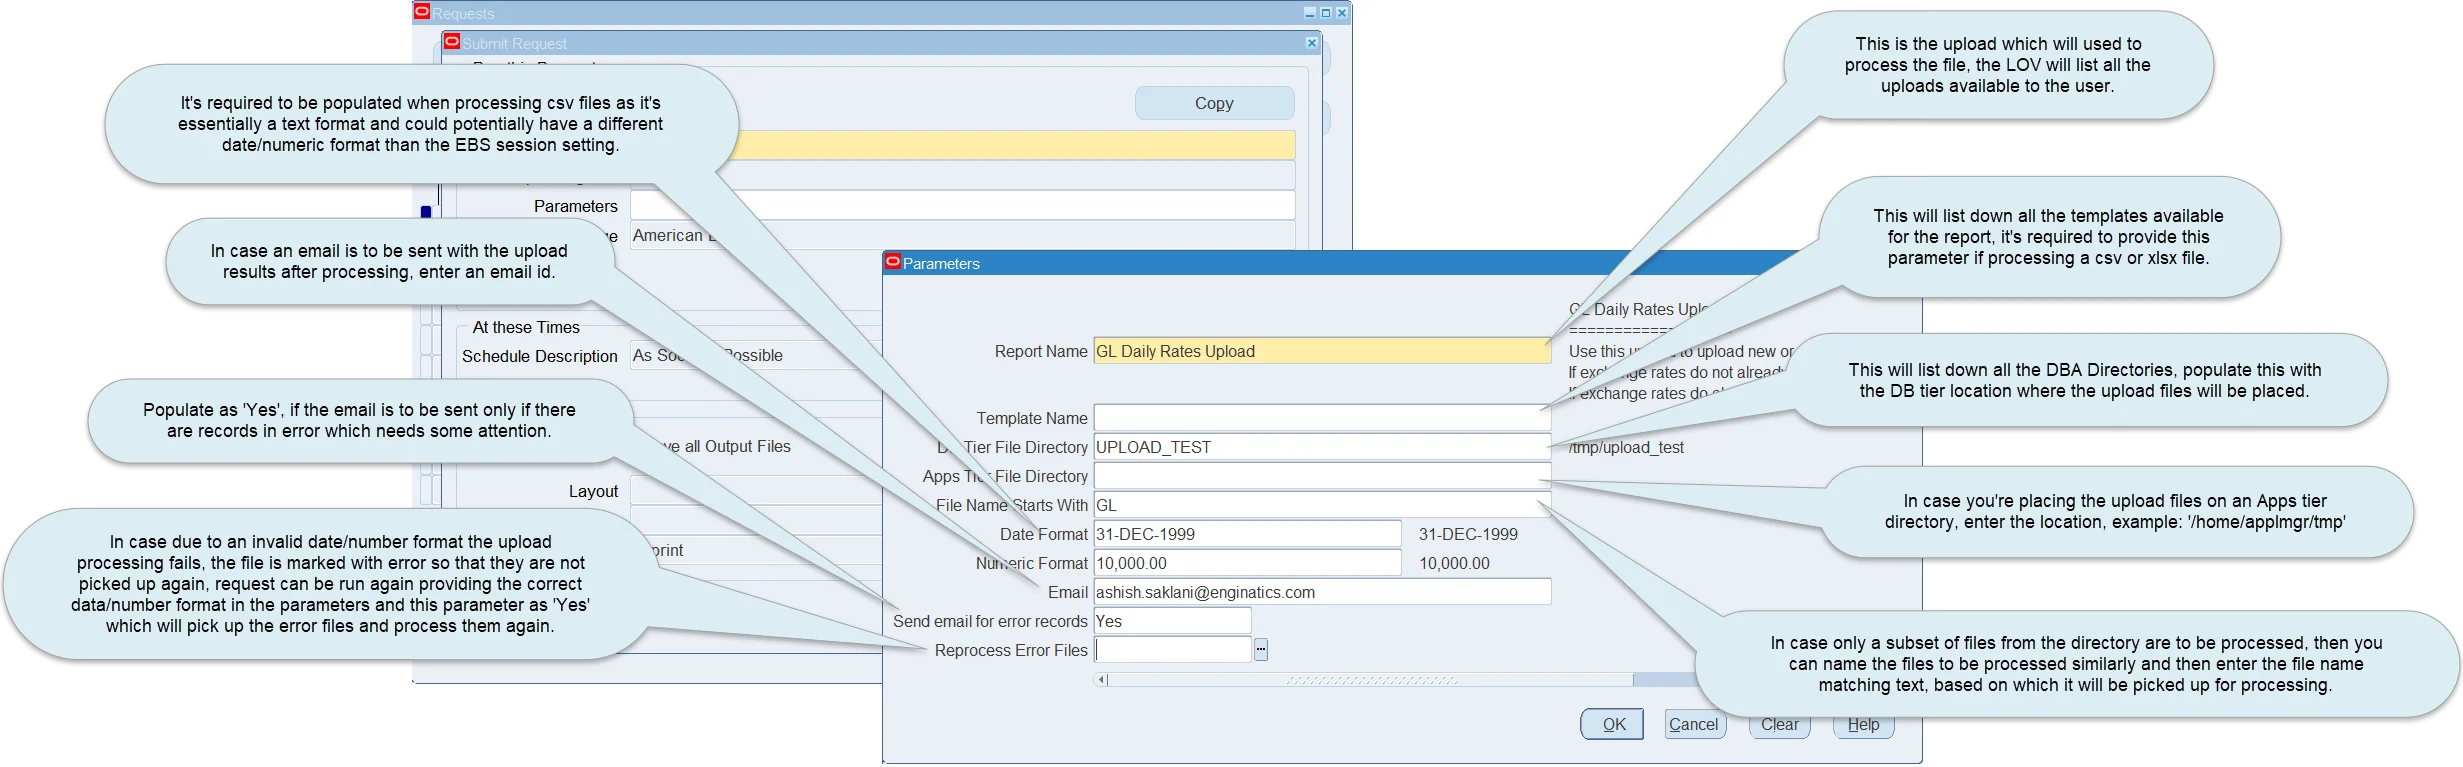
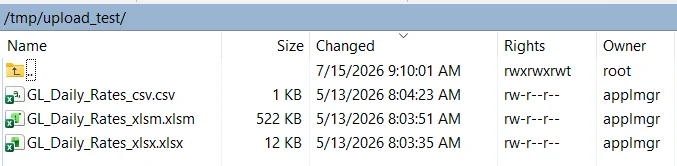
Each run scans the directory for new .xlsm, .xlsx and .csv files and validates and processes them with the same rules as an interactive upload. Values are mapped by column header name, so the files can be workbooks saved from the upload’s Excel template as well as plain .xlsx or .csv files created by another system, as long as their column headers match the upload’s columns.
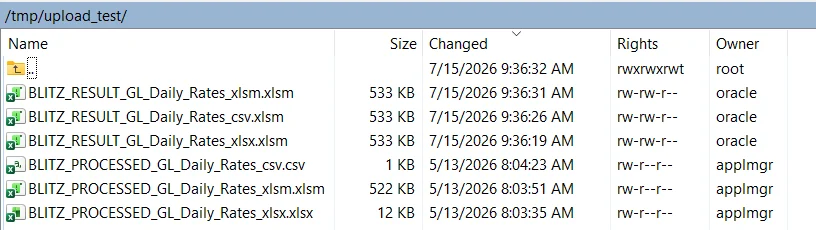
After processing, each file is renamed in place to show its outcome: the prefix BLITZ_PROCESSED_ is added when processing completed successfully, BLITZ_WARNING_ when it completed with warnings, for example when some records were rejected, and BLITZ_ERROR_ when processing failed. A result file with the prefix BLITZ_RESULT_ is written back to the directory, containing the processed records with their Status and Message columns, so the sending party can check the outcome of every record. Files prefixed BLITZ_ERROR_ are picked up again when the program is scheduled with Reprocess Error Files set to Yes.
6 GL Financial Statement and Drilldown (FSG)
The GL Financial Statement and Drilldown (FSG) Report empowers users to generate comprehensive reports on financial balances while providing detailed insights through drilldown capabilities. This tool allows users to link Excel cells directly to Oracle data via built-in functions, ensuring that data can be refreshed as needed to reflect the most up-to-date information.
Blitz FSG is part of the Blitz Report Excel Add-in. A statement is an ordinary Excel workbook, and the Blitz FSG tools appear on the Blitz Report tab whenever a statement sheet is active.
Key features include:
- Balance and Detail Reporting: Generate high-level balance reports and drill down into the details, including journal entries and subledger transactions.
- Oracle Data Integration: Seamlessly link Excel cells to Oracle data, with the ability to refresh the data for real-time updates.
- Drilldown Functionality: Access detailed information at various levels, including balances, journal entries, and subledger details.
- Migration Tools: Converters migrate Oracle FSG reports, and GL Wand and Spreadsheet Server workbooks, one workbook or a whole folder at a time.
- AI Integration: Microsoft 365 Copilot and Claude in Excel build, refresh and drill statements and explain variances, see AI integration.
For a quick demonstration, refer to our YouTube video: https://youtu.be/dsRWXT2bem8
6.1 Accessing Blitz FSG
Blitz FSG runs in the Blitz Report Excel Add-in, see Installing the add-in. Start a statement in Excel with the Financial Statement button, or by running the GL Financial Statement and Drilldown (FSG) report.
Creating a statement in Excel
- On the Blitz Report tab, click Login and connect to Oracle EBS, see Logging in.
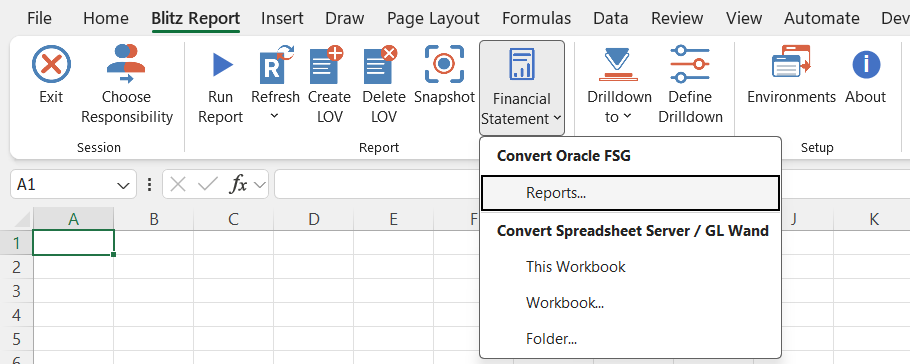
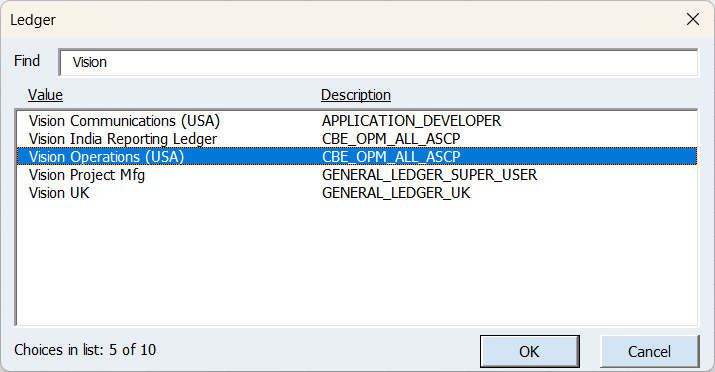
- Click Financial Statement and select the ledger. The list shows the ledgers your responsibilities give access to.
- The statement sheet is created in the active workbook, on the active sheet if that is empty, or in a new workbook if none is open.
- Build the statement with the Discover, List of Values and Insert Functions tools, or convert an Oracle FSG report or a GL Wand or Spreadsheet Server workbook from the Financial Statement dropdown, see Converter.
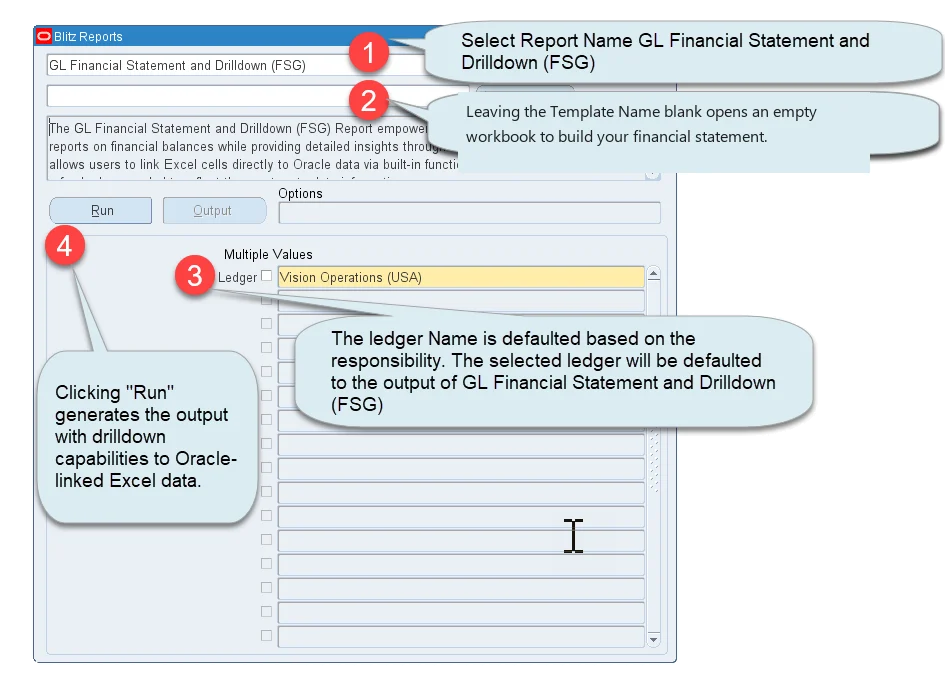
Running the GL Financial Statement and Drilldown (FSG) report with a blank template
1. Select Report Name GL Financial Statement and Drilldown (FSG).
2. Leave the Template Name blank.
3. The ledger Name is defaulted based on the responsibility. The selected ledger will be defaulted to the output of GL Financial Statement and Drilldown (FSG).
4. Click Run. An empty workbook opens, connected to Oracle, in which you build your financial statement, calculate balances or run account inquiries using the criteria sheets and the Blitz FSG tools on the Blitz Report tab.
5. Build your templates either by converting from a legacy tool or with the Blitz FSG tools on the Blitz Report tab.

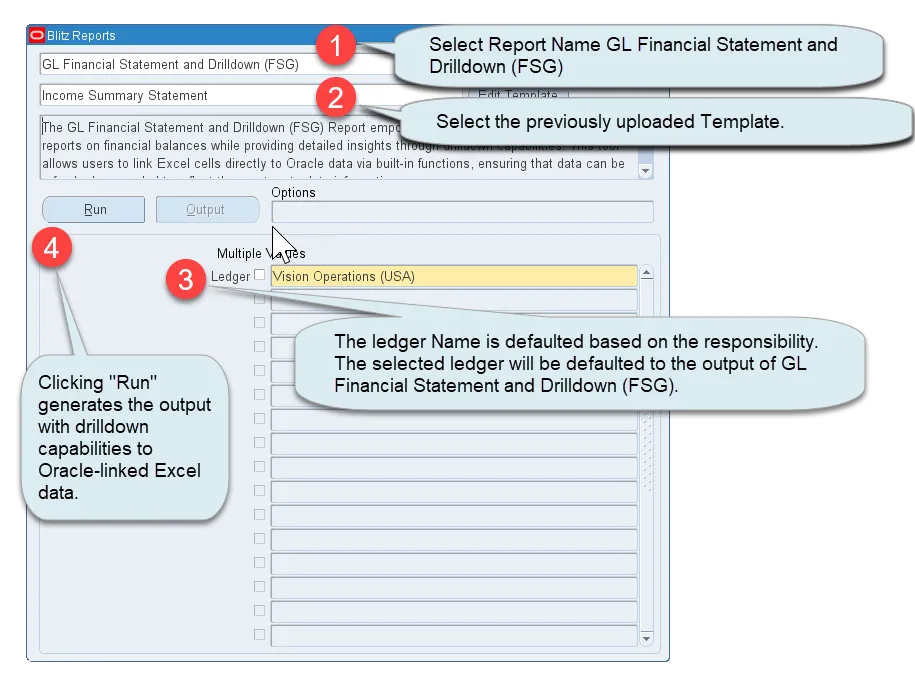
Running the GL Financial Statement and Drilldown (FSG) Report for uploaded templates in Blitz Report
- Select Report Name GL Financial Statement and Drilldown (FSG).
- Select the previously uploaded Template.
- The ledger Name is defaulted based on the responsibility. The selected ledger will be defaulted to the output of GL Financial Statement and Drilldown (FSG).
- Clicking ‘Run’ generates the output with drilldown capabilities to Oracle-linked Excel data.
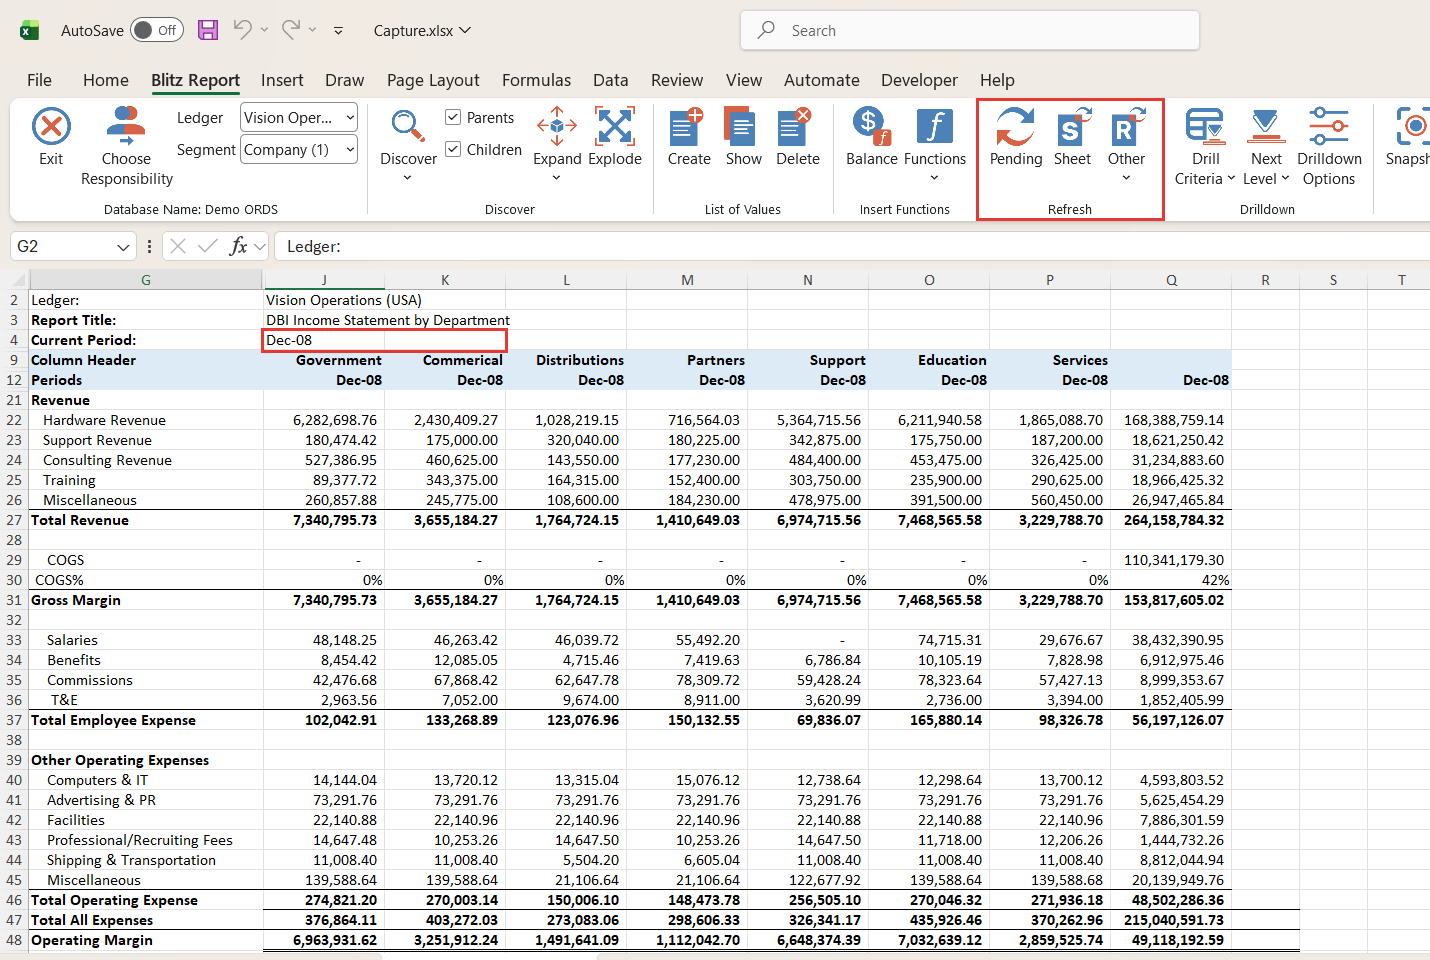
- Customize report parameters (e.g., Segment, Company, Period Name) to fit your analysis needs.
- Update Financial Data Instantly with Blitz FSG’s Refresh Tools.
Running the GL Financial Statement and Drilldown (FSG) Report for templates stored locally
The template can be built and stored locally on your computer or saved to a shared drive for team access. Locate and open the template file.
Open the file in Excel and click Login on the Blitz Report tab, see Connecting through the browser. Each statement sheet keeps the environment, ledger and responsibility it was built with.
Statements from the standalone Blitz FSG workbook
Statements saved from the macro-enabled Blitz FSG workbook (.xlsm) are converted for the add-in in one step: open the file and click Convert to Add-in on the Blitz Report tab. A macro-free copy with the same name and the extension .xlsx is saved next to it and opened in its place, and the original is closed unchanged. Formulas, formatting, lists of values and the statement’s ledger and environment are carried over.
Connecting through the browser
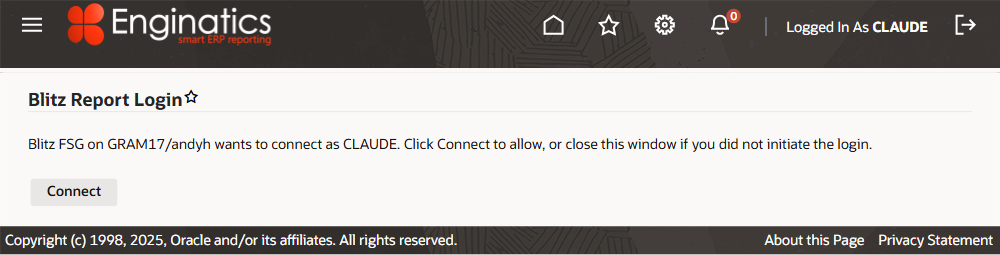
Blitz FSG uses the login of the Blitz Report Excel Add-in: click Login on the Blitz Report tab, select the environment, sign in to EBS in your default browser, including single sign-on, and click Connect on the page that follows. See Logging in for the other login methods.
Connection status
The first group of the Blitz Report tab shows the environment of the active statement, for example Database Name: PROD.
Exit
Click Exit on the Blitz Report tab to end the connection to Oracle EBS.
6.2 Responsibility, Ledger and Segment Selector
Once logged in, the Ledger and Segment dropdowns in the first group of the Blitz Report tab are populated based on your assigned responsibilities. The responsibility is defaulted with the responsibility from which the report was run.

Choose Responsibility
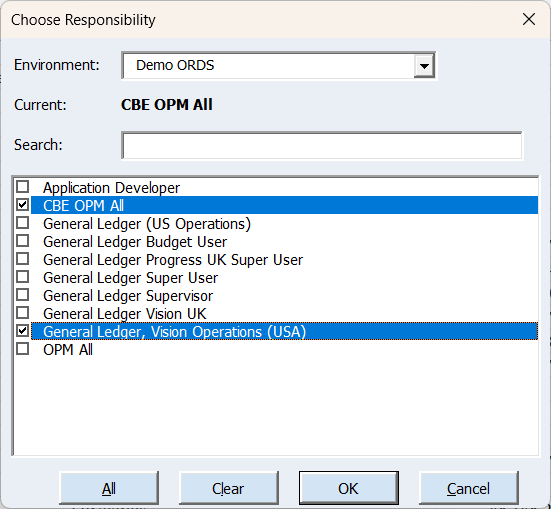
Click Choose Responsibility. The list displays all responsibilities you have access to in Oracle, including those with Account Inquiry functionality. By default, the system selects the responsibility from which the report was launched.
You can:
- Select a different responsibility using the checkboxes
- Tick all responsibilities with All, or remove the ticks with Clear
After making your selection, click OK to load the corresponding ledgers in the dropdown. Your selection will be saved and automatically set as the default for future use.
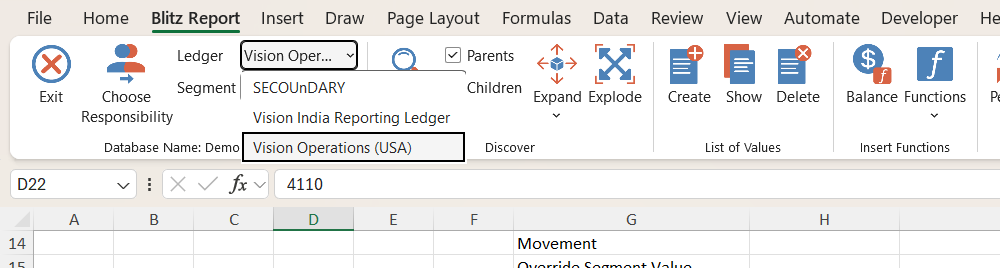
Ledger
The Ledger dropdown dynamically displays available ledgers according to your access permissions:
- Single Responsibility Access: Shows only ledgers assigned to your current responsibility
- Multiple Responsibilities: Lists all ledgers from all responsibilities you’ve selected
- Oracle R12 Environment: If selected responsibility’s data access set contains multiple ledgers, all will appear.
Until the ledger list has been loaded, the dropdown shows Choose ledger…, which opens it.
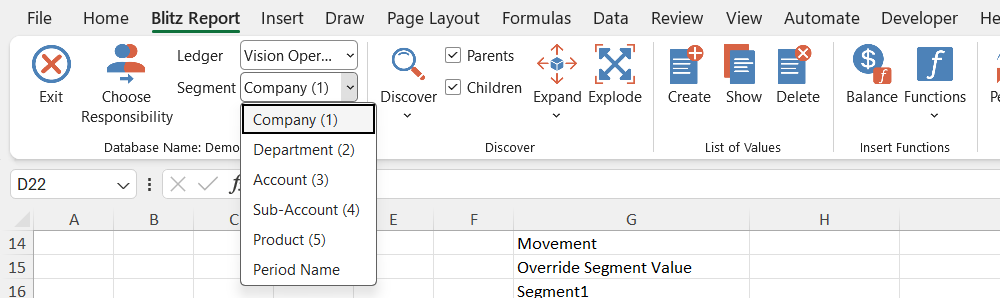
Segment
The dropdown list displays all available segments for the currently selected ledger. Each segment is labeled with its corresponding segment number in parentheses (e.g., ‘Company (1)’). Its last entry, Period Name, is used to discover period names.
6.3 Discover
The Discover Tools enable you to:
- Extract segment information directly from Oracle
- Automatically populate Excel cells with the retrieved data

Discover
This feature enables you to:
- Populate Excel spreadsheets directly with chart of accounts values and period name.
- Streamline report building and segment value review processes
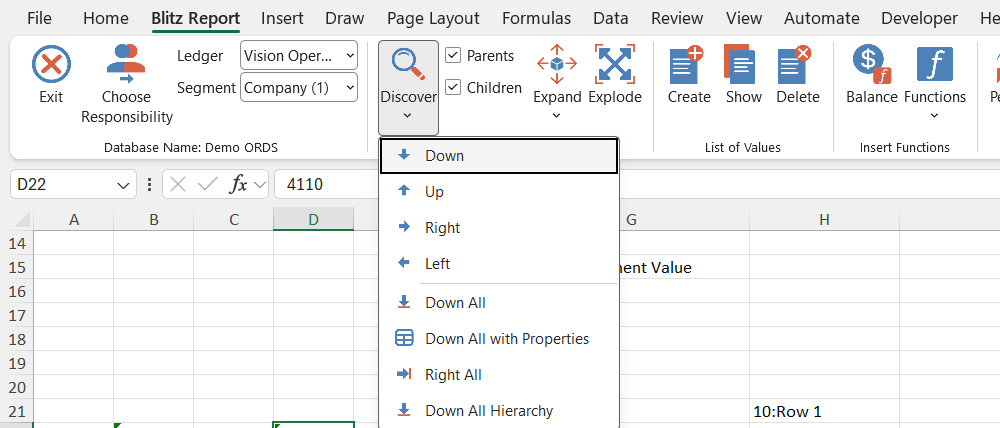
Key Features:
- Automatic population of adjacent cells (down or to the right)
- Configurable hierarchy discovery:
- Child values only
- Parent values only
(Adjust via Discover Level setting check the box to decide the level)
| Down | Discover Down value for the currently selected segment or period. |
| Up | Discover the previous value Up for the currently selected segment or period. |
| Right | Discover the next value to the Right for the currently selected segment or period. |
| Left | Discover the previous value to the Left for the currently selected segment or period. |
| Down All | Discover All segment values Down for the currently selected segment. |
| Down All with properties | Down All with properties allows a variety of information to be extracted about the selected segment values. The following information will be populated in the cells to the right of the segment value:
|
| Right All | Discover All segment values to the Right for the currently selected segment. |
| Down All Hierarchy | Discovers the complete hierarchy of the currently selected segment downwards — parent values together with the child values beneath them — rather than a flat list of values. Use this when the report should mirror the account hierarchy as it is defined in Oracle. |
Discover Functionality Best Practices:
- Segment Matching
Ensure the segment selected in the Ledger and Segment Selector matches the segment in your active Excel cell. - Parent Values Identification
- Parent values appear in bold font
- Regular font indicates child values
- Batch Discovery. To discover multiple values simultaneously:
- Highlight a range of cells
- Click any discover button
- Complete Value Discovery. For all available values:
- Use Discover Down All (vertical)
- Or Discover Right All (horizontal)
- Text Format Requirement. All segment values must be in text format to preserve formatting:
- Option 1: Pre-format cells as Text (Number Format > Text)
- Option 2: Prefix values with an apostrophe (‘)
- Example: For “001”, enter ‘001
- Note: Without this, leading zeros will be lost and discovery may fail
Expand
To expand to child segment values:
- Select a cell containing a parent segment (e.g., ‘Account(3)’) value
- Ensure adjacent columns contain related Blitz FSG functions (segment description, balance, etc.)
- Click ‘Expand > Down’ to reveal all child values in the hierarchy”
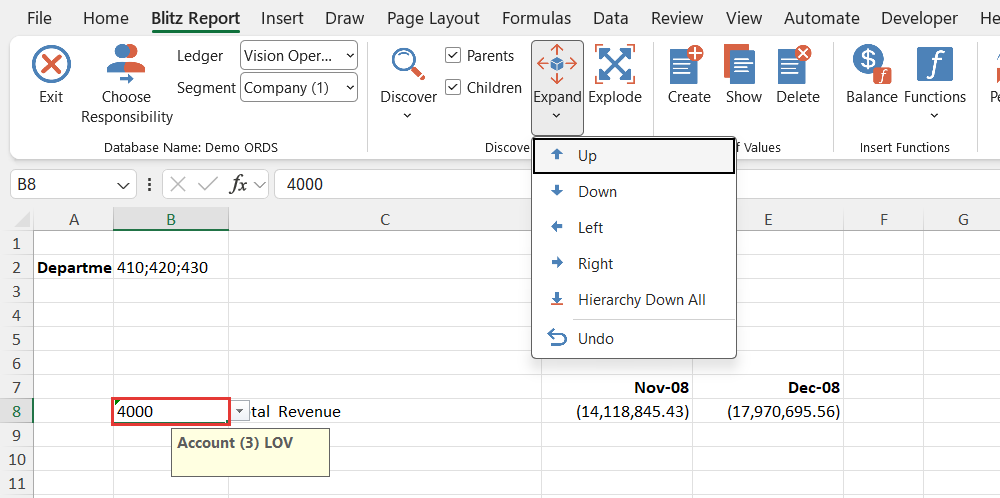
When expanded, the child values will be inserted while automatically copying all adjacent formulas and content to the new rows.
Multi-Row Expand Option
You can select multiple rows before executing an Expand operation. Blitz FSG will automatically expand each selected row individually.
Hierarchy Down All
Expands the selected parent value through every level of its hierarchy in one action, inserting a row for each descendant value. Adjacent formulas and content are copied to the new rows in the same way as a single-level Expand.
Undo
Clicking Undo Expand removes the results of the most recent Expand operation.
- Supports multiple undo levels.
- Repeated clicks will step backward through previous Expand results.
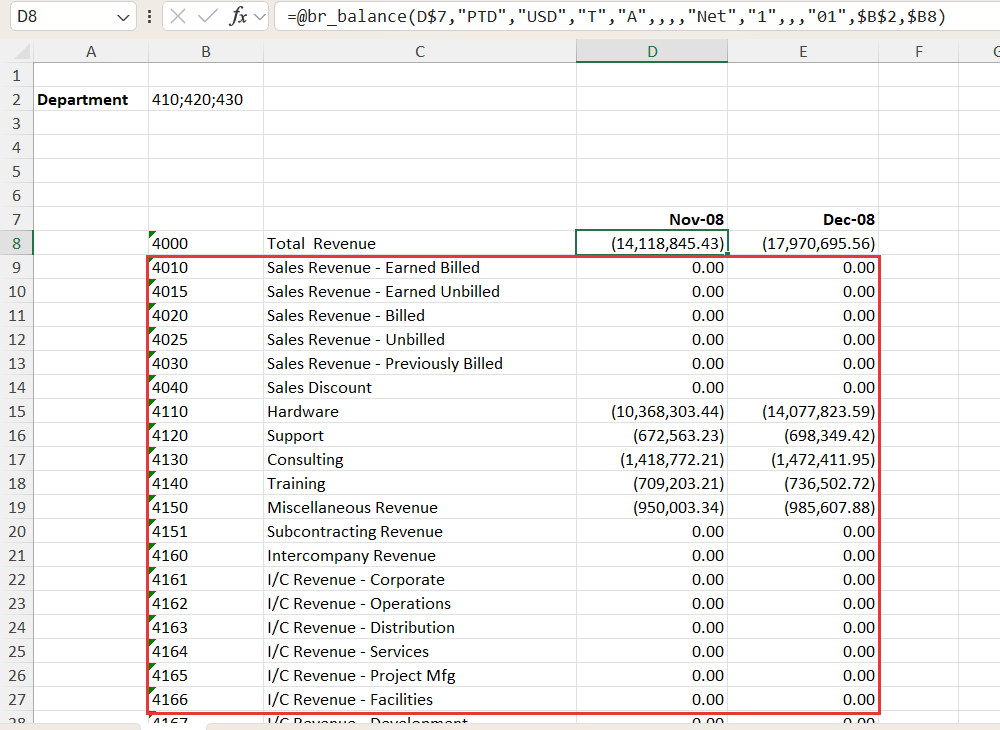
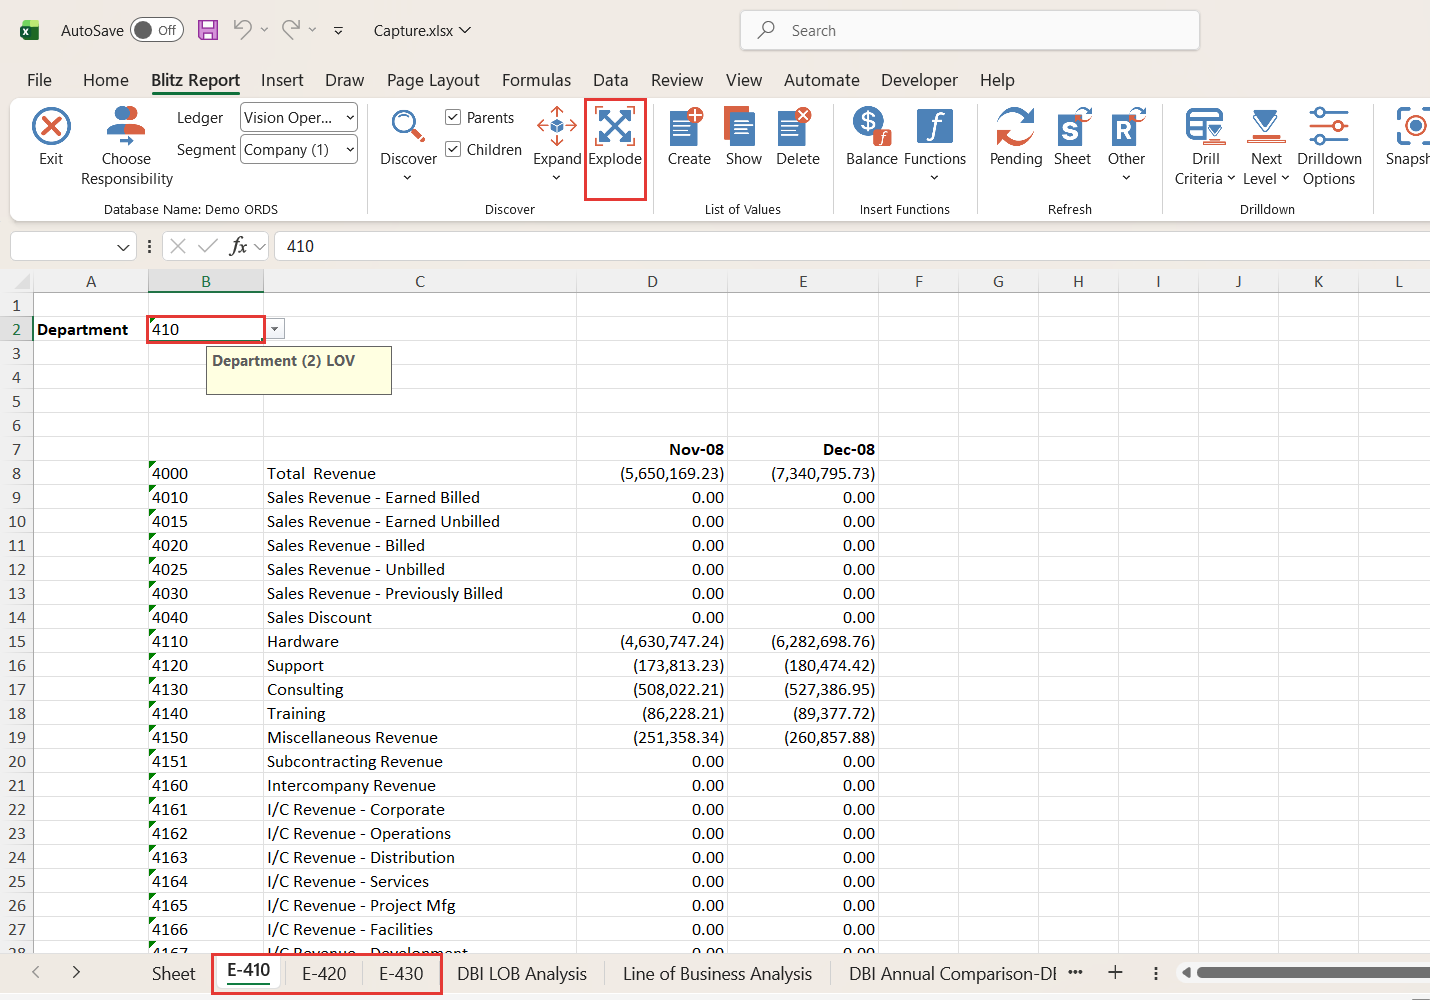
Explode
The Explode feature duplicates the current worksheet for each child value of your selection. Your selection can be:
- Parent segment value
- Segment Value range
- Child segment Value
- Any combination of these
- Select a cell containing a segment value (e.g., a parent account)
- Choose the corresponding segment from the list (e.g., “Department”)
- On Click of Explode button, Blitz FSG will –
- Retrieve all child values from Oracle
- And create a new worksheet for each child value in the current workbook

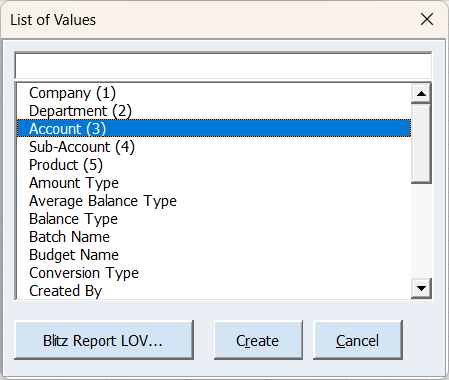
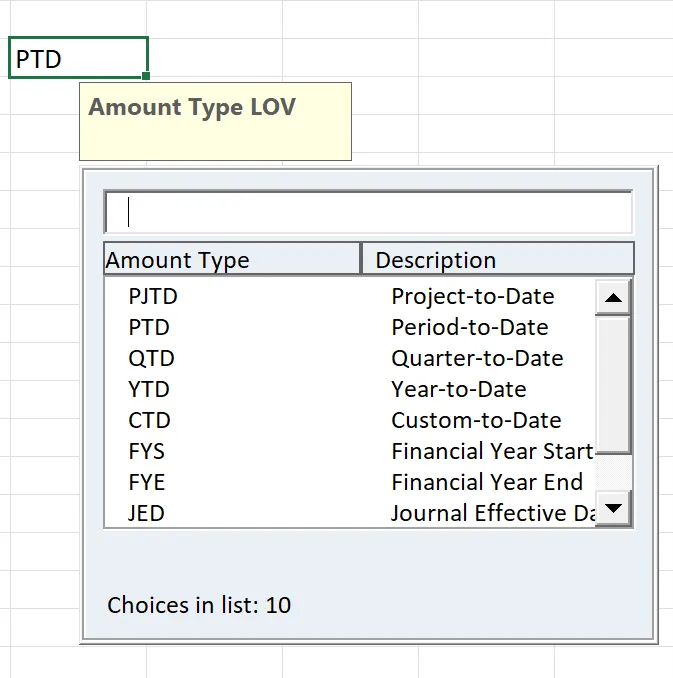
The ‘Create’ feature converts a cell into a List of Values (LOV) cell, marked by a note prefixed with the LOV name (e.g., ‘Amount Type LOV’, ‘Company (1) LOV’). In the window that opens, select the list and click Create, or click Blitz Report LOV… to attach any Blitz Report list of values.
To access the values:
- Double-click the cell, or
- Select the cell and click ‘Show’ from List of Values on the ribbon.
The LOV will display values specific to the data type assigned to that LOV cell.
There are 3 different types of List of Values:
Single Value
- Refine selections using the search field or select from the list.
- Click OK to apply selections to the cell.
Multiple Value
- Select values individually or use Add Range for bulk inclusion.
- Exclude specific entries with Add Exclude.
- Refine selections using the search field.
- Click OK to apply selections to the cell.
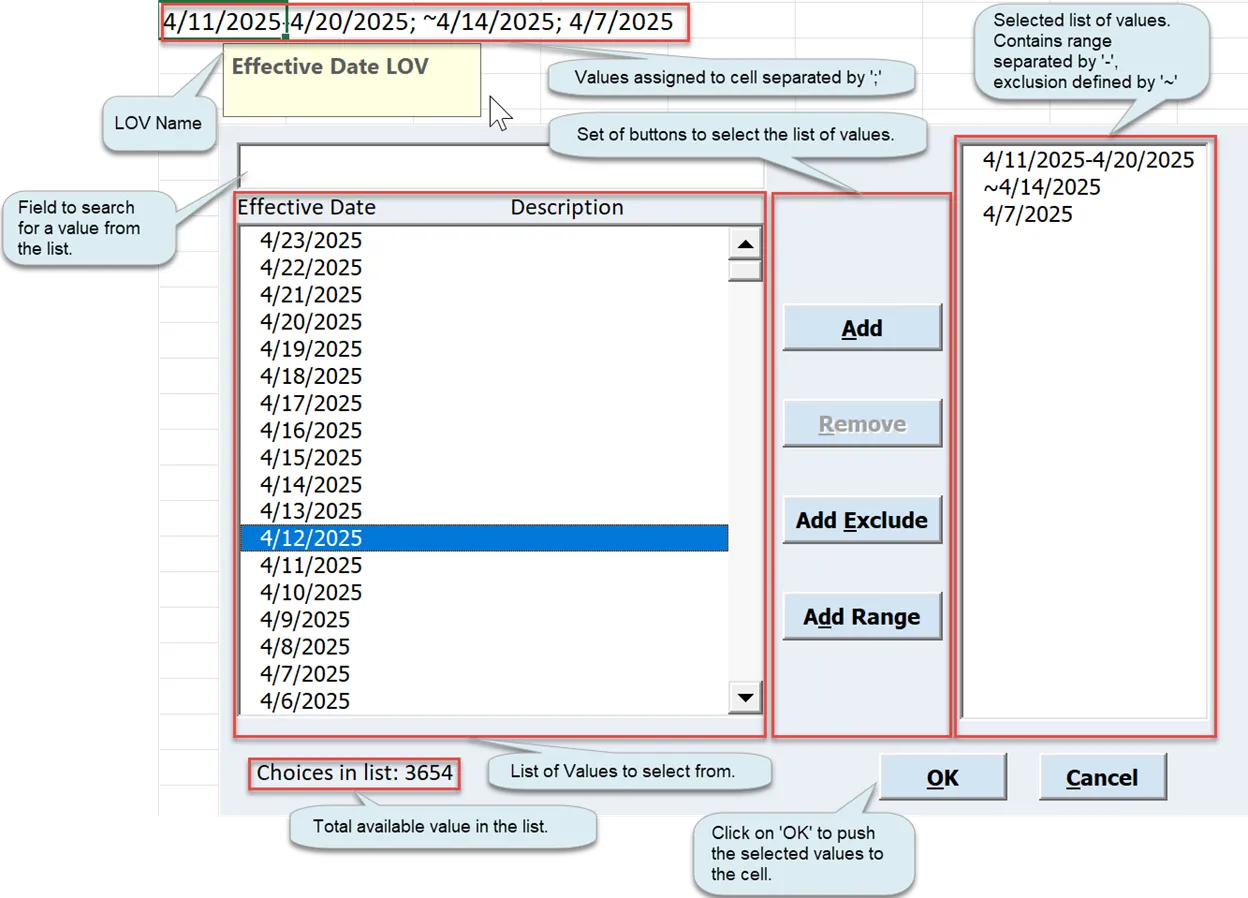
Note: The format rules are as followed:
- Range: Defined with a hyphen (-).
Example: 4/11/2025-4/20/2025 - Exclusion: Prefix with a tilde (~). Applies to single values or
Examples:- Single: ~4/14/2025
- Range: ~4/11/2025-4/20/2025
- Multiple Values on the cells: Separated by semicolons (;).
Example: 4/11/2025; 4/20/2025
Segment Values
The Segment List of Values (LOV) enables selecting account ranges or individual values. It supports hierarchical navigation, multi-selection, and exclusions.
- You could select a hierarchy (e.g., Cash and Short Term Equivalents) to narrow the account list.
- Select values individually or use Add Range for bulk inclusion.
- Exclude specific entries with Add Exclude.
- Refine selections using the search field.
- Click OK to apply selections to the cell.
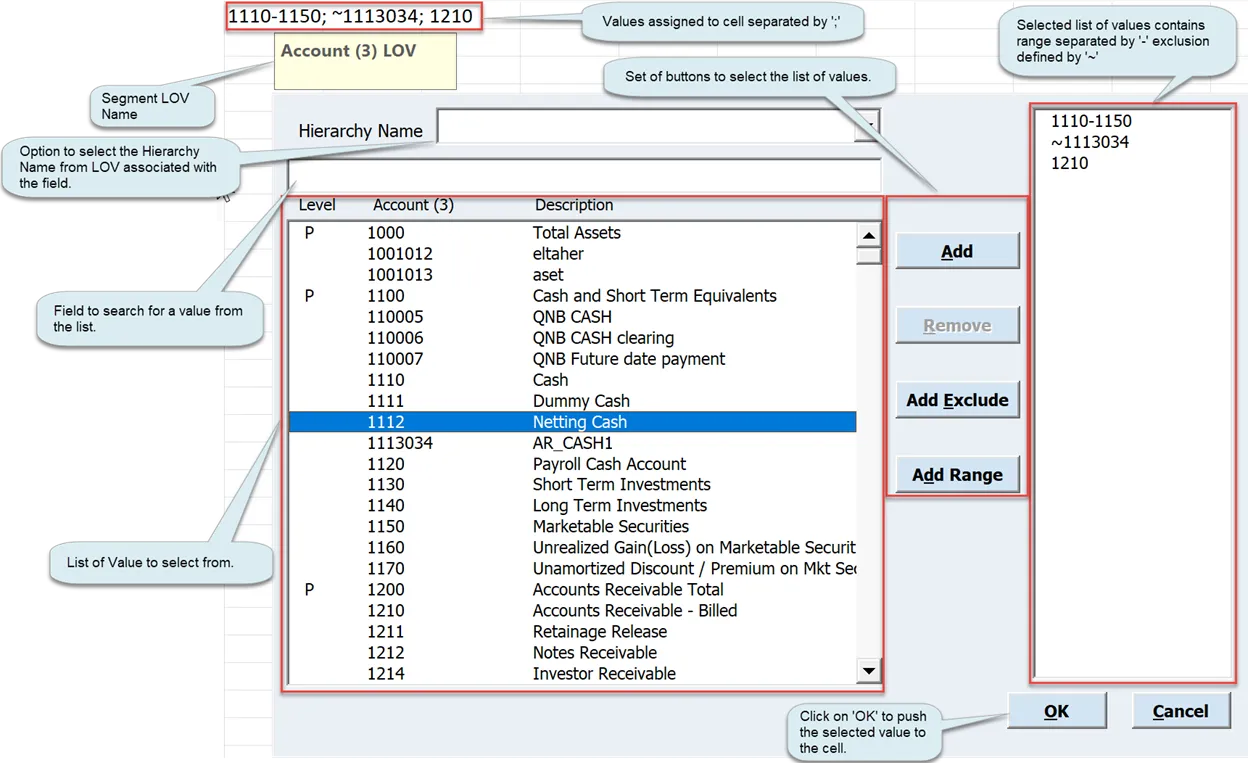
Note: The format rules are as followed:
- Range: Defined with a hyphen (-).
Example: 1110-1150 - Exclusion: Prefix with a tilde (~). Applies to single values or
Examples:- Single: ~1113034
- Range: ~1110-1120
- Multiple Values on the cells: Separated by semicolons (;).
Example: 1110-1150;1210;1211;~1111;~1120-1130
Adding Range in Multiple Values and Segment List of Values
1. First select multiple values from the list, then click ‘Add Range’ to form your chosen value range.
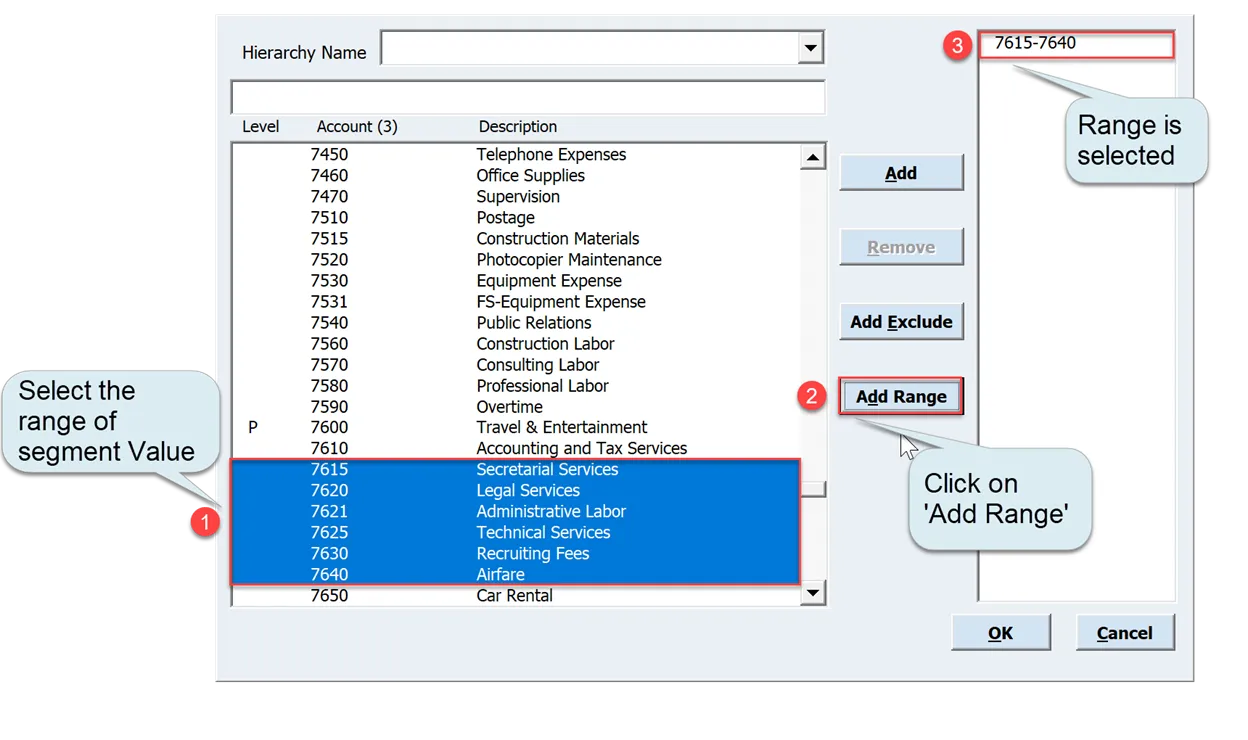
2. First select multiple values from the list, then click ‘Add Range’ to form your chosen value range.
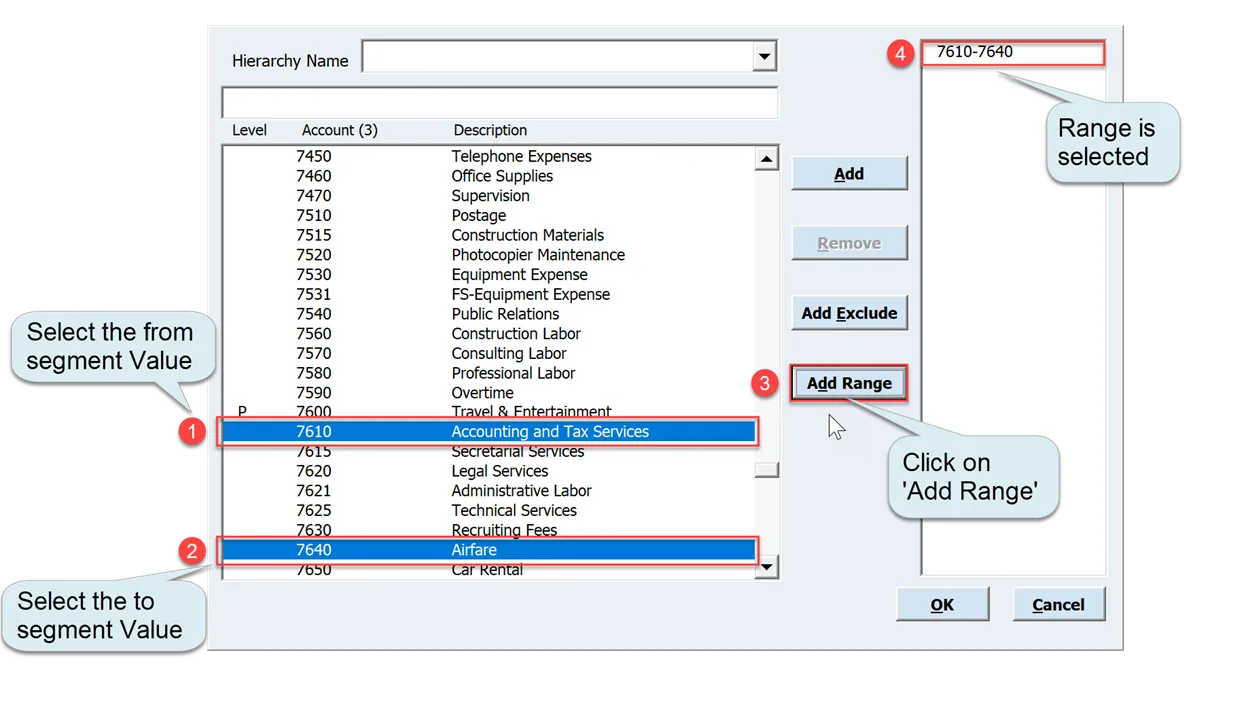
3. Select and ‘Add’ the from value, then the to value, click on selected value and finally click on ‘Add Range’ to form your chosen value range.
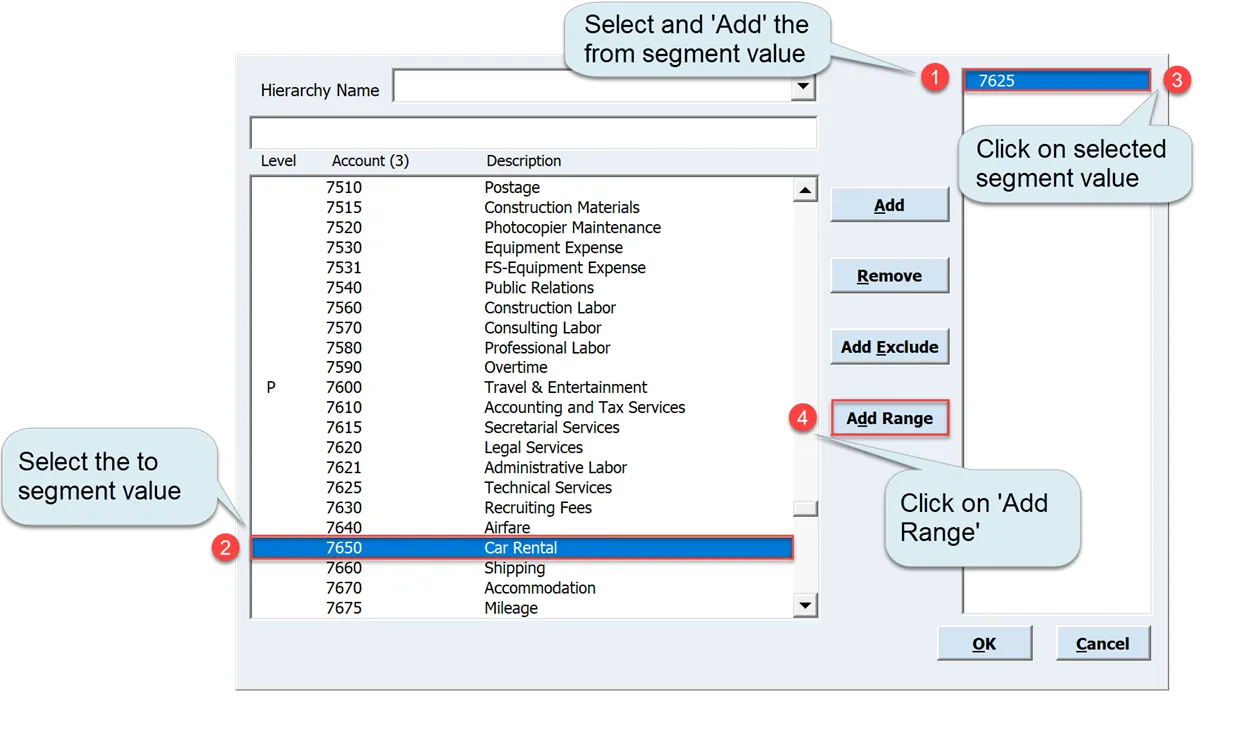
4. Select and ‘Add Exclude’ the from value, then the to value, click on selected value and finally click on ‘Add Range’ to form your chosen value range.

Delete List of Values
To delete the list of values from the cell then you can click on ‘Delete’ from List of Values on the ribbon.
6.5 Insert Functions
Blitz FSG provides a suite of custom Excel functions that enable dynamic data extraction from Oracle. To use these functions click on dedicated function button like ‘Balance’ or select one from the ‘Functions’ dropdown menu.
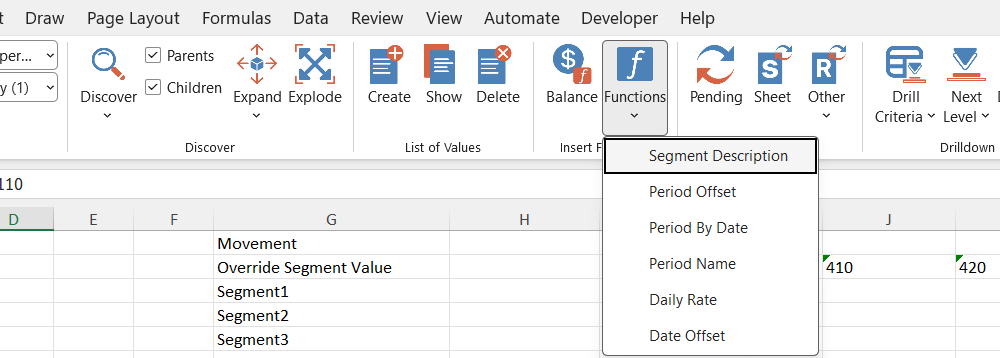
Using the Function Form
- Parameter Selection
- Choose values from list of values, which are dynamically populated with:
- Valid options for each parameter pulled directly from Oracle.
- Cell Referencing
- Click the Link button to bind a parameter to an Excel cell.
- For ranges: Press F4 to toggle between absolute/relative referencing (standard Excel behavior).
- The field highlighted yellow are required parameters.
- Range: Defined with a hyphen (-).
Example: 1110-1150 - Exclusion: Prefix with a tilde (~). Applies to single values or
Examples:- Single: ~1113034
- Range: ~1110-1120
- Multiple Values on the cells: Separated by semicolons (;).
- If you want to choose all the values you could choose to keep the parameter as blank, this is same as passing ‘%’
Balance
As the cornerstone of Blitz FSG, the Balance function retrieves General Ledger balances—either individually or aggregated—based on your specified parameters. To begin, click the Balance button on the Blitz FSG toolbar to open the function form.
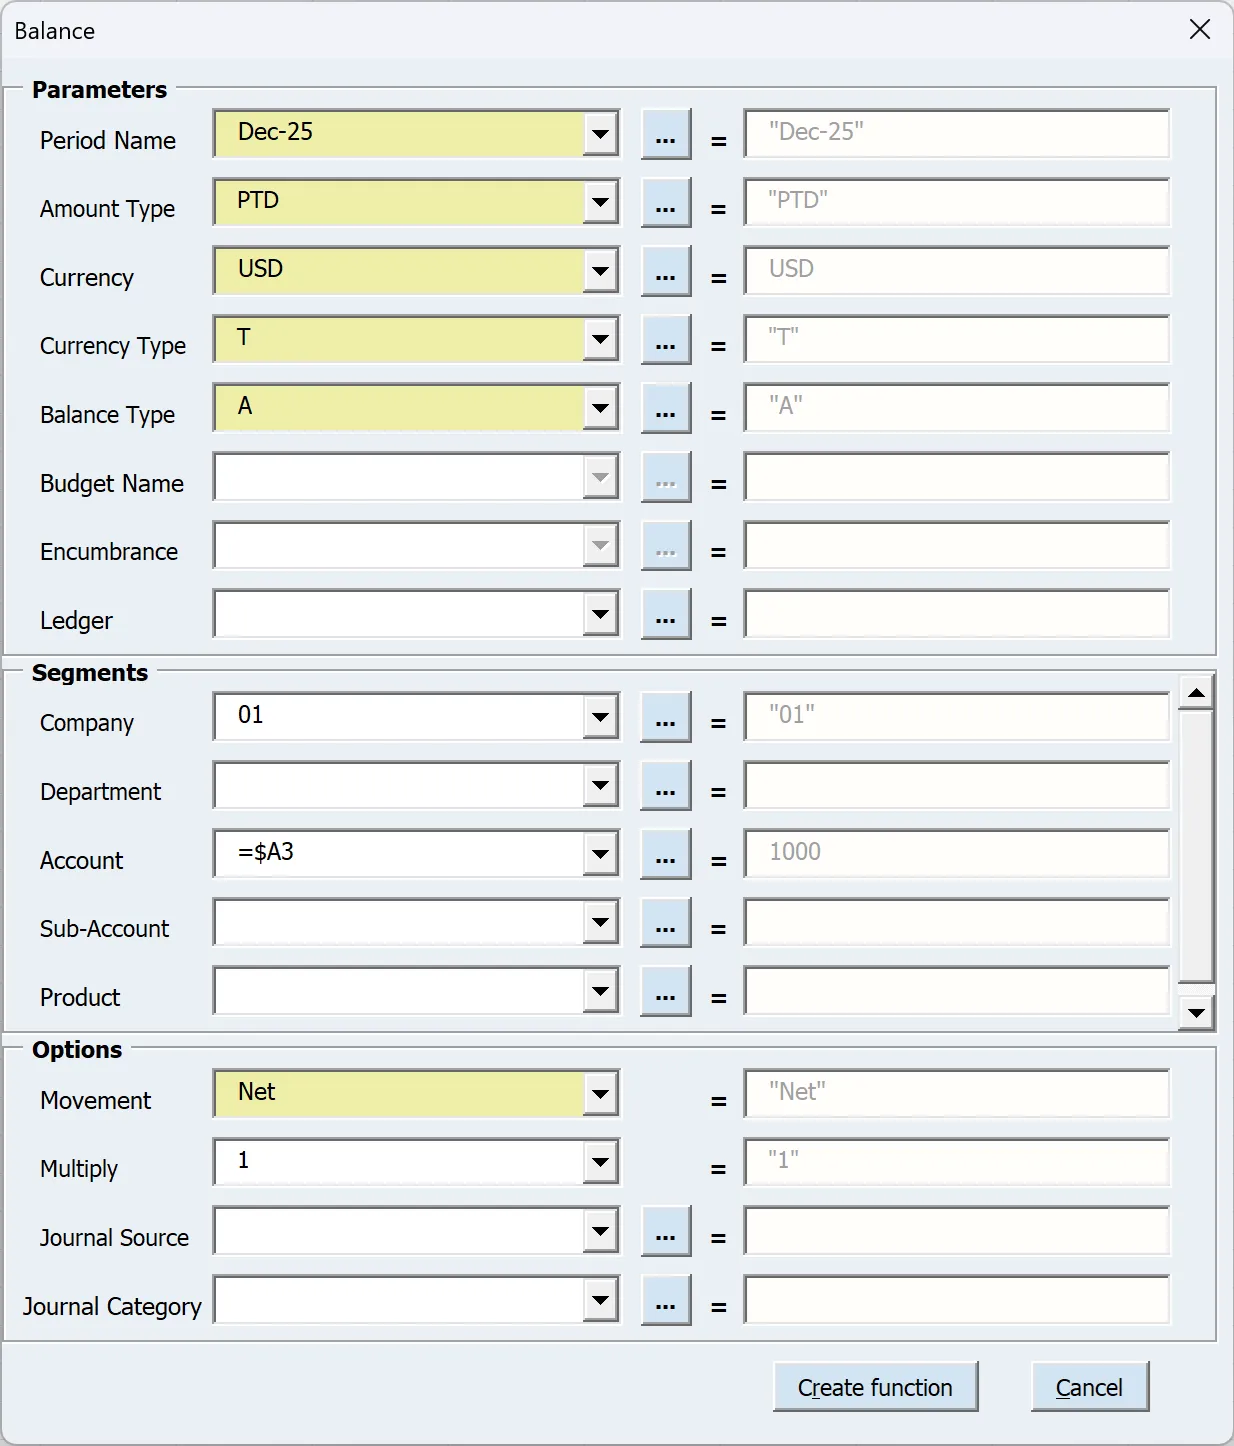
Formula : br_balance(“Dec-25″,”PTD”,”USD”,”T”,”A”,,,,”Net”,”1″,,,”01″,,$A3,,,,,,,,,,,,,,,,,)
Parameters:
| Period Name | The period name must exactly match the format configured in Oracle. For instance, if your Oracle system uses “Jan-07” as the period format, entering variations like “JAN-2007”, “January-07”, or “jan-07” will result in no data being returned and will trigger an “invalid (Period)” message. When used with the custom balance type CTD (Custom to Date), you can specify a custom period range such as “Feb-07-Aug-07” to aggregate movement data across multiple periods. This parameter supports multiple period ranges and lists, including wildcard entries like “Jan-0%” or “%-07” for flexible period matching. For the special balance types “JED”, “JEDU”, or “JEDP” (Journal Effective Date), the period parameter functions as a date parameter, accepting entries like “01/01/2007-05/01/2007;10/01/2007”. The date format is critical—the hyphen (“-“) serves as a range delimiter in Blitz FSG and cannot be used as a date separator. For example, “01-01-2007” would be invalid if your Windows regional settings use hyphens as date delimiters. To avoid issues, we recommend using slashes (“/”) as date separators and formatting dates as text in Excel to prevent automatic conversion based on regional settings. |
| Amount Type | Balance Type Parameters (All values must be in uppercase):
|
| Currency | Oracle currency code (uppercase) – Example: USD |
| Currency Type | Use the following codes to specify which Currency type to retrieve:
|
| Balance Type | A – Actual, B – Budget, E – Encumbrance. |
| Budget Name | If Balance Type is selected as ‘B’, this field will be enabled for input. Enter one or more budget names, separating multiple entries with the designated list delimiter character. |
| Encumbrance | If Balance Type is selected as ‘E’, this field will be enabled for input. Enter one or more encumbrance types, separating multiple entries with the designated list delimiter character. |
| Ledger | If this parameter is left blank, the system will calculate balances using the ledger selected in the dropdown menu. The ledger dropdown values are dynamically populated based on your assigned responsibilities. Note that changing the ledger selection will automatically trigger a re-evaluation of the Segments parameter. |
| Segments (1-20) | Enter segment value in these fields. Format the value exactly as configured in Oracle, including all leading zeros (e.g., enter “0010” for a four-character segment where Oracle stores “10” with leading zeros). Accepted Formats:
Note: Leave blank or enter “%” to include all possible values Lists always function as OR conditions (e.g., “1110;1210” returns accounts matching either value) Changing ledger selections may affect available segment values |
| Movement | Debit – Dr, Credit – Cr, Both – Net |
| Multiply | 1 or -1– Use this parameter to switch the sign of the balance |
| Journal Source | Limits the result to journal sources. |
| Journal Category | Limit the results to journal categories. |
Segment Description
Returns the description and corresponding value for the specified segment within the applicable ledger context.
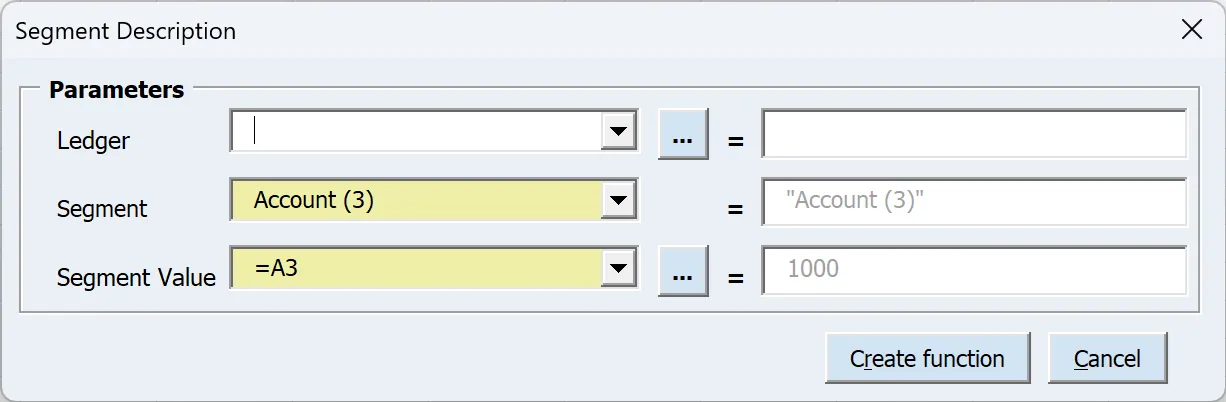
Formula : br_segment_description(“Account (3)”,A3,)
Parameters:
| Ledger | If this parameter is left blank, the system will evaluate using the ledger selected in the dropdown menu. The ledger dropdown values are dynamically populated based on your assigned responsibilities. Note that changing the ledger selection will automatically trigger a re-evaluation of the Segment parameter list of values. |
| Segment | The segment name. |
| Segment Value | The segment value. |
Period Offset
Returns the period name located a specified number of periods before (negative values) or after (positive values) a reference point.
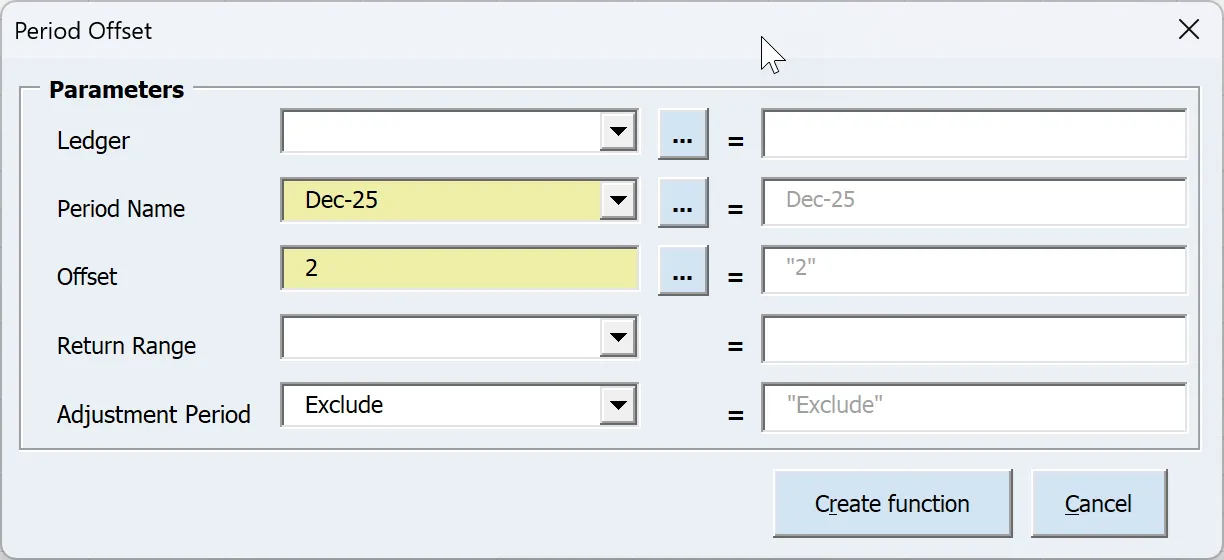
Formula : br_period_offset(“Dec-25″,”2″,,”Exclude”,)
Parameters:
| Ledger | If this parameter is left blank, the system will evaluate using the ledger selected in the dropdown menu. |
| Period Name | The period name must exactly match the format configured in Oracle. For instance, if your Oracle system uses “Jan-07” as the period format, entering variations like “JAN-2007”, “January-07”, or “jan-07” will result in no data being returned and will trigger an “invalid (Period)” message. |
| Offset | Enter a numerical value to retrieve period names relative to your specified criteria:
|
| Return Range | When enabled (Yes), formats results as a period range spanning from offset to base period. Example: Mar-08 with offset -2 returns ‘Jan-08-Mar-08’. |
| Adjustment Period | Use this parameter to control how adjustment periods are handled in your results, by default it includes. Exclude: Adjustment periods are filtered out |
Period by Date
Returns the accounting period name corresponding to the specified date.
Options:
- Ledger-specific: Returns period names according to the selected ledger’s calendar
- Period offset: Retrieve future or past periods by specifying a positive/negative offset value
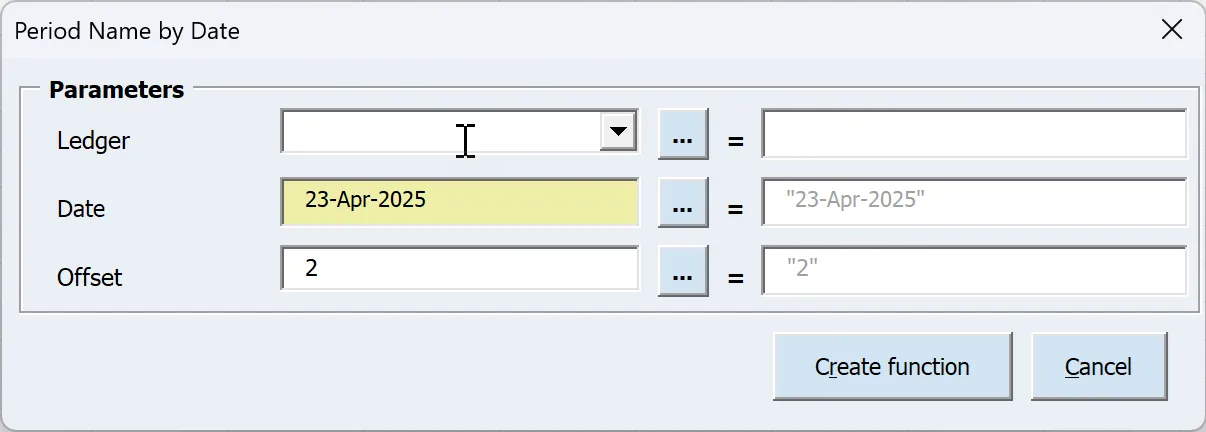
Formula : br_period_from_date(“23-Apr-2025″,,”2”)
Parameters:
| Ledger | If this parameter is left blank, the system will evaluate using the ledger selected in the dropdown menu. |
| Date | The date that you want the period name for. |
| Offset | Enter a numerical value to retrieve period names relative to your specified criteria:
|
Period Name
Returns the accounting period name for a specified year and period number.
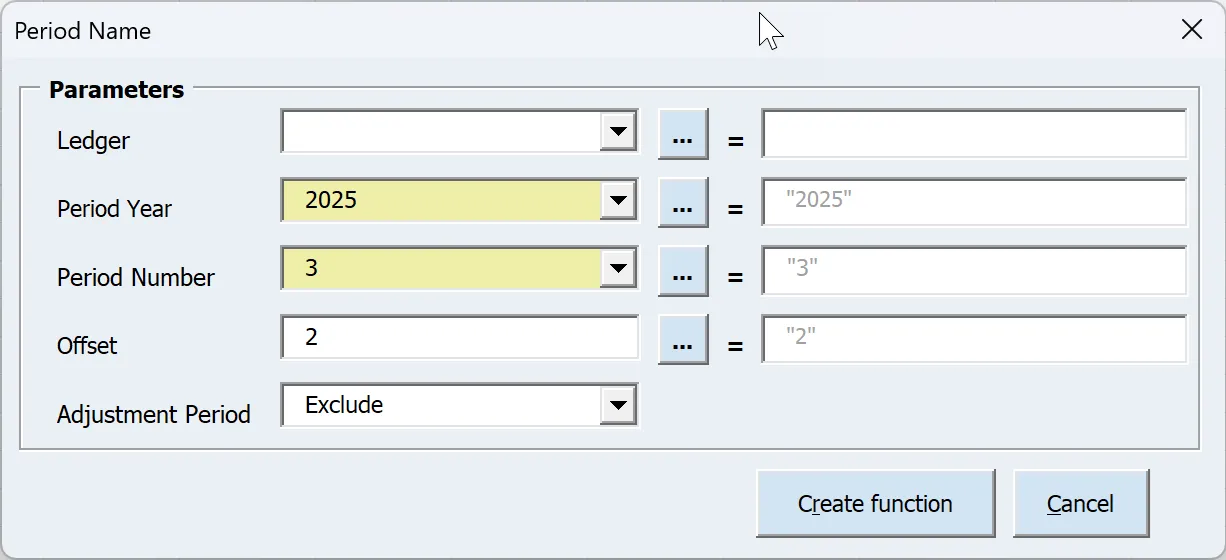
Formula : br_period_name(“2025″,”3″,,”2″,”Exclude”)
Parameters:
| Ledger | If this parameter is left blank, the system will evaluate using the ledger selected in the dropdown menu. |
| Period Year | The year that you want the period name for. |
| Period Number | The period number that you want the period name for. |
| Offset | Enter a numerical value to retrieve period names relative to your specified criteria:
|
| Adjustment Period | Use this parameter to control how adjustment periods are handled in your results, by default it includes. Exclude: Adjustment periods are filtered out |
Daily Rate
Returns the daily currency conversion rate for the selected currencies, date and conversion type.
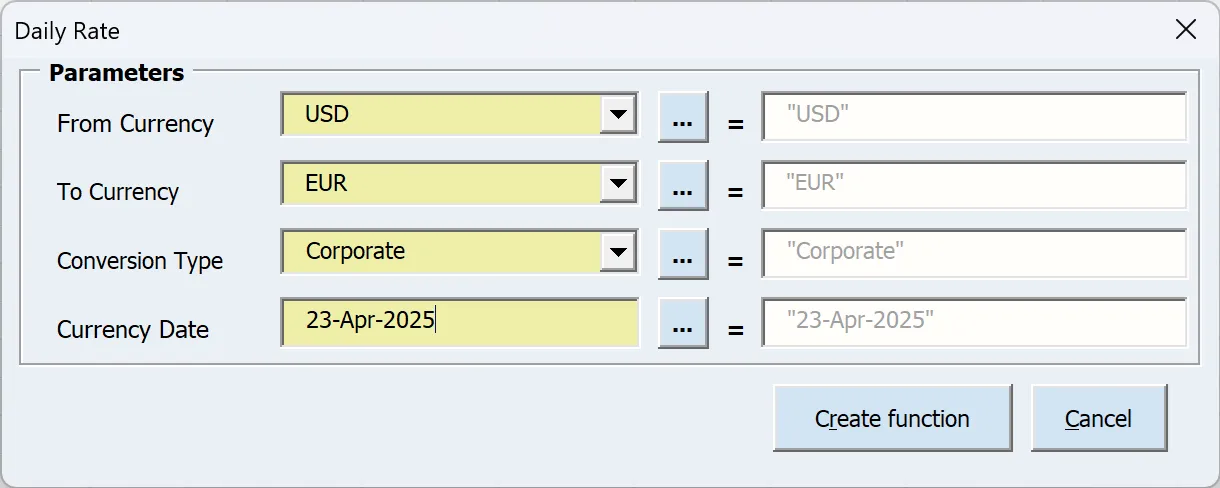
Formula : br_daily_rate(“USD”,”EUR”,”Corporate”,”23-Apr-2025″)
Parameters:
| From Currency | The currency to convert from. |
| To Currency | The currency to convert to. |
| Conversion Type | The currency conversion type. |
| Currency Date | The date to convert the currencies. |
Date Offset
Shifts a date, a date range, or a list of dates by a given number of days. It is most often used with the journal effective date amount types (JED, JEDP, JEDU), where the period parameter of the Balance function holds dates rather than period names.
Formula : br_date_offset(“01/04/2025-30/04/2025″,”-1″,”All”)
Parameters:
| Effective Date | The date, range or list to shift. The same formatting rules as the Balance function period parameter apply: a hyphen (-) separates the from and to of a range, a semicolon (;) separates list entries, and a tilde (~) marks an exclusion. Use slashes as date separators and format the cell as Text, so that Excel does not reinterpret the value according to your regional settings. |
| Offset | The number of days to shift by. Positive numbers move the date forward, negative numbers move it back. |
| Modify | Controls which end of a range is shifted:
|
Intersect
Returns the values that two or more segment expressions have in common. It has no button of its own, but you will meet it in templates produced by the Converter: where an Oracle FSG column set overrides a segment that the row set also restricts, the converted template combines the two restrictions with this function, so that the balance honours both.
Formula : br_intersect(“1100-1300″,”1200-1500”)
The example returns 1200-1300.
Parameters:
| Segment Expression 1 | The first segment expression. Accepts the full segment syntax: a single value, a range, a semicolon list, and tilde exclusions. |
| Segment Expression 2 … | Further segment expressions to intersect with the first. Any number can be supplied. |
If the expressions have no values in common, the function returns an empty result and the balance that references it returns no data.
6.6 Refresh
The refresh buttons provide granular control over which cells are updated.
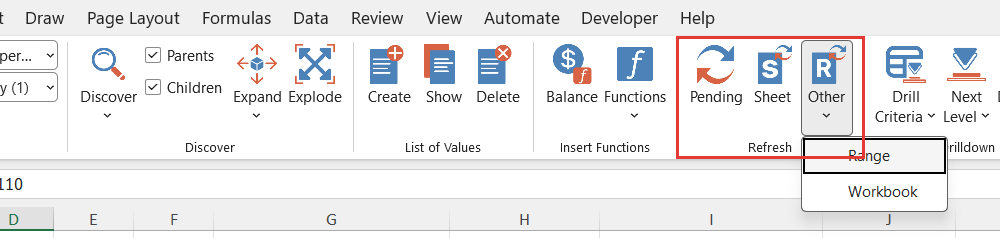
Refreshing Data with Pending Calculations
To refresh only cells requiring recalculation (marked as “(pending)”):
- Click the Pending refresh button.
Refreshing a Sheet
To calculate an entire sheet:
- Select the desired sheet
- Click the Sheet refresh button
Refreshing Specific Ranges
To calculate selected cells:
- Highlight your target range
- For multiple ranges: Hold Ctrl while selecting (standard Excel behavior)
- Click the Range refresh button
Refreshing the Entire Workbook
To refresh all calculations in the workbook:
- Click the Workbook refresh button
6.7 Drilldown
In Blitz FSG, drilldown data is extracted through Blitz Reports such as GL Journals (Drilldown), GL Balances (Drilldown) and GL Account Analysis (Drilldown). Each of these reports has templates that define which columns are displayed, their sequence, and sorting order. Users can create custom templates to add, remove, sort, or reorder columns as needed. Although the report is designed to be comprehensive and cover all possible data columns, users with developer access can create a custom copy of the drilldown reports to add any missing columns if required.
Drill Criteria
There are two types of drill criteria sheets available:
Balance Drill Criteria
The Balance Criteria Sheet enables rapid extraction of detailed general ledger balances that meet specific criteria. This is particularly useful when working with large volumes of GL data, as it returns values faster than multiple individual Get Balance formulas.
How to Use:
- Enter Extraction Parameters
- Criteria mirror the Get Balance function parameters and operate identically.
- Manually type values or select from a list by double-clicking the target cell.
- Define Your Criteria
- Period: Enter the fiscal period.
- Amount Type:
- YTD: Extracts all journal lines for the year (drill-down).
- QTD: Extracts journals for the quarter (drill-down).
- Currency Code: Enter the currency code.
- Balance Type:
- E (Entered) or T (Translated); use Total for Oracle R12.
- A (Actual), B (Budget), or E (Encumbrance).
- For B/E, specify the Budget Name or Encumbrance Type.
- Segment Values: Populate as needed.
- Ledger: Adjust if required.
- Journal Source/Category: Optional filter to narrow results.
- For B/E, specify the Budget Name or Encumbrance Type.
- Execute
- Click Execute Drilldown to run the report.
- From there, you can further drill down into:
- Individual journals
- Related subledger entries
- Journal attachments
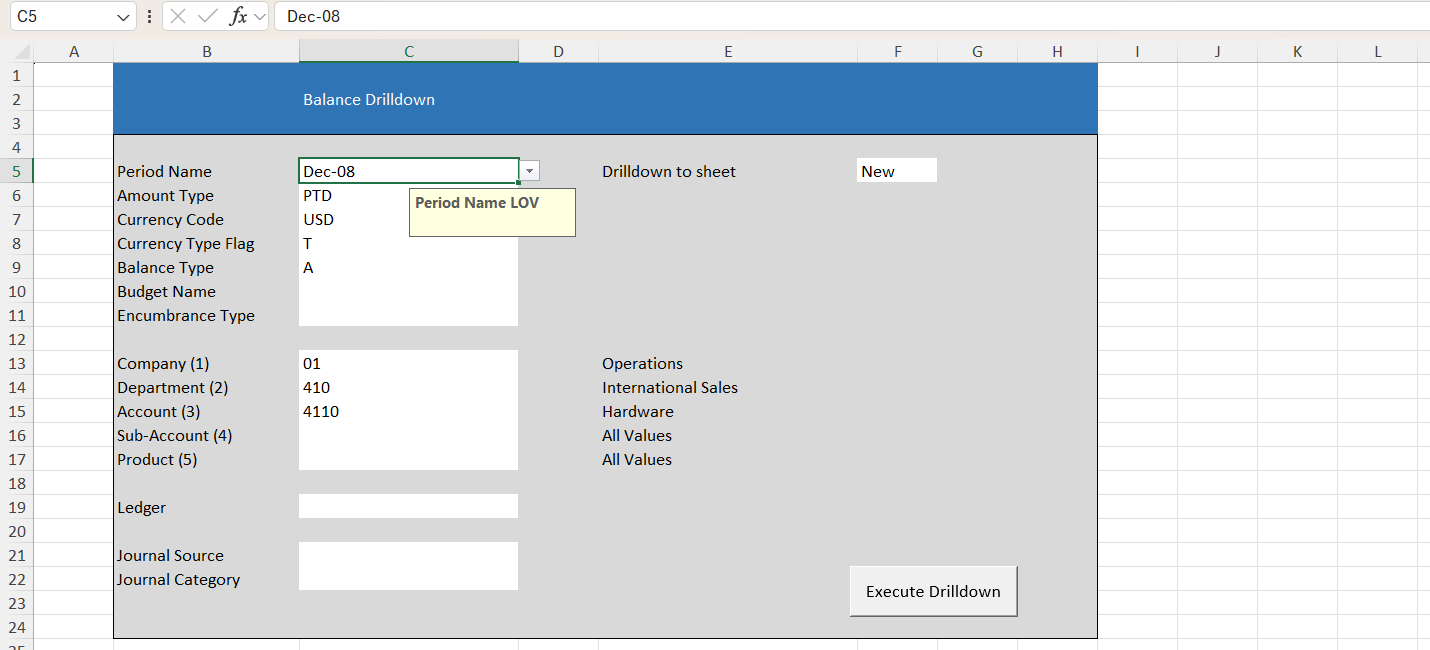
Journal Extract Drill Criteria
The Journal Extract Drill Criteria Sheet enables users to extract journal entries based on specified criteria.
How to Use:
- Enter Extraction Parameters
- Manually type values or select from a list by double-clicking the field (where applicable).
- Single values supported for parameters like Batch and Journal Name.
- Ranges/lists are supported for journal parameters like Source, Category, Budget Name and Encumbrance.
- Date Parameters like Date Created / Posted Date: Dates are treated as inclusive (e.g., 01-JAN-2024 includes all entries up to 23:59:59 on that day). Time components are ignored.
- Created By: Enter a valid Oracle username.
- Execute
- Click Execute Drilldown button to run the report.
- From there, you can further drilldown into:
- Associated subledger entries
- Journal attachments
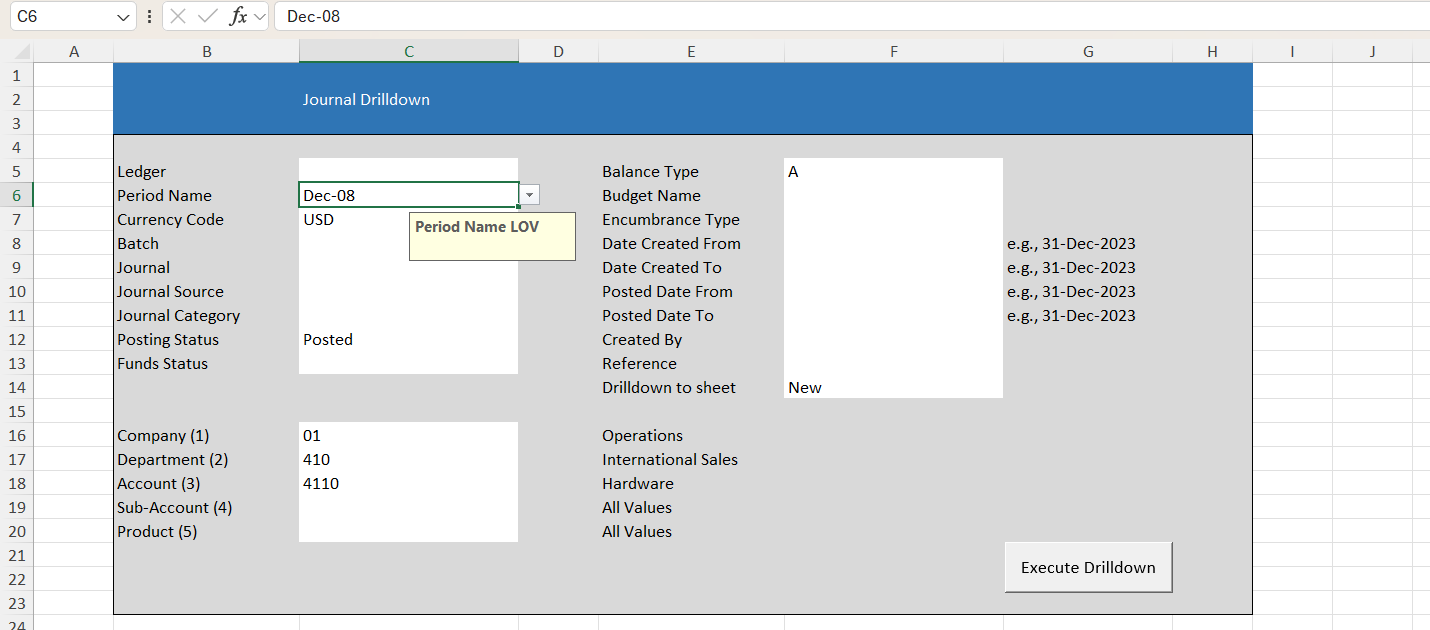
Next Level Drilldown
To drill down to Balance, Journal, or Subledger data from the balance sheet:
- Single selection:
- Select one balance
- Choose Next Level Drilldown > [desired option]
- Multiple selections:
- Select multiple balances
- Click Next Level Drilldown > [desired option]
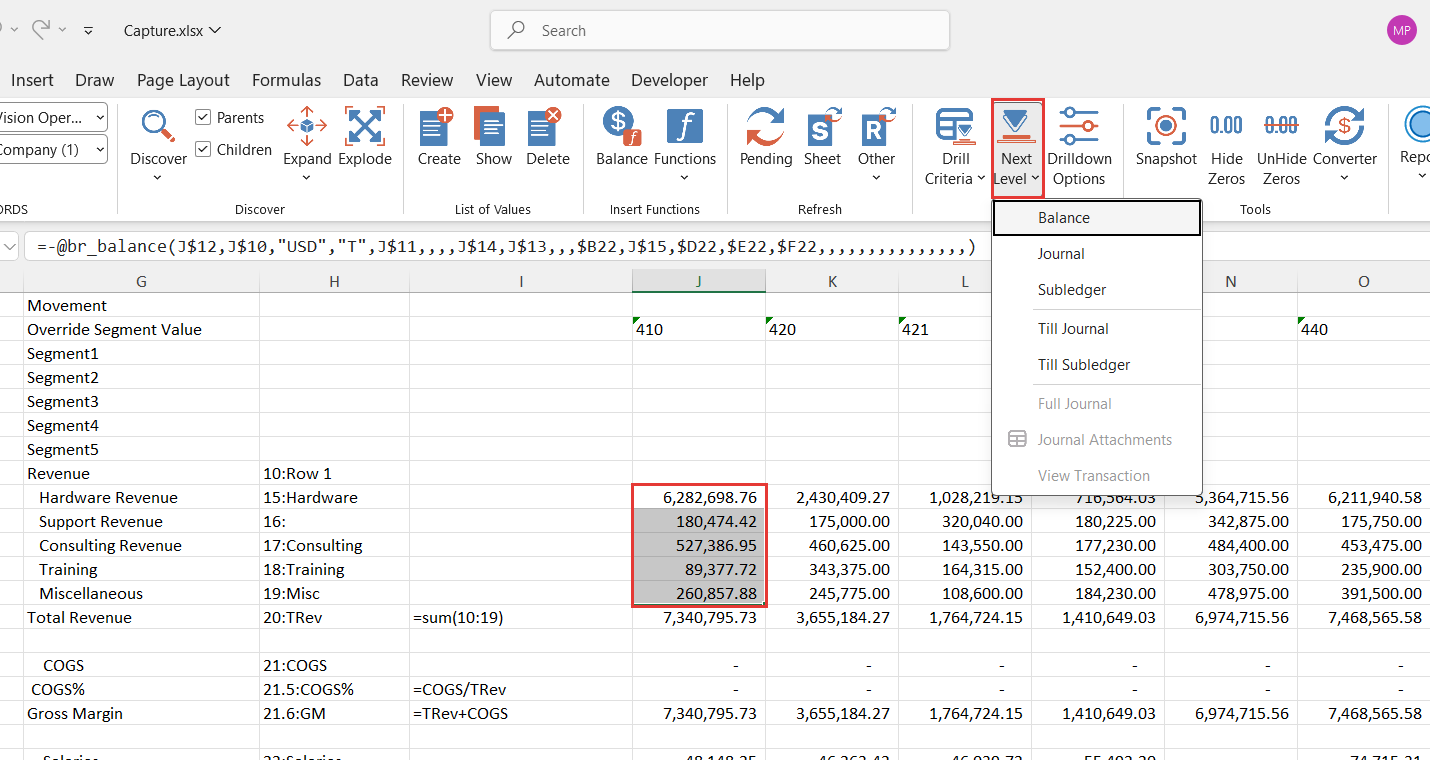
To drill down further for multiple rows on the Balance/Journal Drilldown sheet:
- Select the desired cells.
- Right-click and choose “Journal Drilldown” from the context menu.
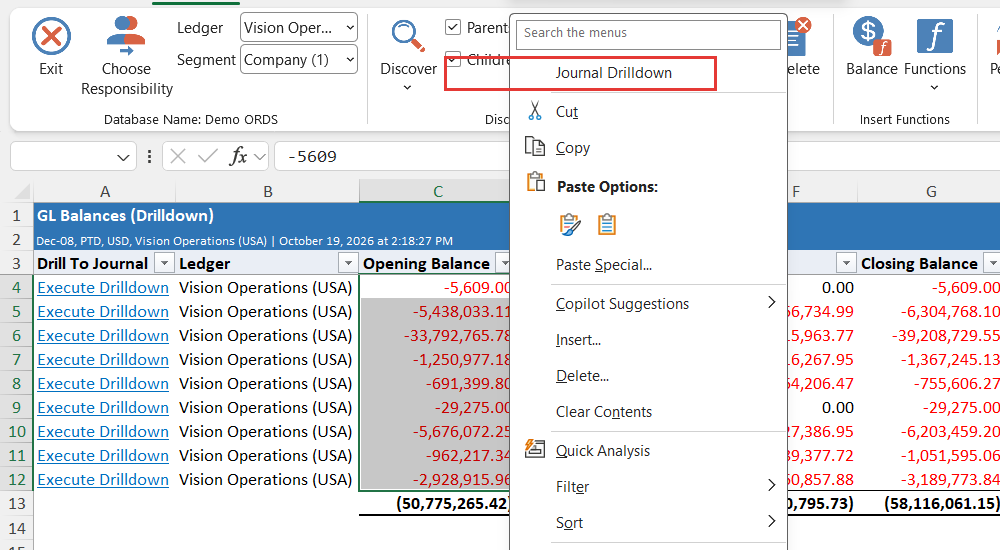
Select a Next-Level Drilldown Option from the Journal Drilldown Sheet:
- Subledger
- Journal Attachment
- Full Journal
- For a single-cell drilldown: Click the ‘Execute Drilldown’ hyperlink.
- For multiple-cell drilldown: Select the desired cells, right-click, and choose the next-level drilldown option.
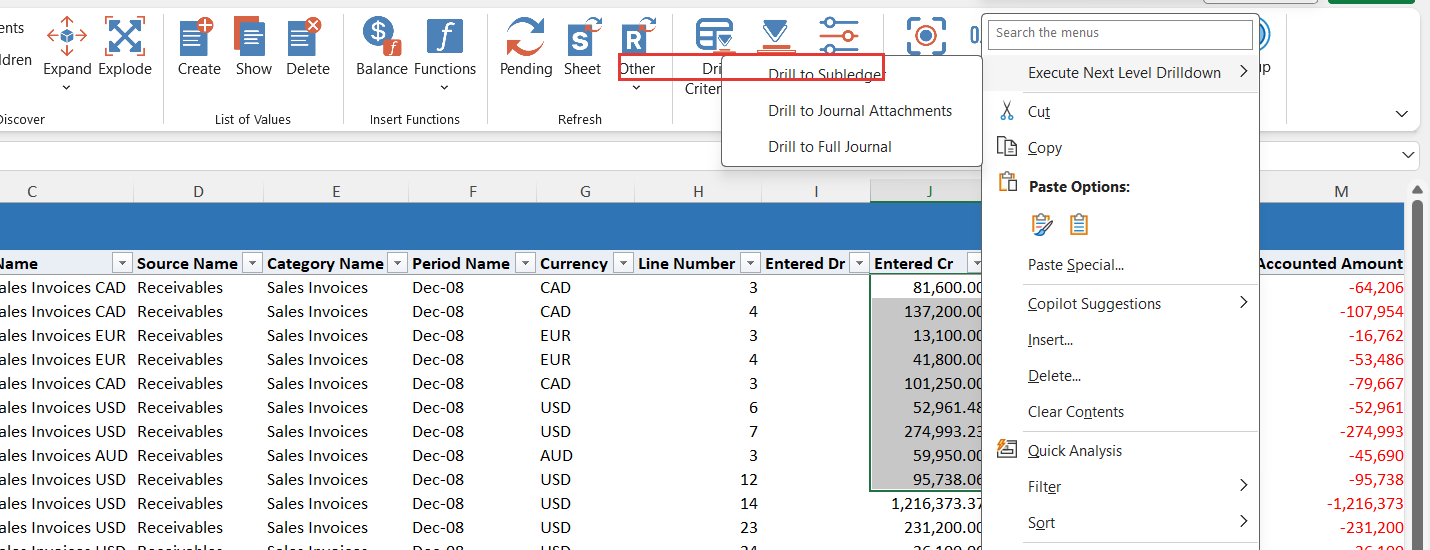
Drill down to transaction details and access the relevant Oracle EBS form for deeper analysis.
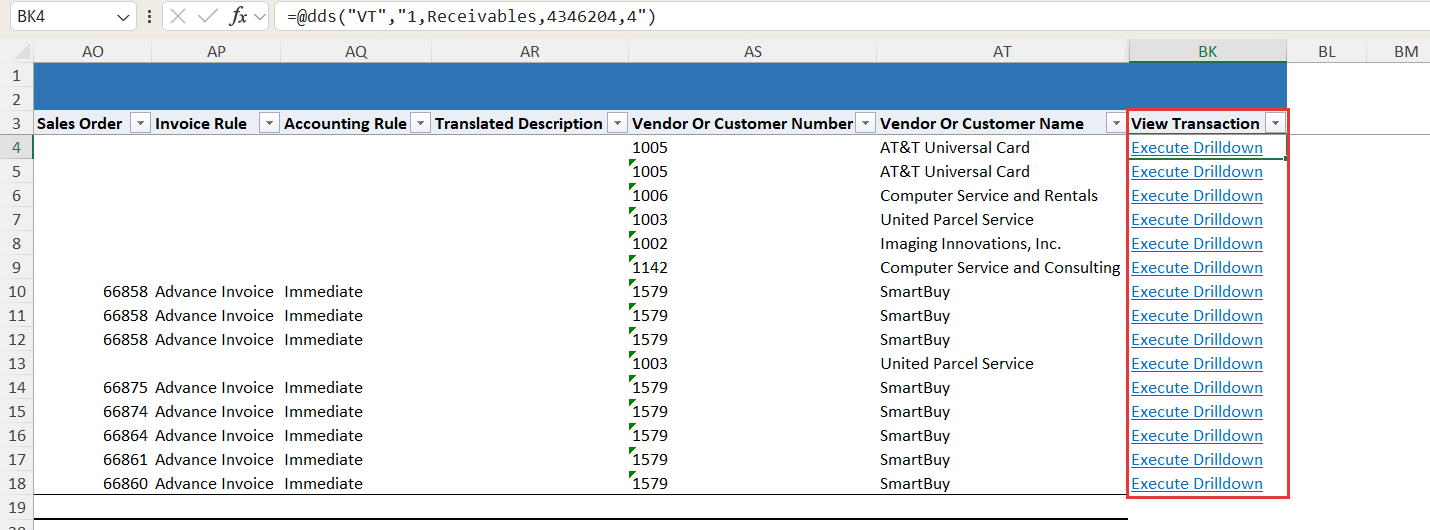
Till Journal and Till Subledger
Balance, Journal and Subledger are consecutive levels, so reaching subledger detail from a balance normally means drilling down two or three times, one level at a time. Two options on the Next Level menu run the whole chain in a single action:
- Till Journal — from a selected balance, produces the balance drilldown and then the journal drilldown
- Till Subledger — from a selected balance, produces the balance drilldown, the journal drilldown and then the subledger drilldown
Every level is produced, each on its own sheet in the same workbook, so you keep the full audit trail from the balance down to the transaction rather than only the final level. Both options accept a multiple-cell selection, so several balances can be taken down together.
Both are context sensitive: used on a balance formula they start from the balance, and used on a sheet that is already the result of a drilldown they continue from that level.
Drilldown options
Drilldown Options controls which report and template each drilldown level uses, where the result is placed, and what a double-click on a balance does. In earlier versions this button was labelled Layout Options.
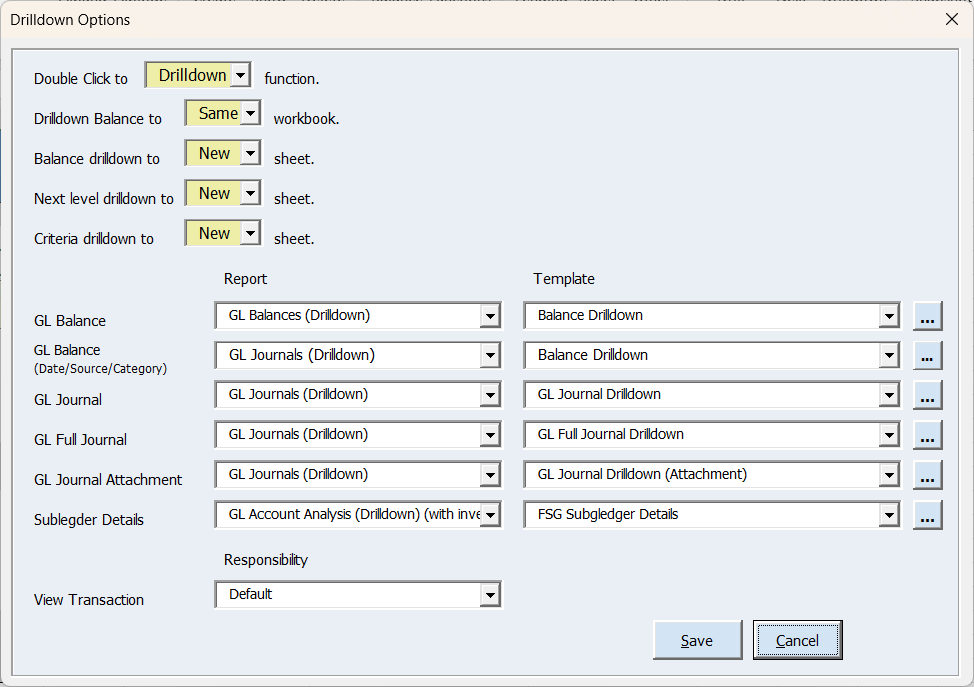
Report and template per drilldown level
The report used for each level is shown but cannot be changed by a normal user: it is an organisation-wide setting that an administrator maintains through the profiles below. The template beside it is yours to choose, and is remembered for your user.
| Drilldown level | Report profile | Template profile |
| GL Balance | Blitz FSG Drilldown Report GB | Blitz FSG Drilldown Template GB |
| GL Balance by date, source and category | Blitz FSG Drilldown Report GB2 | Blitz FSG Drilldown Template GB2 |
| GL Journal | Blitz FSG Drilldown Report GJ | Blitz FSG Drilldown Template GJ |
| GL Full Journal | Blitz FSG Drilldown Report GFJ | Blitz FSG Drilldown Template GFJ |
| GL Journal Attachment | Blitz FSG Drilldown Report GJA | Blitz FSG Drilldown Template GJA |
| Subledger Details | Blitz FSG Drilldown Report SD | Blitz FSG Drilldown Template SD |
The button beside each template opens the template window directly, so a drilldown template can be created or adjusted without leaving Excel. Users can create custom templates to add, remove, sort, or reorder columns as needed.
Where the drilldown opens
- Drilldown Balance to [Same|New] workbook — whether drilldown results are written into the current workbook or a separate one. A drilldown to a new workbook always starts on a fresh sheet.
- Balance drilldown to [Same|New] sheet — for drilldowns started from a balance formula. Default: New.
- Next level drilldown to [Same|New] sheet — for drilldowns started from a cell on a journal or subledger sheet. Default: Same, so that repeated drilling reuses one sheet instead of leaving a trail of numbered tabs.
- Criteria drilldown to [Same|New] sheet — for drilldowns started from a criteria sheet. Default: Same, and overridable for a single run by the Drilldown to sheet cell on the criteria sheet itself.
Other options
- Double-click on a balance cell — either runs the drilldown, or opens the Balance function form.
- View Transaction responsibility — the responsibility used to open the Oracle EBS transaction form. This can be the responsibility the report was run from, or any GL responsibility with subledger drilldown access.
Click Save to keep your selections.
Creating a Custom Drilldown Template
The drilldown reports (GL Journals (Drilldown), GL Balances (Drilldown) and GL Account Analysis (Drilldown)) use templates to define which columns are displayed, their sequence, and sorting preferences. Users can create custom templates to tailor the drilldown view to their specific needs.
To create a new drilldown template:
1. Navigate to the FSG drilldown report – GL Journals (Drilldown), GL Balances (Drilldown), GL Account Analysis (Drilldown) or custom drilldown report.
2. Create a new or copy existing template
The template window allows you to configure the following elements:
Name – Enter a descriptive name for your template
Description – Optional description of the template’s purpose
Available Columns – List of columns available but not currently displayed
Displayed Columns – Columns included in the drilldown output
Use the arrow buttons to move columns between “Available” and “Displayed” lists, and to change display order. You can use Ctrl and Shift keys for multi-select.
Sort Order – Ascending or descending sort for each column
Sort Priority – Determines sort precedence when multiple columns are sorted
For detailed information on all template options including pivot tables and Excel uploads, refer to 2.5 Templates

Under Blitz FSG Tools you can:
Snapshot
Use the Snapshot tool to save a copy of your Blitz FSG workbook with static values. The copy:
- Replaces every Blitz FSG function with the value it shows.
- Removes the Blitz FSG lists of values.
- Preserves all other Excel formulas and formatting.
The open workbook is not changed. See also Snapshot.
Ideal for:
- Finalizing reports for distribution.
- Reducing file size or improving performance.
- Archiving data without live Oracle connections.
Hide Zeros
Hide Zeros allows you to hide rows in a report that contain only zero values. This feature is especially useful for streamlining reports with many empty rows—such as those with no balances in a given period. With just one click, you can instantly remove all zero-value rows, improving readability and presentation.
Unhide Zeros
This will show the rows previously hidden by the Hide Zeros feature.
Comma to Semicolon
Blitz FSG separates list entries with a semicolon, while values copied from another system, from a spreadsheet or from an e-mail are usually separated by commas. Select the cells and click Comma to Semicolon to replace every comma with a semicolon, so that the values are accepted as a list by the Balance function and by the criteria sheets.
Cells containing formulas are left untouched, so the tool is safe to run over a whole column.
6.9 Converter
The Blitz FSG converters turn Oracle FSG report definitions, and workbooks built with GL Wand or Spreadsheet Server, into Blitz FSG statements. They are in the Financial Statement dropdown on the Blitz Report tab, and in Tools > Converter when a statement sheet is active.
Oracle FSG
The Oracle FSG converter reads a Financial Statement Generator report definition — its row set, column set and content set — and reproduces it as a Blitz FSG template with live balance formulas.
The following video shows the conversion from start to finish.
1. Click the arrow of Financial Statement and select Convert Oracle FSG > Reports…, or on a statement sheet Converter > Oracle FSG. The Oracle FSG Batch Converter opens and lists the FSG reports defined in Oracle.
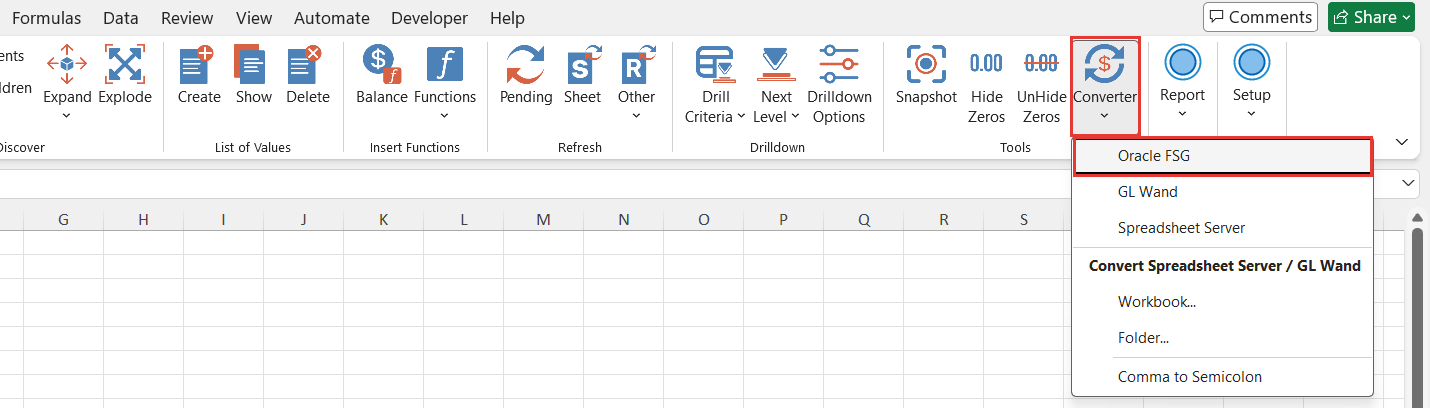
2. Find the reports you want. Type in the search box to narrow the list; the status line shows how many of the total match. For each report the list also shows when it was last run, when it was last updated and how often it has been run, which helps to identify the definitions that are still in use.
3. Select each report to convert: Ctrl+click adds or removes a report, Shift+click selects a range. The order of selection is kept as a sequence number, and the reports are converted in that order, each onto its own worksheet of the active workbook, or of a new workbook if none is open. Selections made while a search filter is active are preserved when the filter changes. To convert the reports of an Oracle FSG report set, double-click Report Set and select the set: its reports are selected in the set’s order. With Sheet Mode Same Sheet, the reports are placed one below the other on a single worksheet.
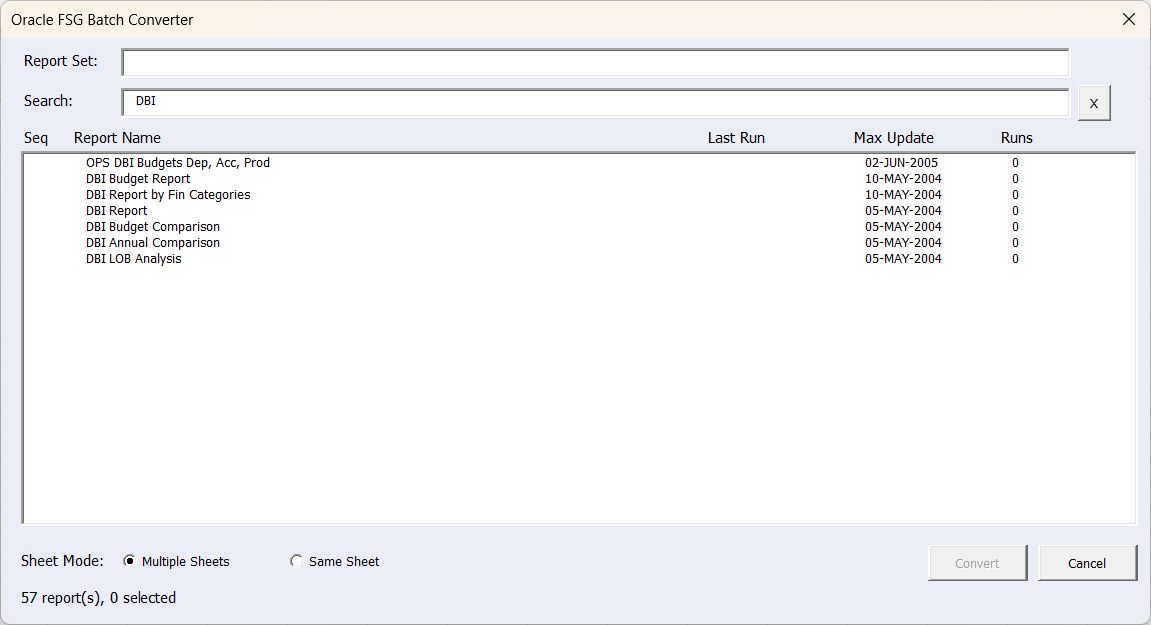
4. Click Convert.
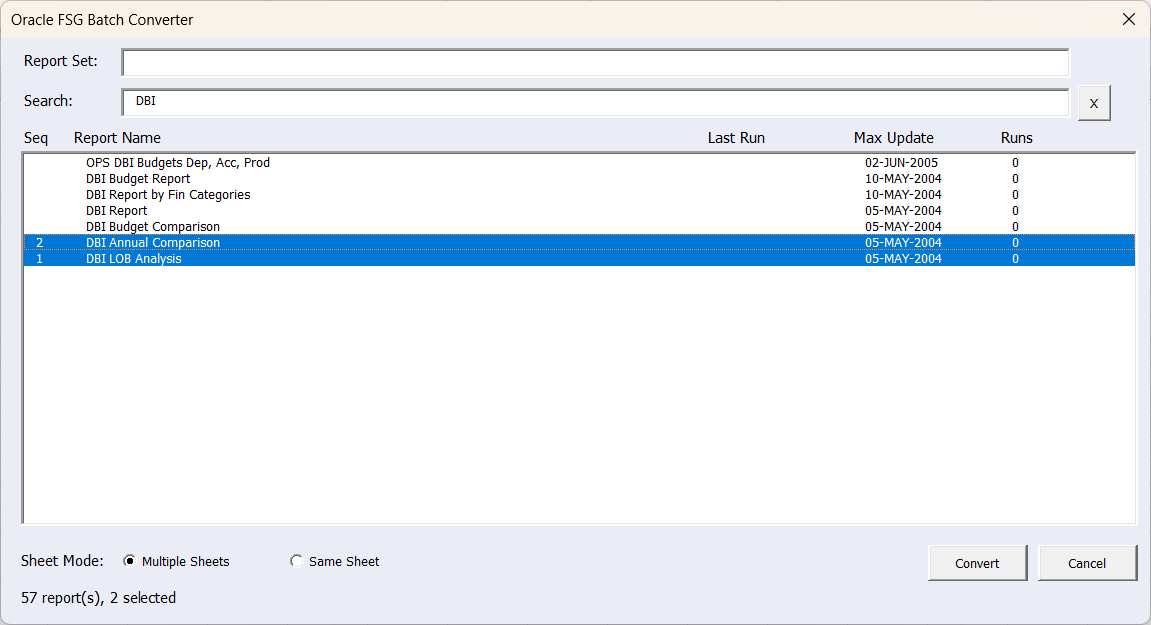
What the converter produces
The converted worksheet reproduces the Oracle definition rather than a skeleton of it:
- Account assignments are converted range by range. Each assignment range keeps its own combination of segment restrictions, together with its sign and its Debit, Credit or Net setting. Ranges are never merged across segments, so a row that Oracle restricts to particular pairings returns the same amount in Blitz FSG.
- The segment values are expanded automatically. A range whose segment display is set to Expand produces one detail row per segment value, with the value’s description alongside it. A range set to Both produces those detail rows and a total row for the range. Rows that Oracle totals without displaying are shown as value rows under a heading, so that the sheet reveals what the axis is made of.
- Row set calculations are converted. Calculations that reference a sequence range or a row name become Excel formulas over the corresponding rows, including where an expanded range occupies many rows, and calculations built on other calculations recalculate in the right order.
- Column set overrides are applied. Where a column overrides a segment that the row also restricts, the two restrictions are combined with the Intersect function, and a column level Debit or Credit setting takes precedence over the row’s.
- Hidden rows are converted. Rows with Display Row unchecked are converted and hidden, so the calculations that refer to them work.
Known limitations
- A segment set to Expand but left unrestricted (%) is not expanded; the row is produced as a single value row under its heading.
- Where a single range sets more than one segment to Expand, only the first is expanded. Totals remain correct, but the grouping is less detailed than Oracle’s.
In both cases you can select the row and use Expand to add the detail rows yourself.
The tables below show how each part of the Oracle definition maps onto the converted worksheet, so that you can check the result against the original.
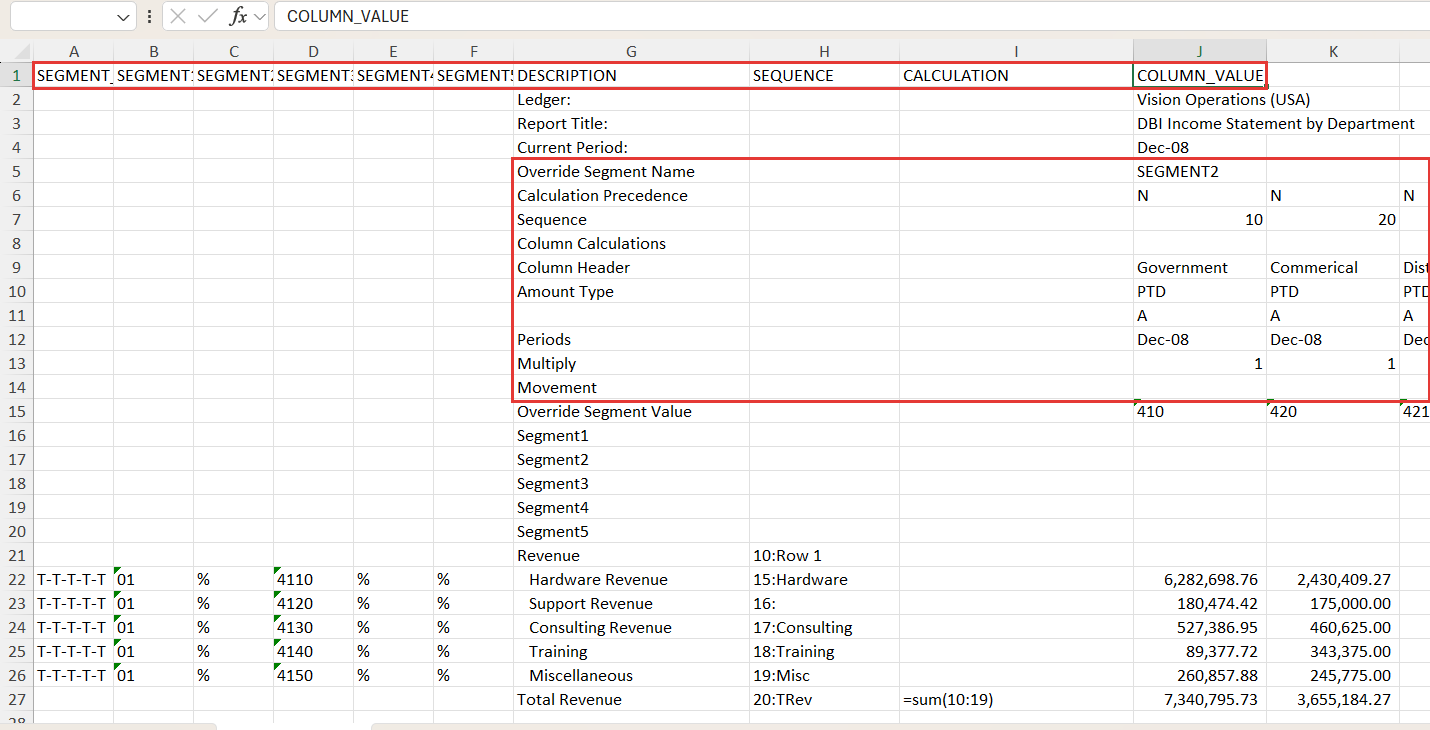
1. Row set information mapped between Oracle form and Blitz FSG Excel template
| Oracle Row Set | Converted Blitz FSG Excel Template |
| Row Set > Rows > Account Assignments | Column B to Column F based on the defined chart of account segments. |
| Row Set > Rows > Account Assignments > Display | Column A – Segment Type |
| Row Set > Rows > Line Item | Column G – Description |
| Row Set > Rows > Line : Row Name | Column H – Sequence |
| Row Set > Rows > Calculations | Column I – Calculations |
2. Column set information mapped between Oracle form and Blitz FSG Excel template
| Oracle Column Set | Converted Blitz FSG Excel Template |
| Column Set > Override Segment | Row 5 : Override Segment Name |
| Column Set > Column > Override Row Calculations | Row 6 : Calculation Precedence |
| Column Set > Column > Sequence | Row 7 : Sequence |
| Column Set > Column > Calculation | Row 8 : Column Calculations |
| Column Set > Column > Column Name | Row 9 : Column Header |
| Column Set > Column > Amount Type | Row 10 : Amount Type – Calculated based on the Amount type |
| Column Set > Column > Amount Type | Row 11 – Calculated based on the Amount type |
| Column Set > Column > Offset | Row 12 : Periods – Calculated based on the defined offset.
|
| Column Set > Column > Account Assignments > Sign | Row 13 : Multiply |
| Column Set > Column > Account Assignments > Activity | Row 14 : Movement |
| Column Set > Column > Override Value | Row 15 : Override Segment Value |
| Column Set > Column > Account Assignments | Row 16 to Row 20 based on the defined chart of account segments. |
3. Content set information mapped between Oracle form and Blitz FSG Excel template
| Oracle Content Set | Converted Blitz FSG Excel Template |
| Content Set > Account Assignment | Every report that the content set produces in Oracle becomes a worksheet of its own, named after the report and the content set value. Display types PT, RE, RB and RT replace the row set’s segment value, RE, RB and RT also its display type. |
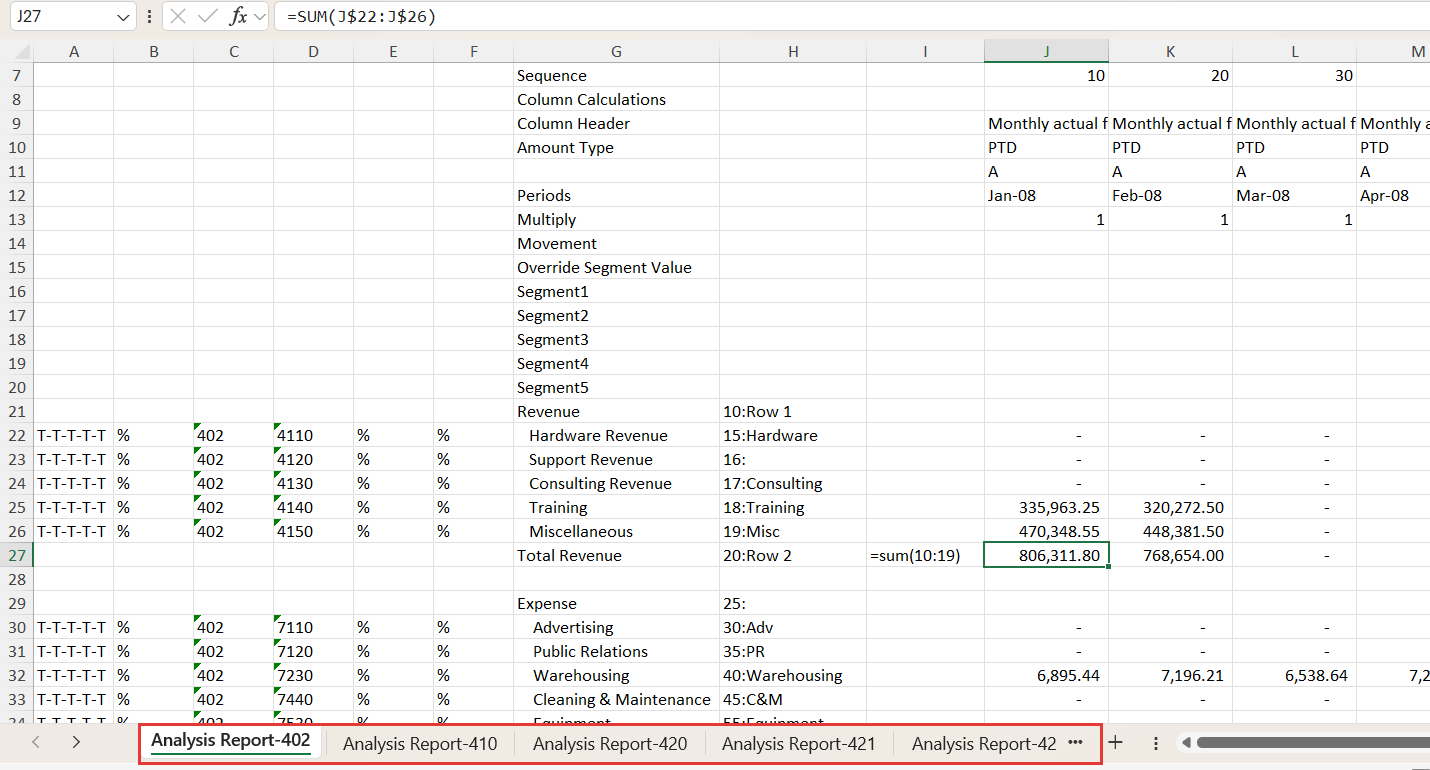
The balance formula is prepopulated based on the defined row set and column set.
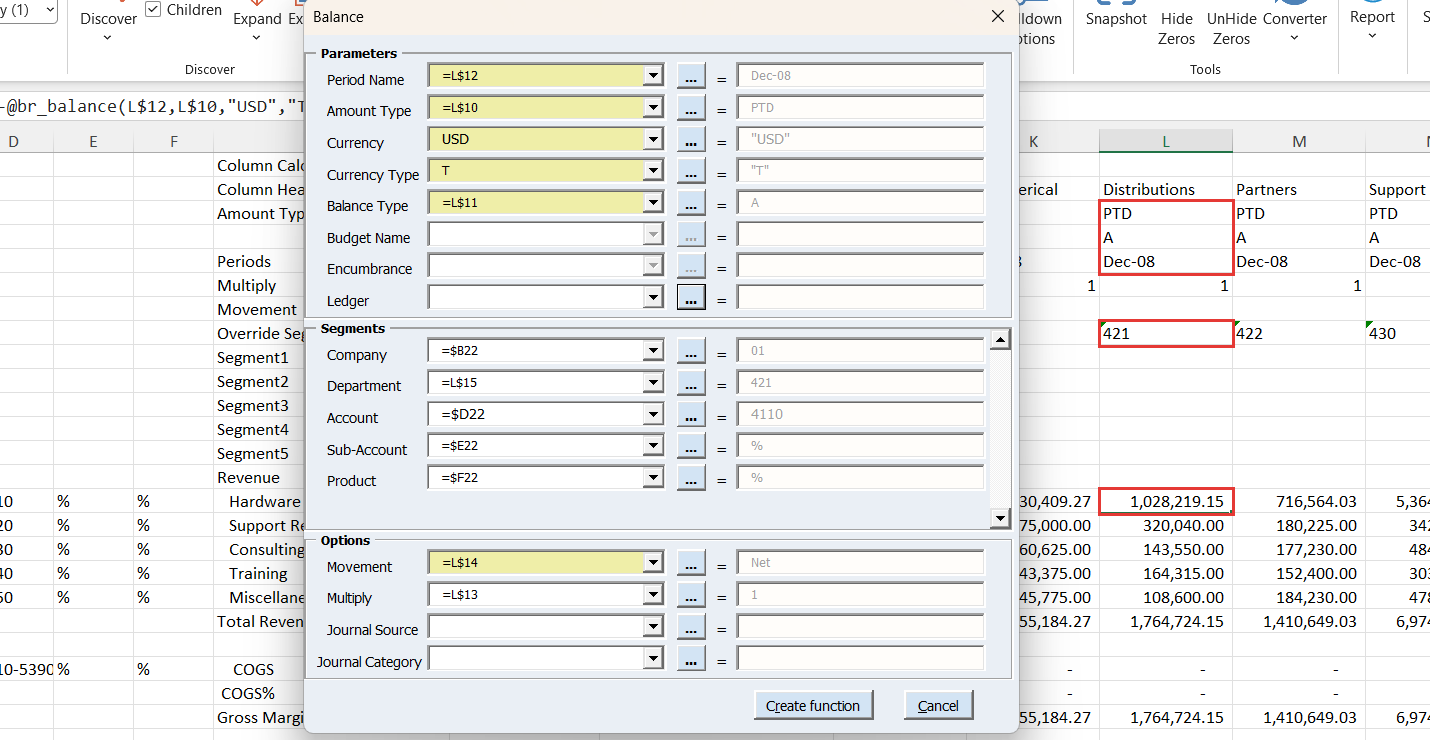
Row set calculations are converted automatically. The examples below show how the Oracle FSG calculation expressions are interpreted, which is useful when checking the converted formulas against the original definition.
Row.
- Row 27 Column I = sum(10:19) -> the row is the sum of the rows with sequence 10 to 19.
- Row 30 Column I = COGS/TRev -> the row divides the row named COGS by the row named TRev.
- Row 31 Column I = TRev+COGS -> the row adds the rows named TRev and COGS.
- Row 37 Column I = sum(22:27) -> the row is the sum of the rows with sequence 22 to 27.
- Row 46 Column I = sum(29:98) -> the row is the sum of the rows with sequence 29 to 98.
- Row 47 Column I = COGS+T-OE+T-Employee Exp -> the row adds the rows named COGS, T-OE and T-Employee Exp.
- Row 48 Column I = TRev+TExp -> the row adds the rows named TRev and TExp.
- Row 49 Column I = OperM/TRev -> the row divides the row named OperM by the row named TRev.
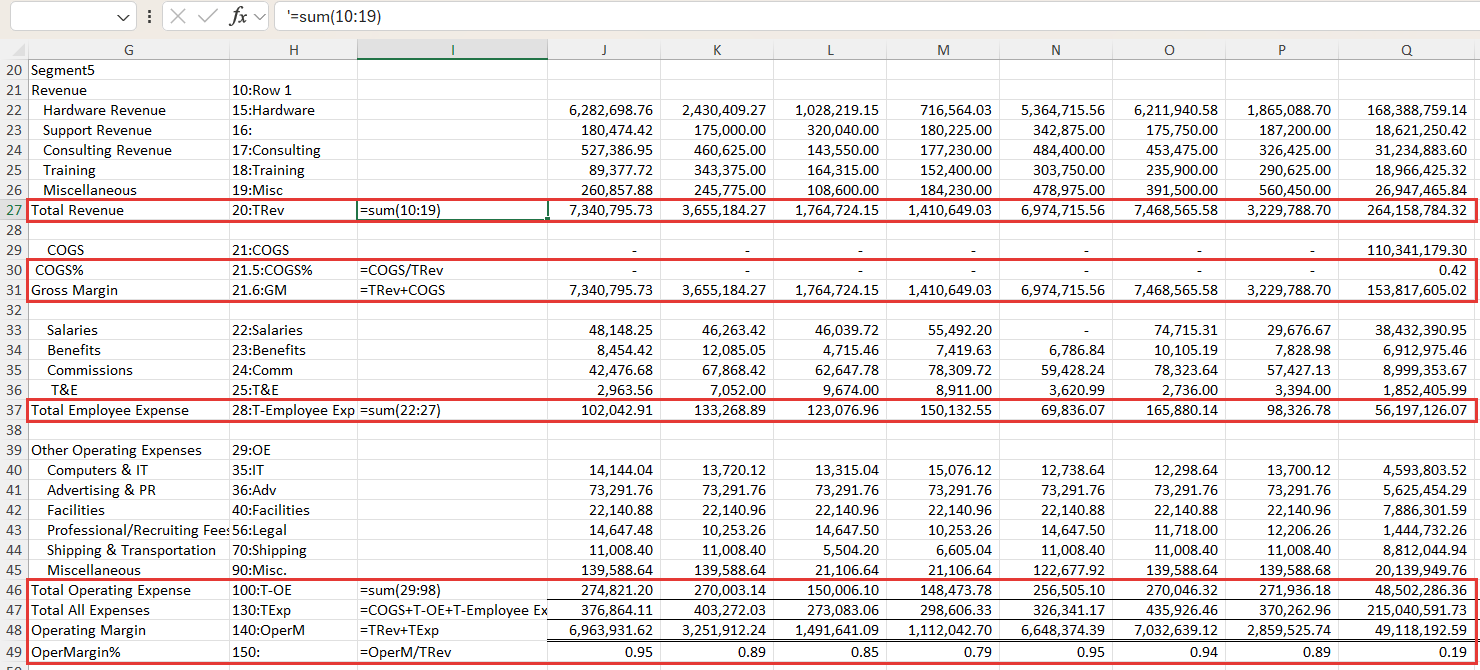
After checking the converted sheet against the supporting information from Oracle FSG’s Row Set, Column Set, and Content Set, delete any temporary rows and columns that were added solely for reference or template construction.
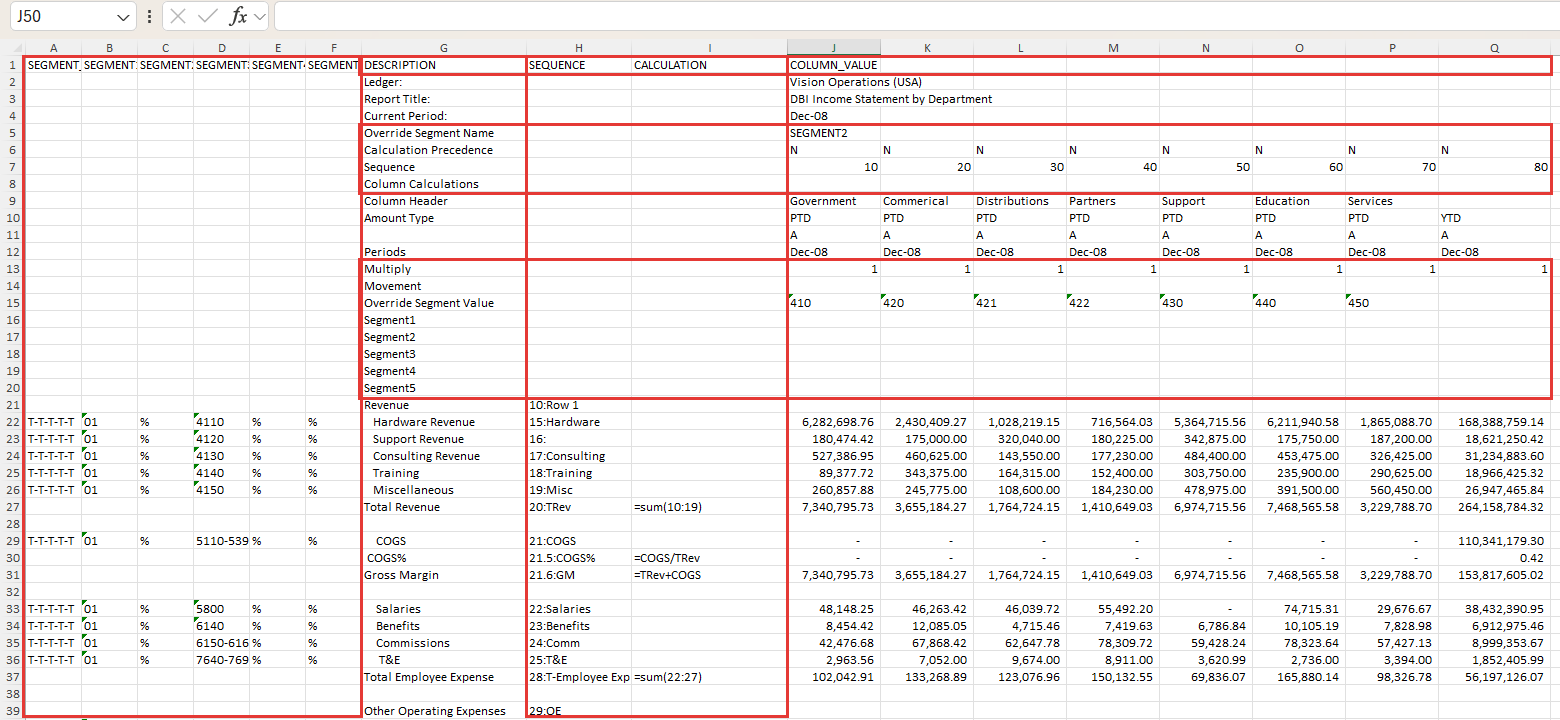
Complete any remaining modifications, then finalize your templates for future use.
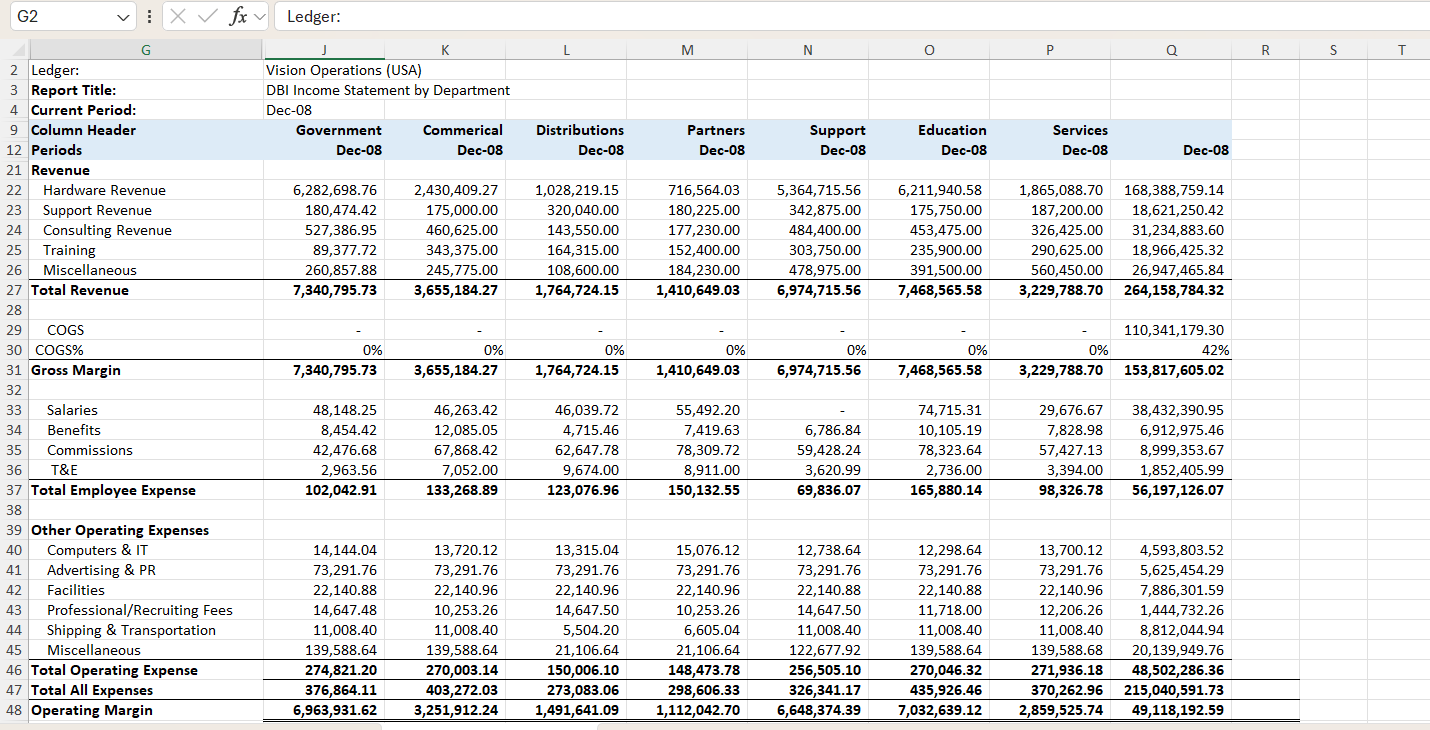
Upload the migrated template to make it available for later use.
- Open Template screen.
- Open the Excel Upload tab.
- Click Upload.
- Browse and select the migrated template file.
- The template can also be shared to grant user access.
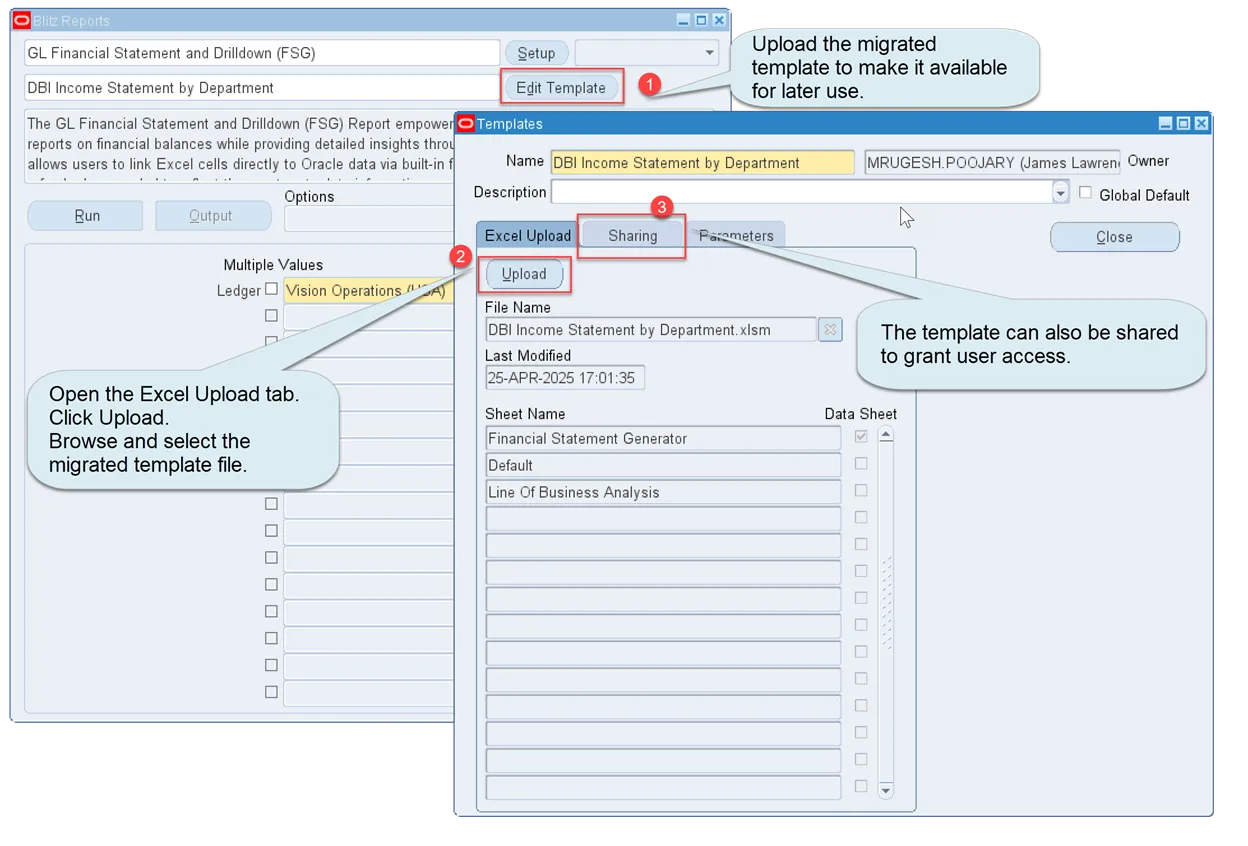
GL Wand & Spreadsheet Server
The GL Wand and Spreadsheet Server converters replace the GL Wand and Spreadsheet Server functions of a workbook with the equivalent Blitz FSG functions (balances, period names, period offsets, segment descriptions and daily rates) and give the parameter cells they read Blitz FSG lists of values. Layout, formatting and all other Excel formulas are kept.
In the Financial Statement dropdown, under Convert Spreadsheet Server / GL Wand, select:
- This Workbook to convert the open workbook in place. The conversion cannot be undone with Ctrl+Z, so Blitz FSG asks for confirmation first, and the file on disk changes only when you save it.
- Workbook… to convert one workbook you select. The original is not changed: the converted workbook is saved as an .xlsx file with the same name in a Blitz FSG folder next to it, and opened.
- Folder… to convert every .xls, .xlsx and .xlsm workbook in a folder, without its subfolders, into a Blitz FSG subfolder. The progress window shows the file being converted and the time remaining.
On a statement sheet, Converter > GL Wand and Converter > Spreadsheet Server convert the open workbook in place, as This Workbook does.
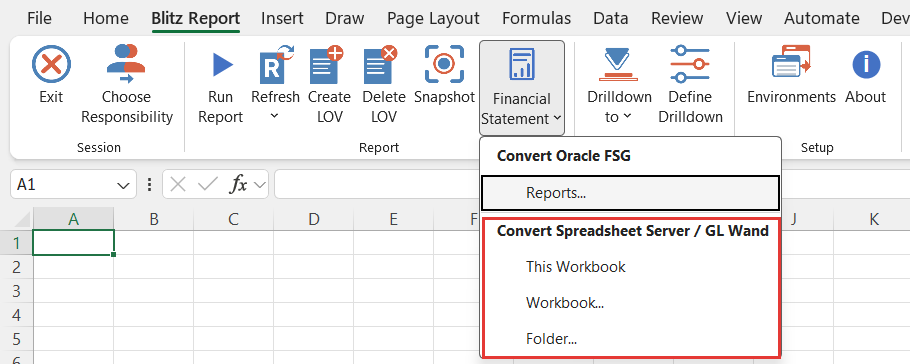
After selecting the workbook or folder, select the ledger for formulas that do not name one. A Spreadsheet Server workbook is bound to the ledger its formulas name most often when your responsibilities give access to it, and a GL Wand ledger id is replaced by the name of the ledger it identifies.
Spreadsheet Server lets each user choose the characters for ranges, lists and exclusions. If a period or segment value contains a character other than the defaults (a period for ranges, the list separator, a slash for exclusions), the converter asks once for the three characters the workbooks use.
When a folder conversion ends, a Conversion Summary workbook in the Blitz FSG folder lists each file with the converter used, the number of Blitz FSG formulas, errors and warnings, a link to the converted workbook and the result, and its Log sheet collects the log lines of all files. A workbook whose converted copy already exists in the Blitz FSG folder is skipped, so an interrupted folder conversion can be started again without overwriting corrections made to earlier results. Delete a converted copy to convert its original again.

Conversion Log
Whatever a converter cannot convert is listed on a Conversion Log sheet of the converted workbook, with its level (Error or Warning), the cell and the reason, for example a Spreadsheet Server function without a Blitz FSG equivalent (GXE, GXC, GEXD, GPX), a ledger your responsibilities do not give access to, or a currency type Blitz FSG does not support. Correct those cells, or let Copilot or Claude work through the log with the br-fsg-conversion-review skill, then refresh the workbook to calculate the balances. Compare the converted workbook against the original before putting it into use.

6.10 AI integration
Microsoft 365 Copilot and Claude in Excel work with Blitz FSG through the AI integration of the Blitz Report Excel Add-in. Three Excel skills, available on the AI Skills page, teach the assistant the Blitz FSG workflow:
- br-run-fsg builds a statement from a request in your own words, such as an income statement, balance sheet, trial balance, balances by period or department, or actual against budget. It refreshes the statement, answers questions from its balances, and drills a balance to account balances, journal lines and subledger transactions, and on to the detailed Blitz Report of those transactions.
- br-fsg-variance-analysis compares two periods, the same period of the previous year, or actual against budget, flags the material variances, explains the largest from their journal lines and drafts variance commentary for you to review.
- br-fsg-conversion-review works through the Conversion Log of a converted GL Wand or Spreadsheet Server workbook: it shows each proposed fix as before and after, applies the fixes you confirm and marks every log line.
Examples of requests:
- Build an income statement for Vision Operations (USA) for Mar-02 by account
- What was cash at the end of December?
- Why did travel expenses change from Feb-02 to Mar-02? Explain it from the journal lines
- Review the conversion log of this workbook
The following video shows Microsoft 365 Copilot building statements, explaining a variance from the journal lines and drilling a balance to its supplier invoices.
The following video shows Microsoft 365 Copilot reviewing month-end variances: comparing March with the budget and with March of the previous year, explaining the largest variances from their journal lines and drafting the variance commentary.
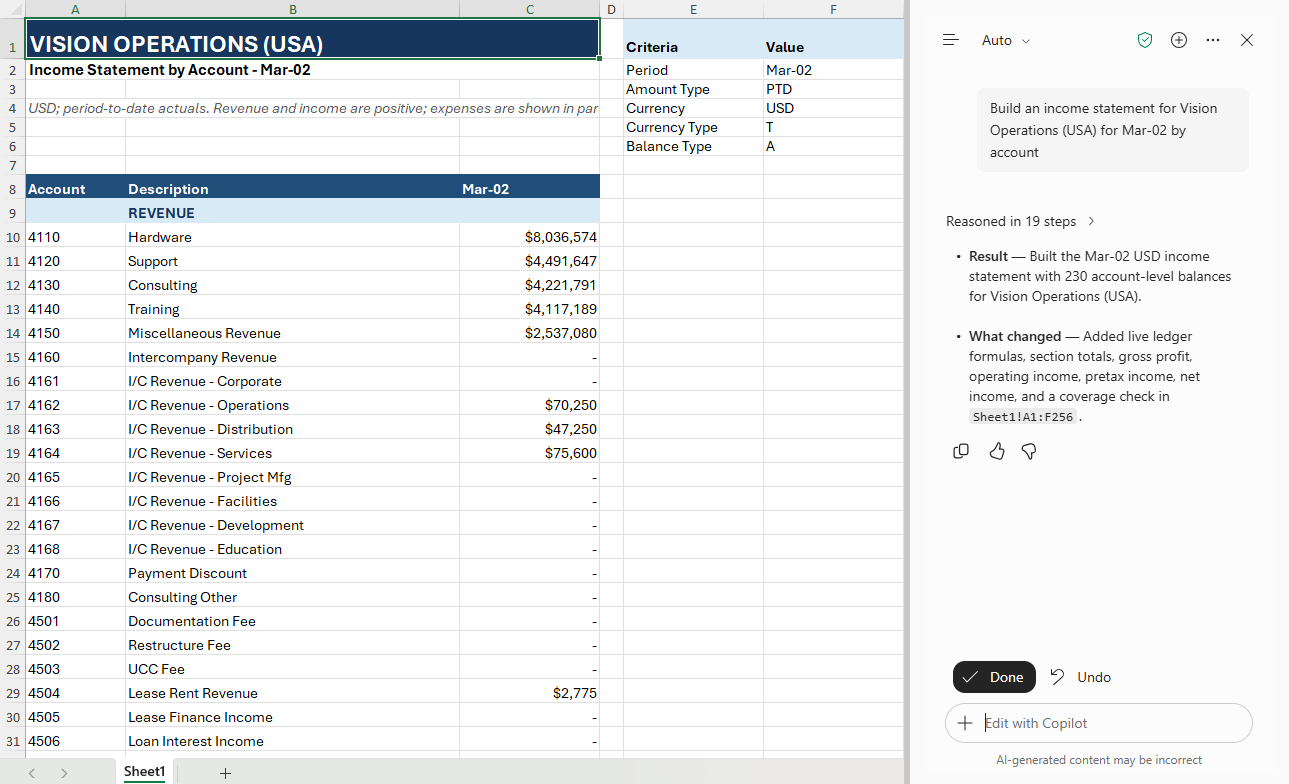
Every balance on the sheet is a Blitz FSG formula that you can check, refresh and drill like any other, and each drilldown goes to a new sheet of the workbook. The assistant works under your own login and responsibilities, so it sees only the ledgers you can see, and the skills never change anything in Oracle EBS. Log in on the Blitz Report tab before asking: the assistant cannot log in for you.
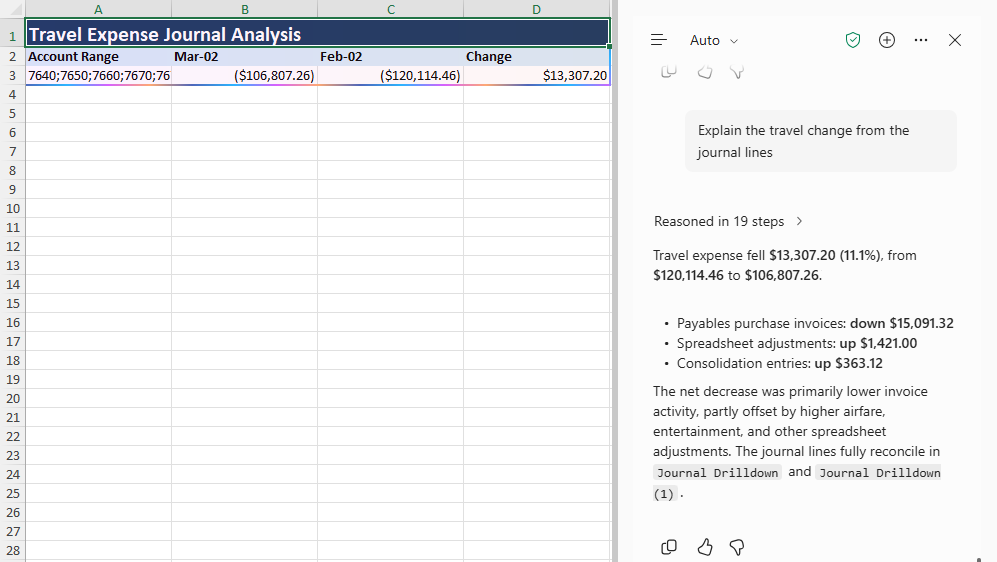
7 Supply Chain Hub
Supply Chain Hub is a planning workbench for Oracle EBS that brings item information, supply and demand, planning results and planning actions together in one searchable form. It works with either standard MRP or Advanced Supply Chain Planning (ASCP) as the planning source and is included in the Blitz Report installation package; the setup is described in the Supply Chain Hub setup chapter of the Installation Guide.
Background reading: Oracle Supply Chain Hub that takes simplicity to another level and Getting all horizontal with ASCP planning.
7.1 Search
The Search tab finds items across inventory organizations, including full text search over item information. The matching items are shown in the Items grid.
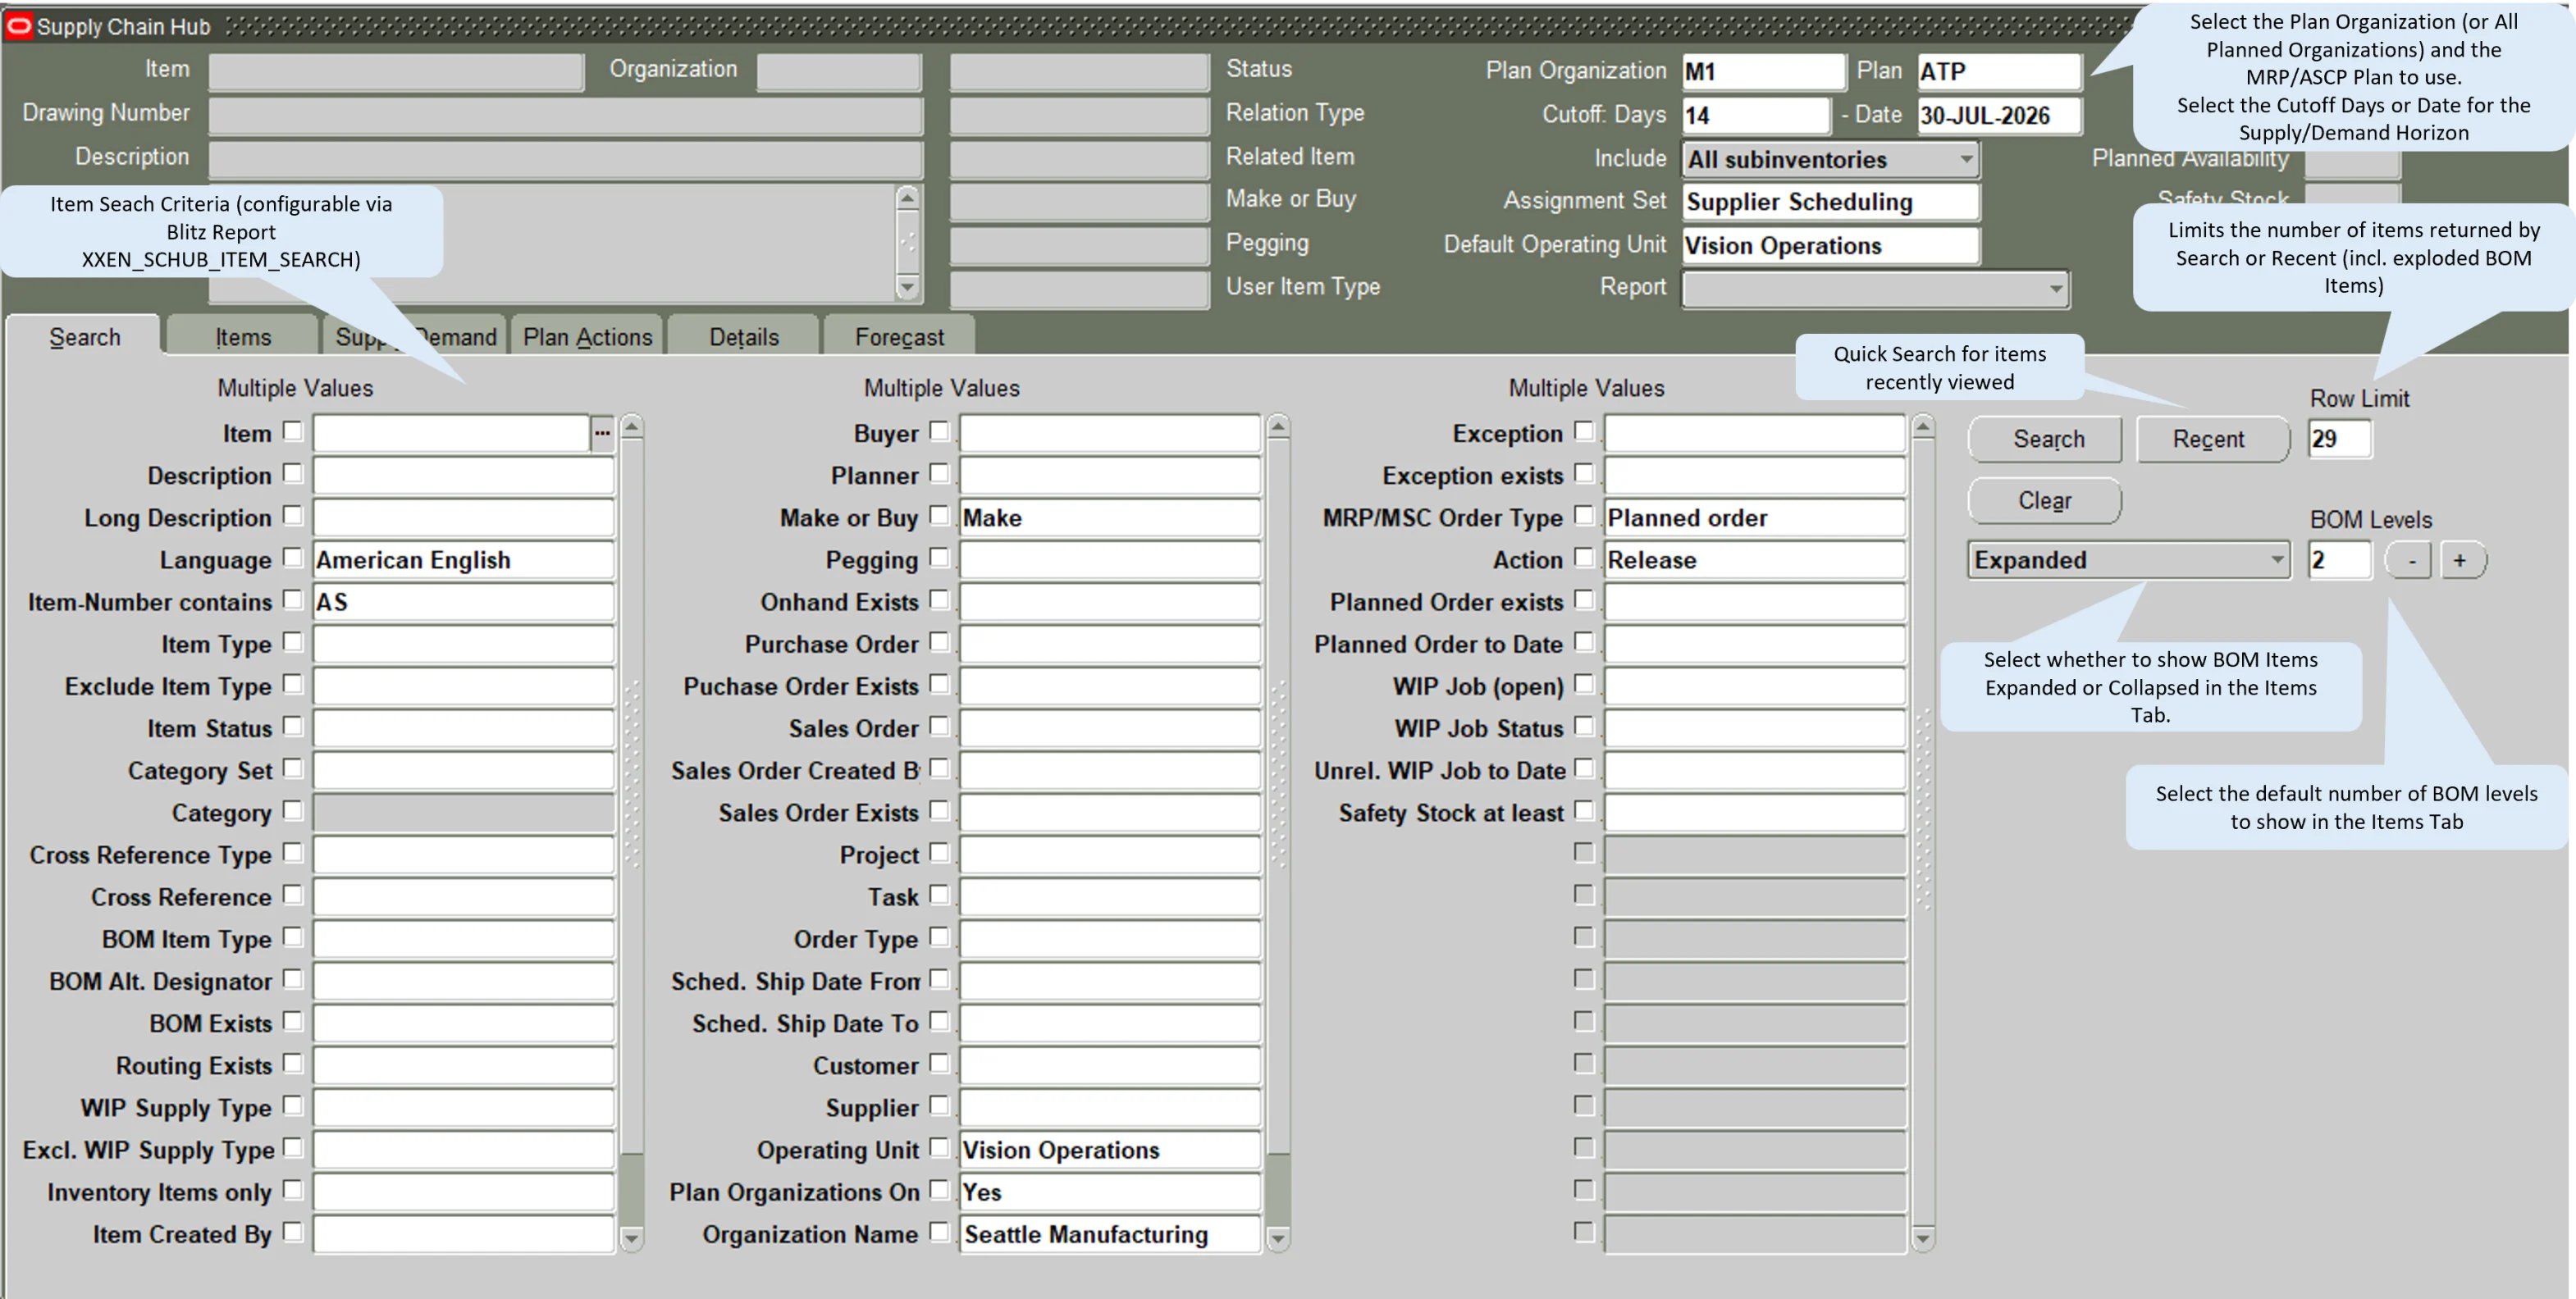
7.2 Items
The Items tab lists the matching items with their attributes in a grid. Additional item descriptive flexfield columns can be added to the grid, see Update item DFF columns in items grid in the Installation Guide.
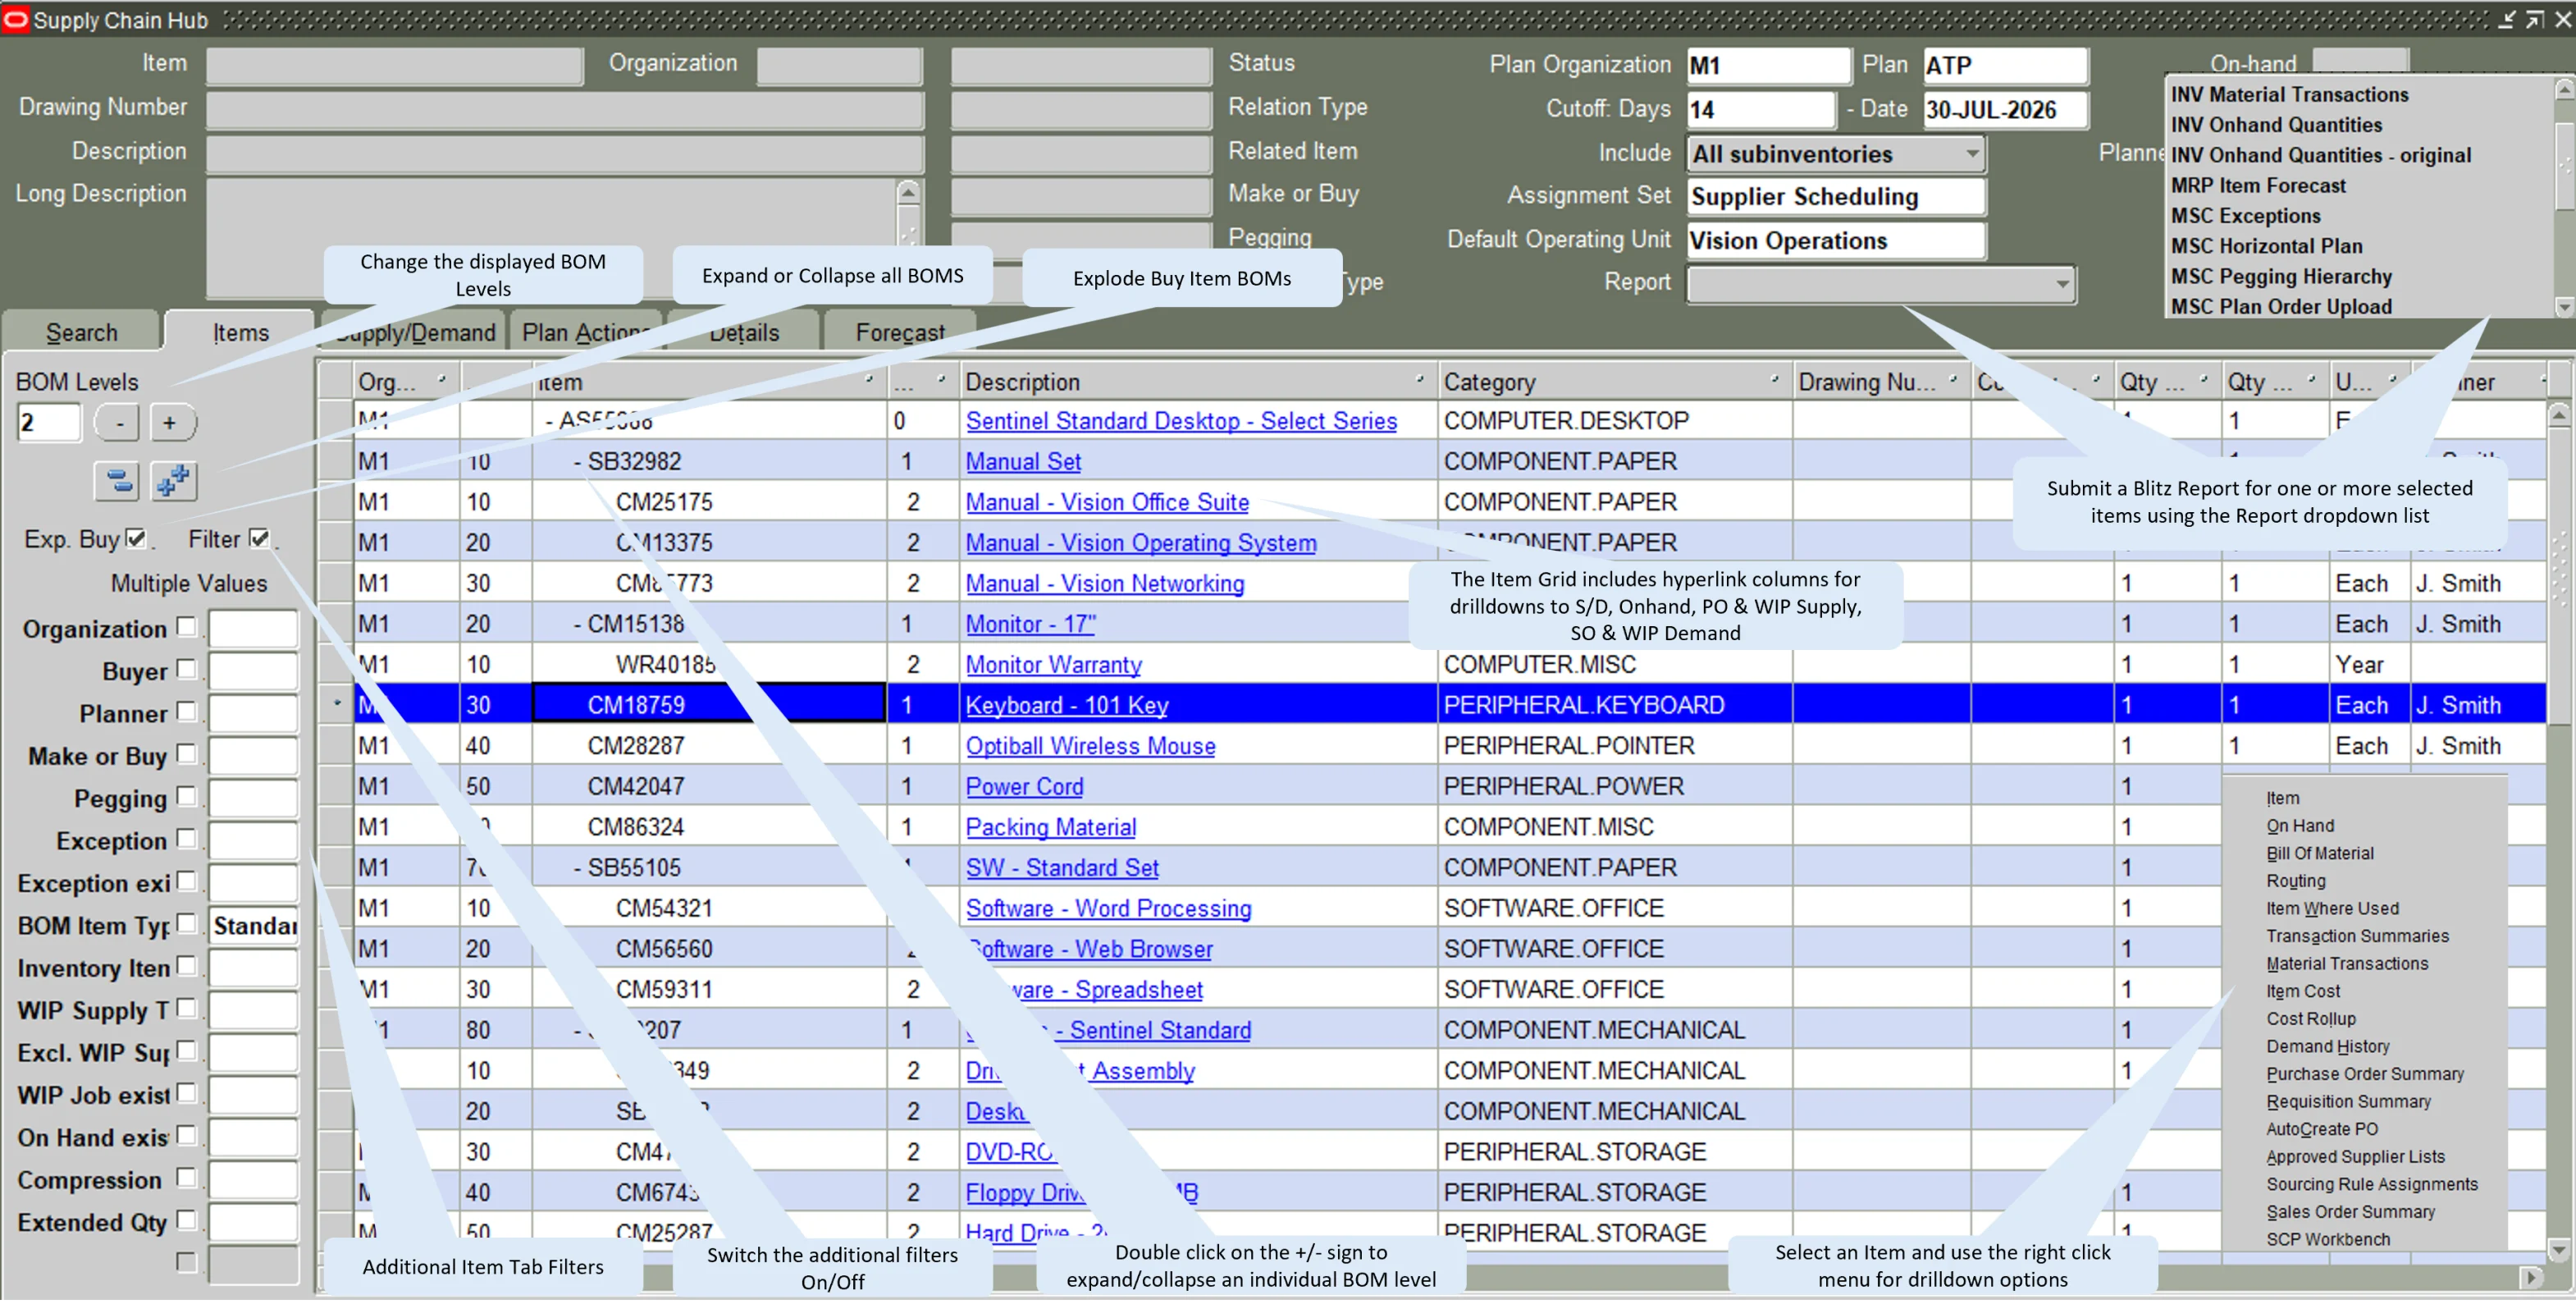
7.3 Supply/Demand
The Supply/Demand tab shows the supply and demand records of the selected item with pegging information, including cross organization fulfillment.
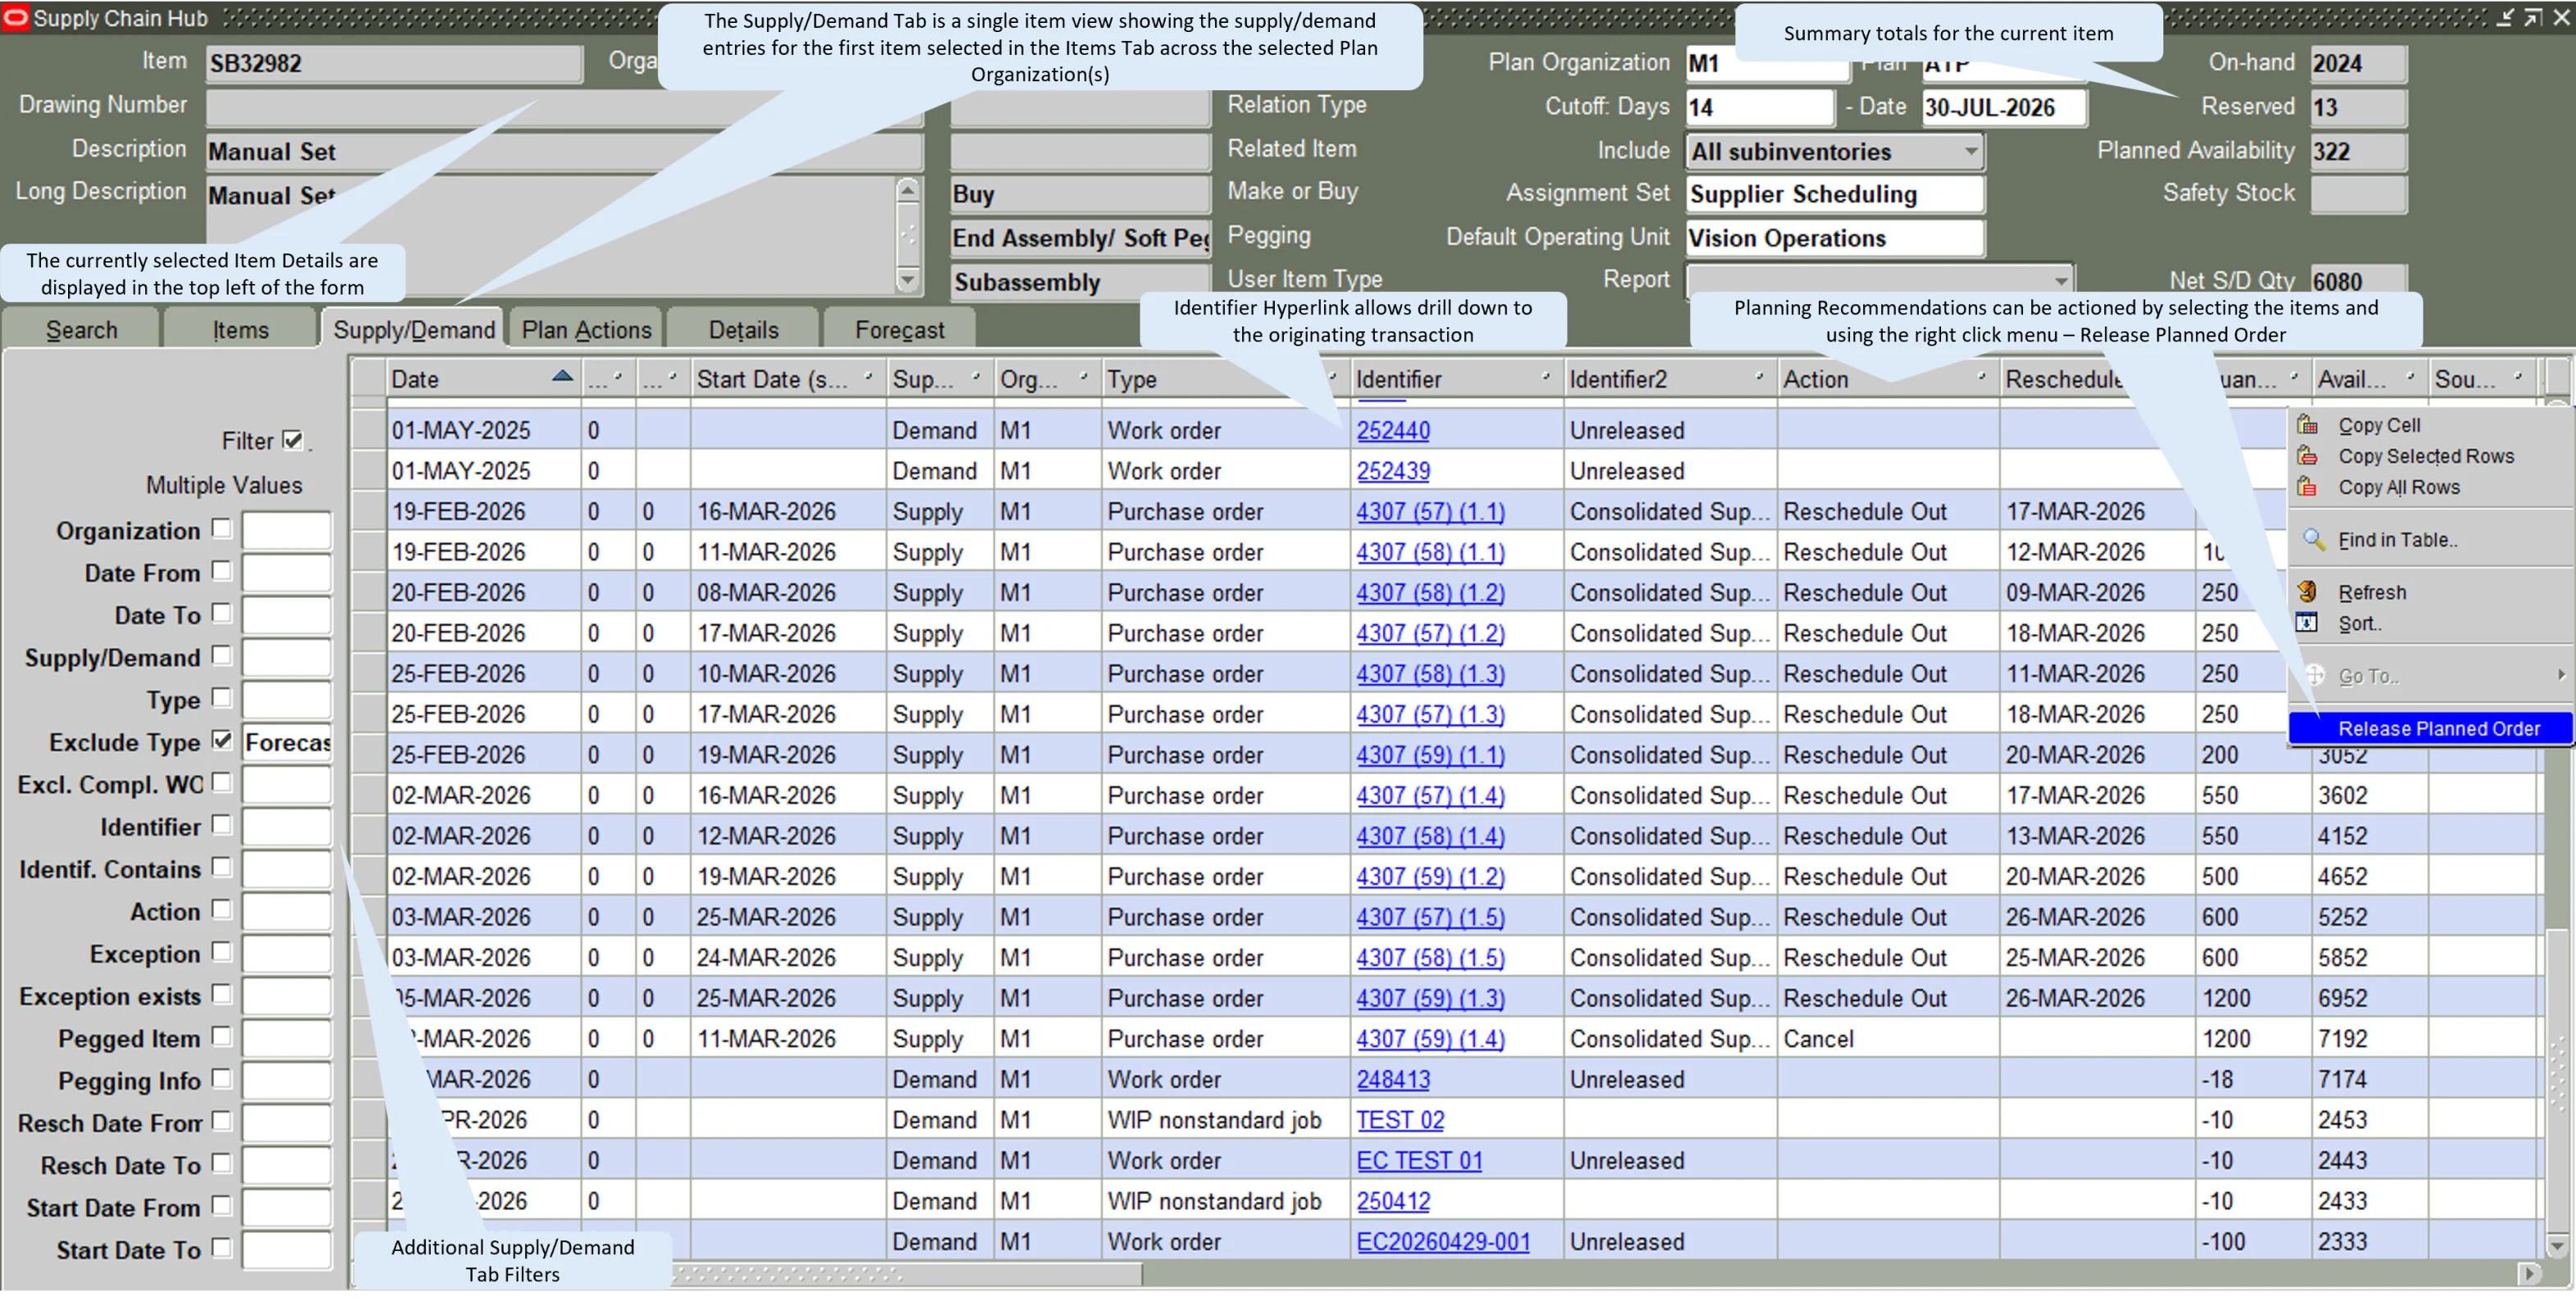
7.4 Plan Actions
The Plan Actions tab lists the planning recommendations and exception messages for the selected items, and planned orders can be released directly from the grid. The prerequisites for order release are described in Planned order release requirements in the Installation Guide.
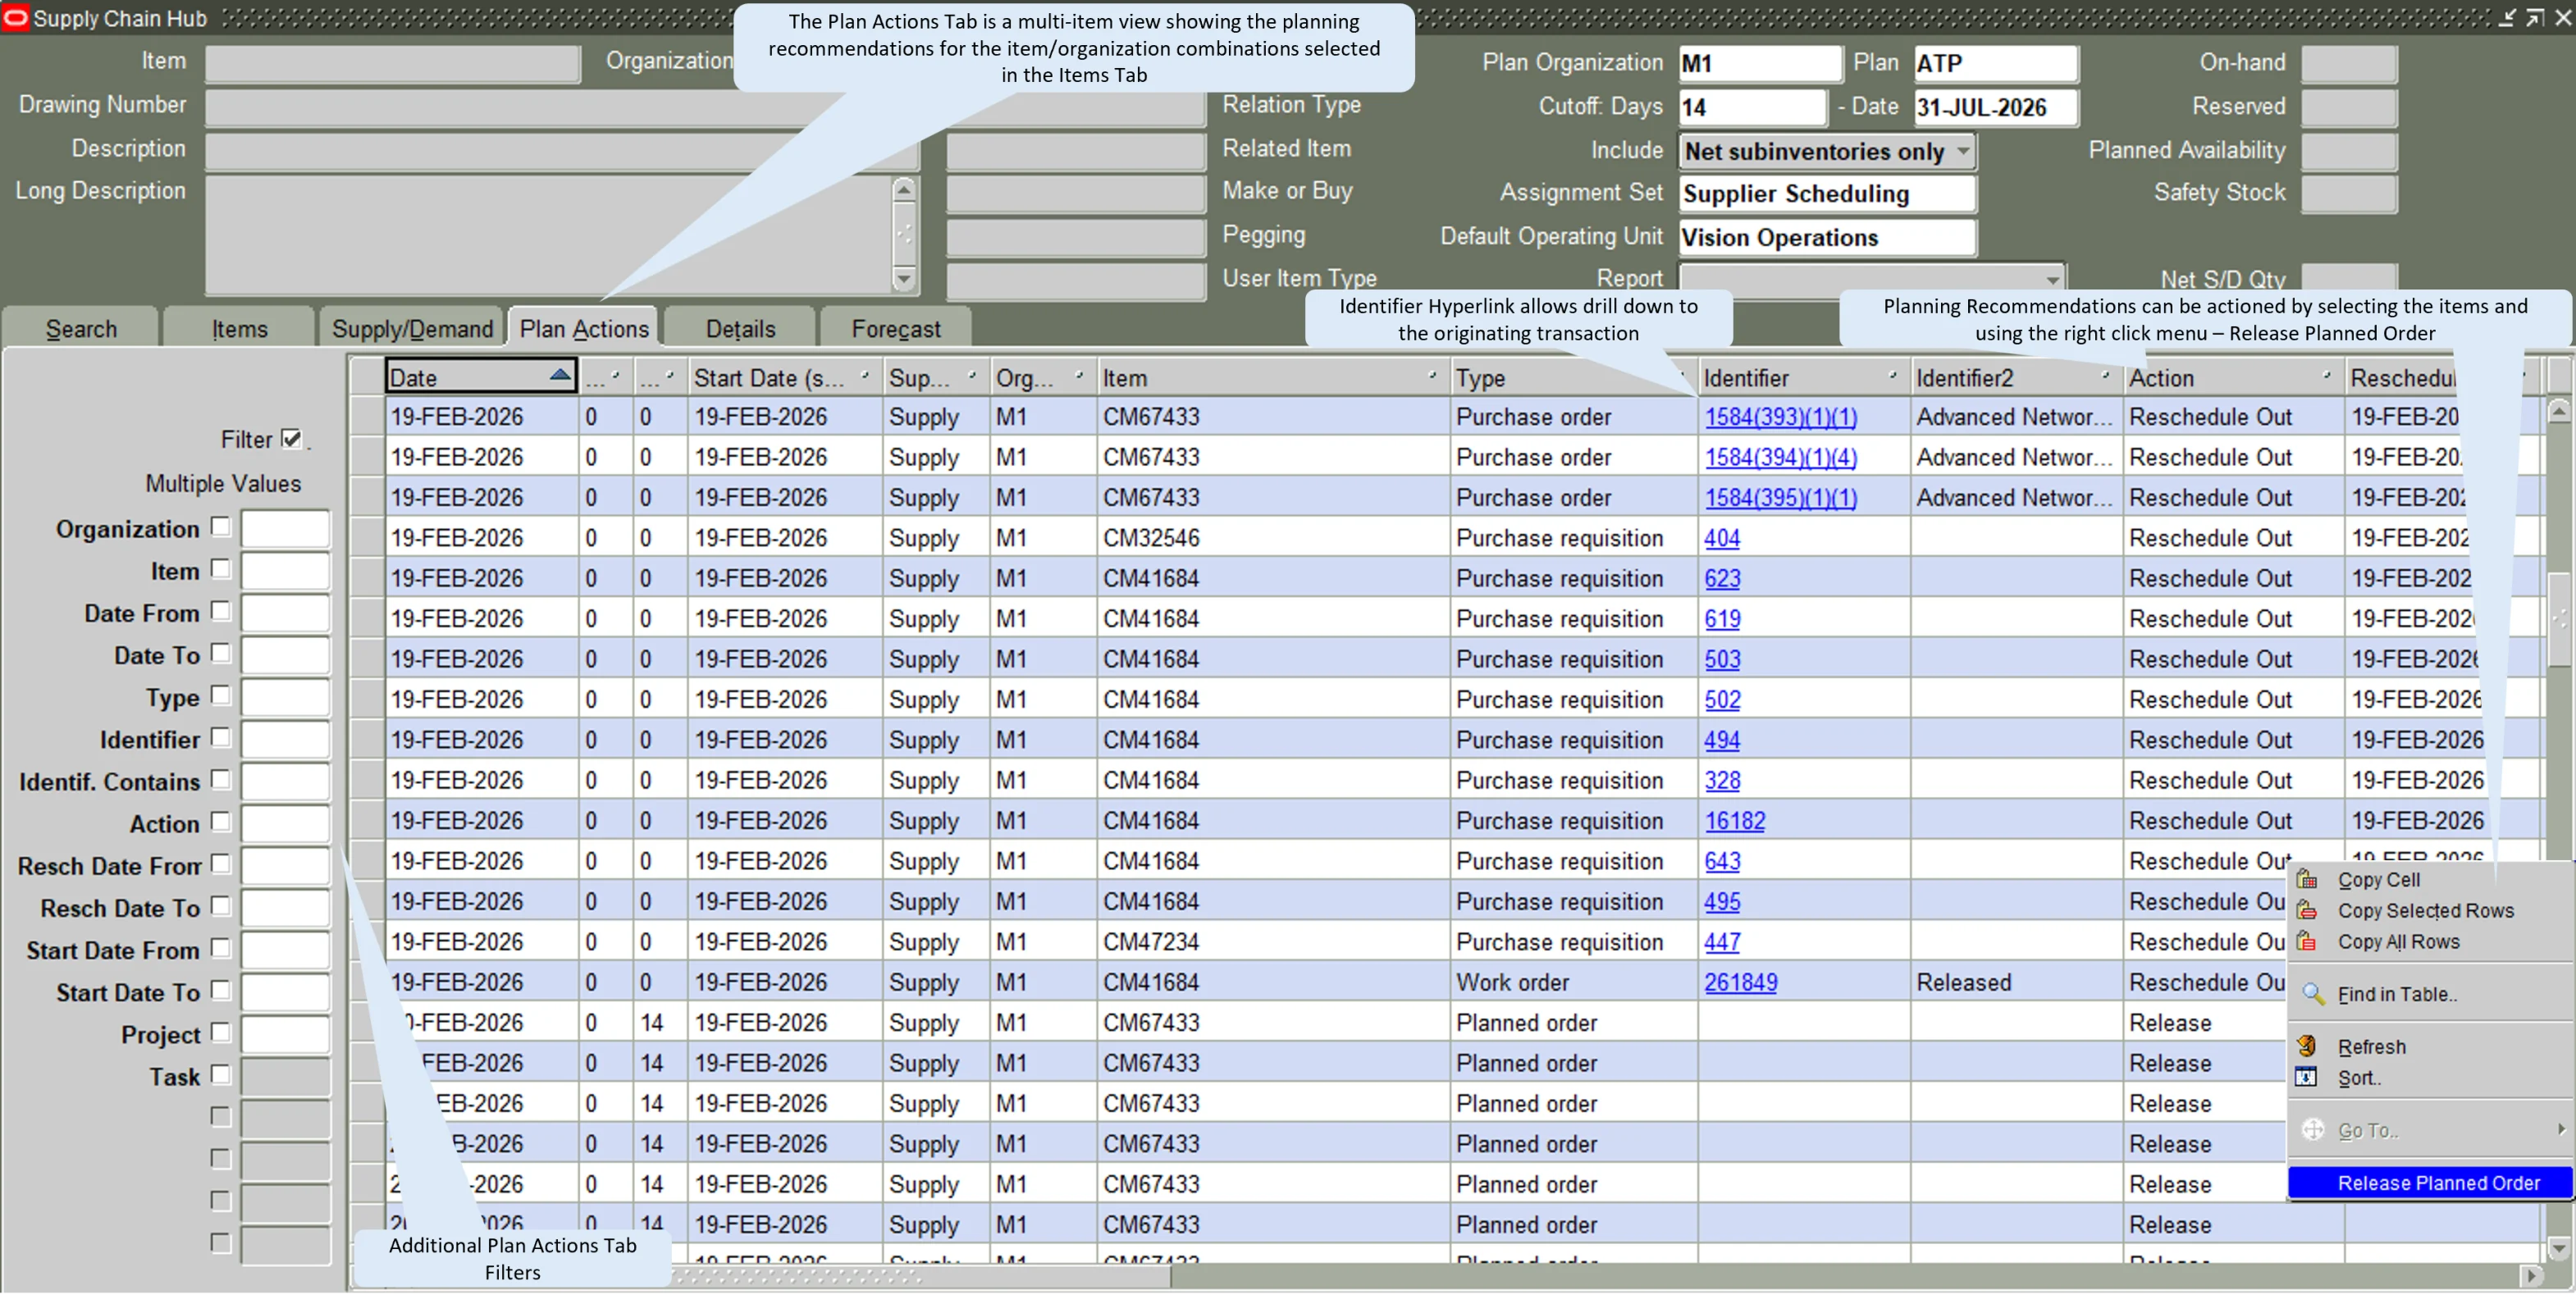
7.5 Details
The Details tab shows further information for the selected item, for example planning attributes such as the safety stock.
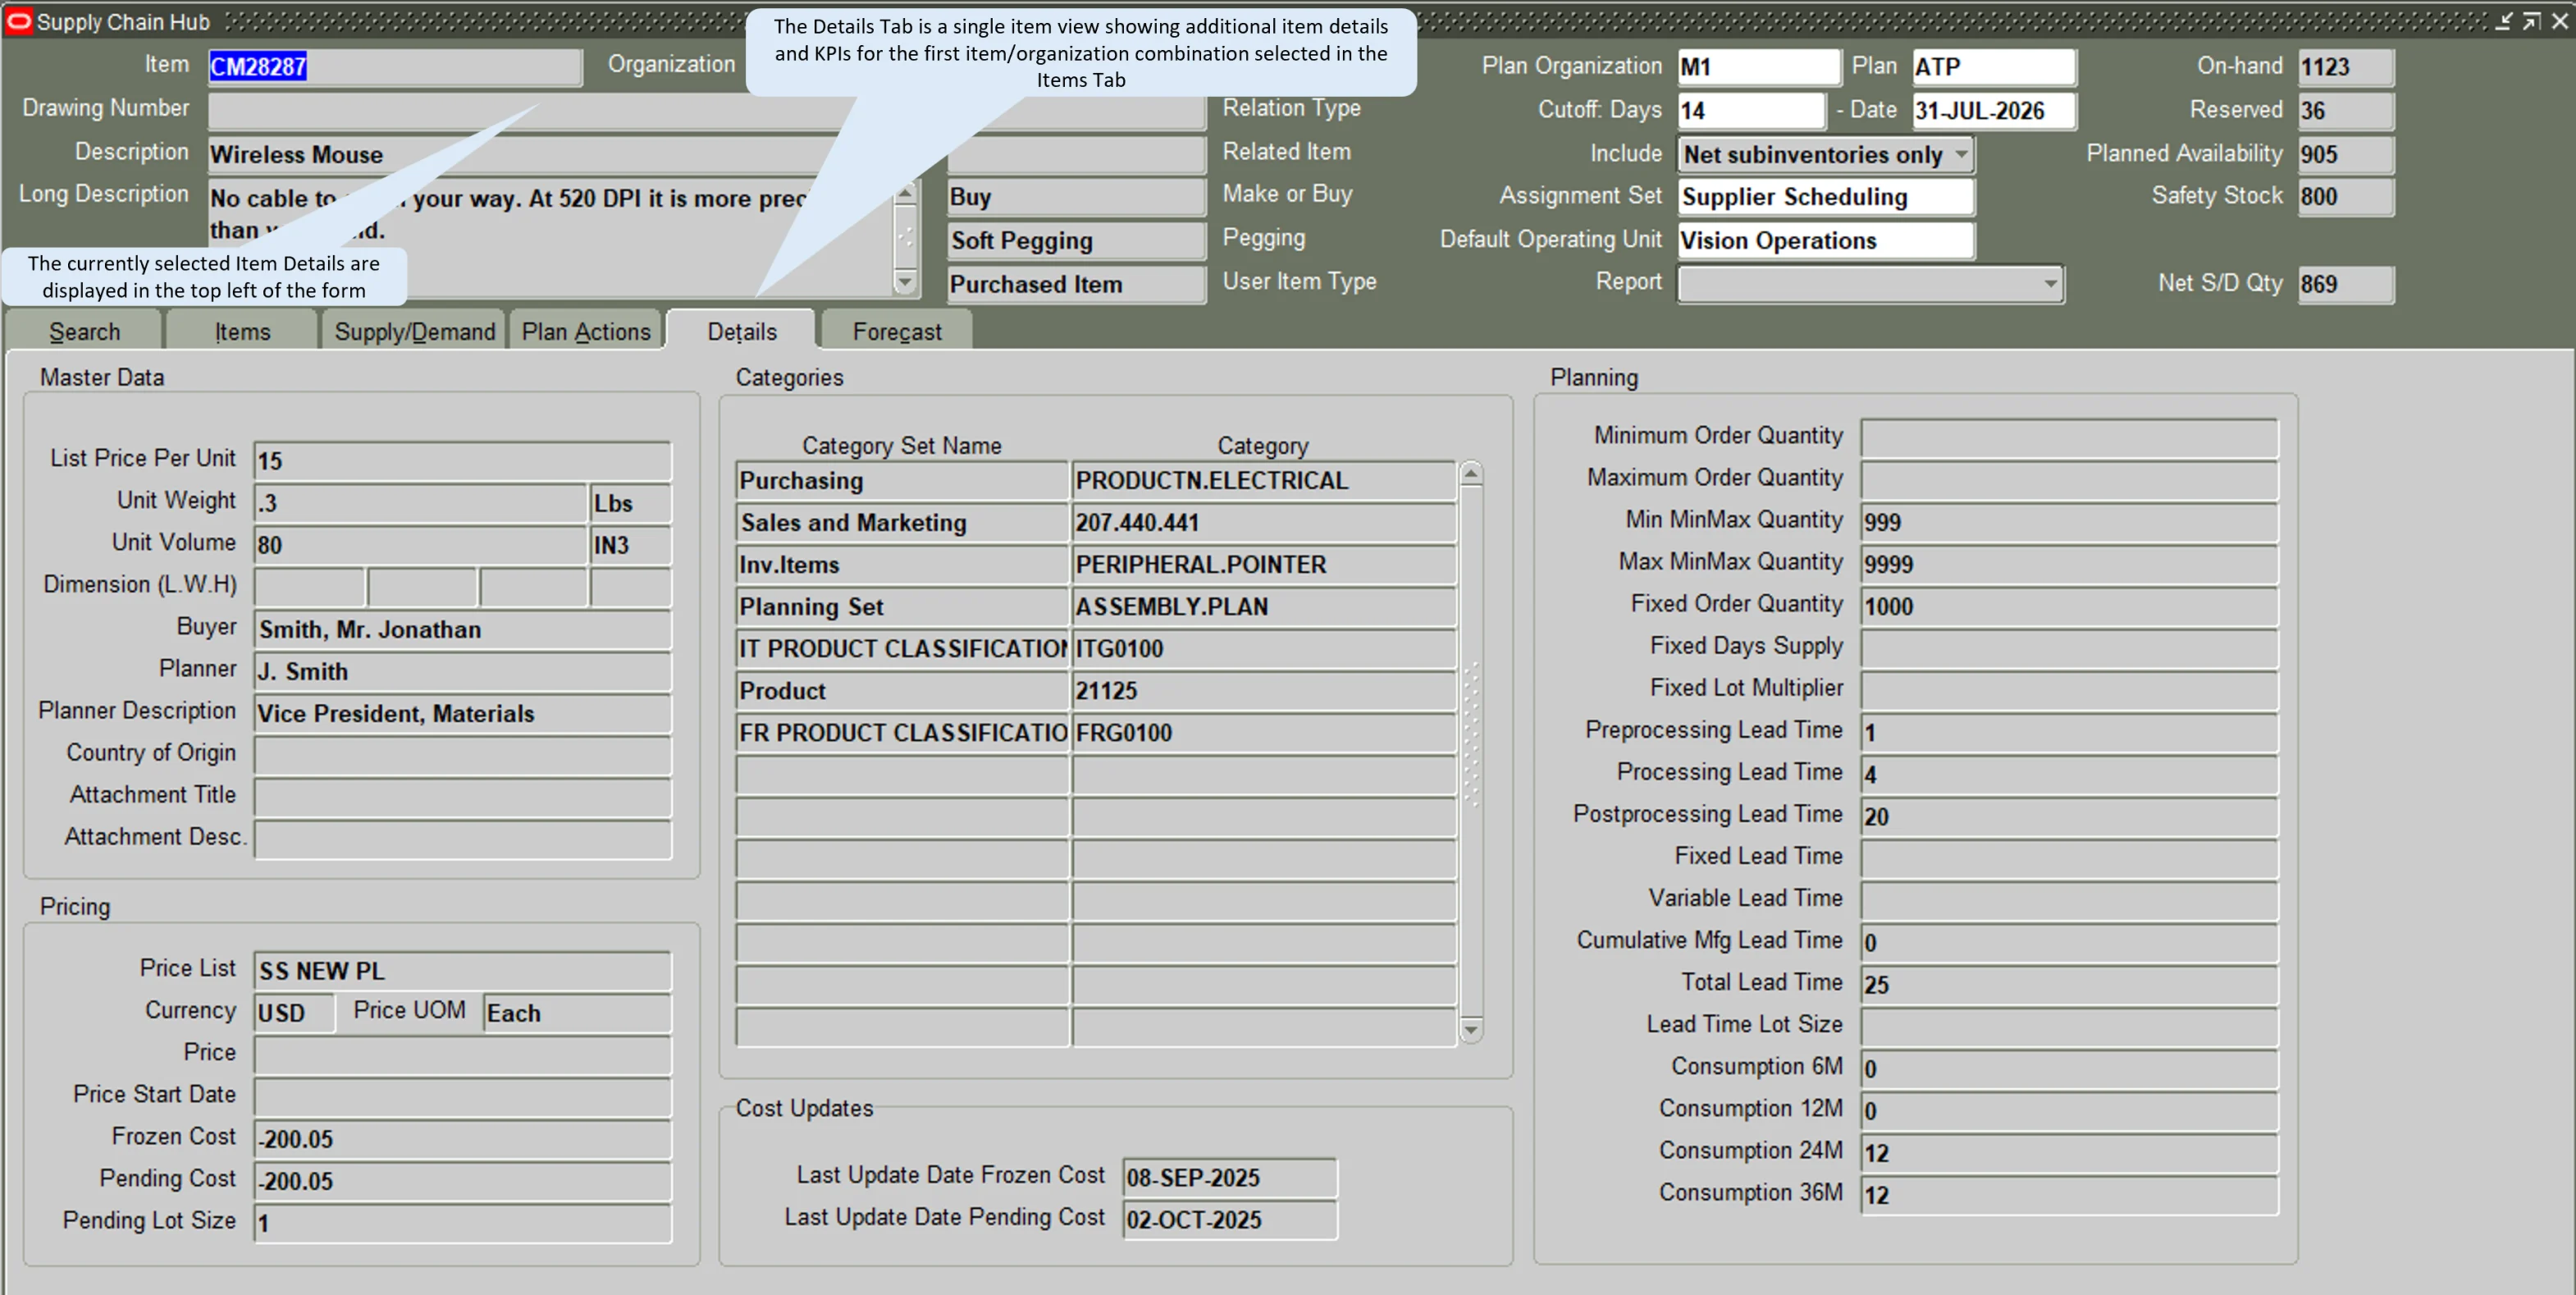
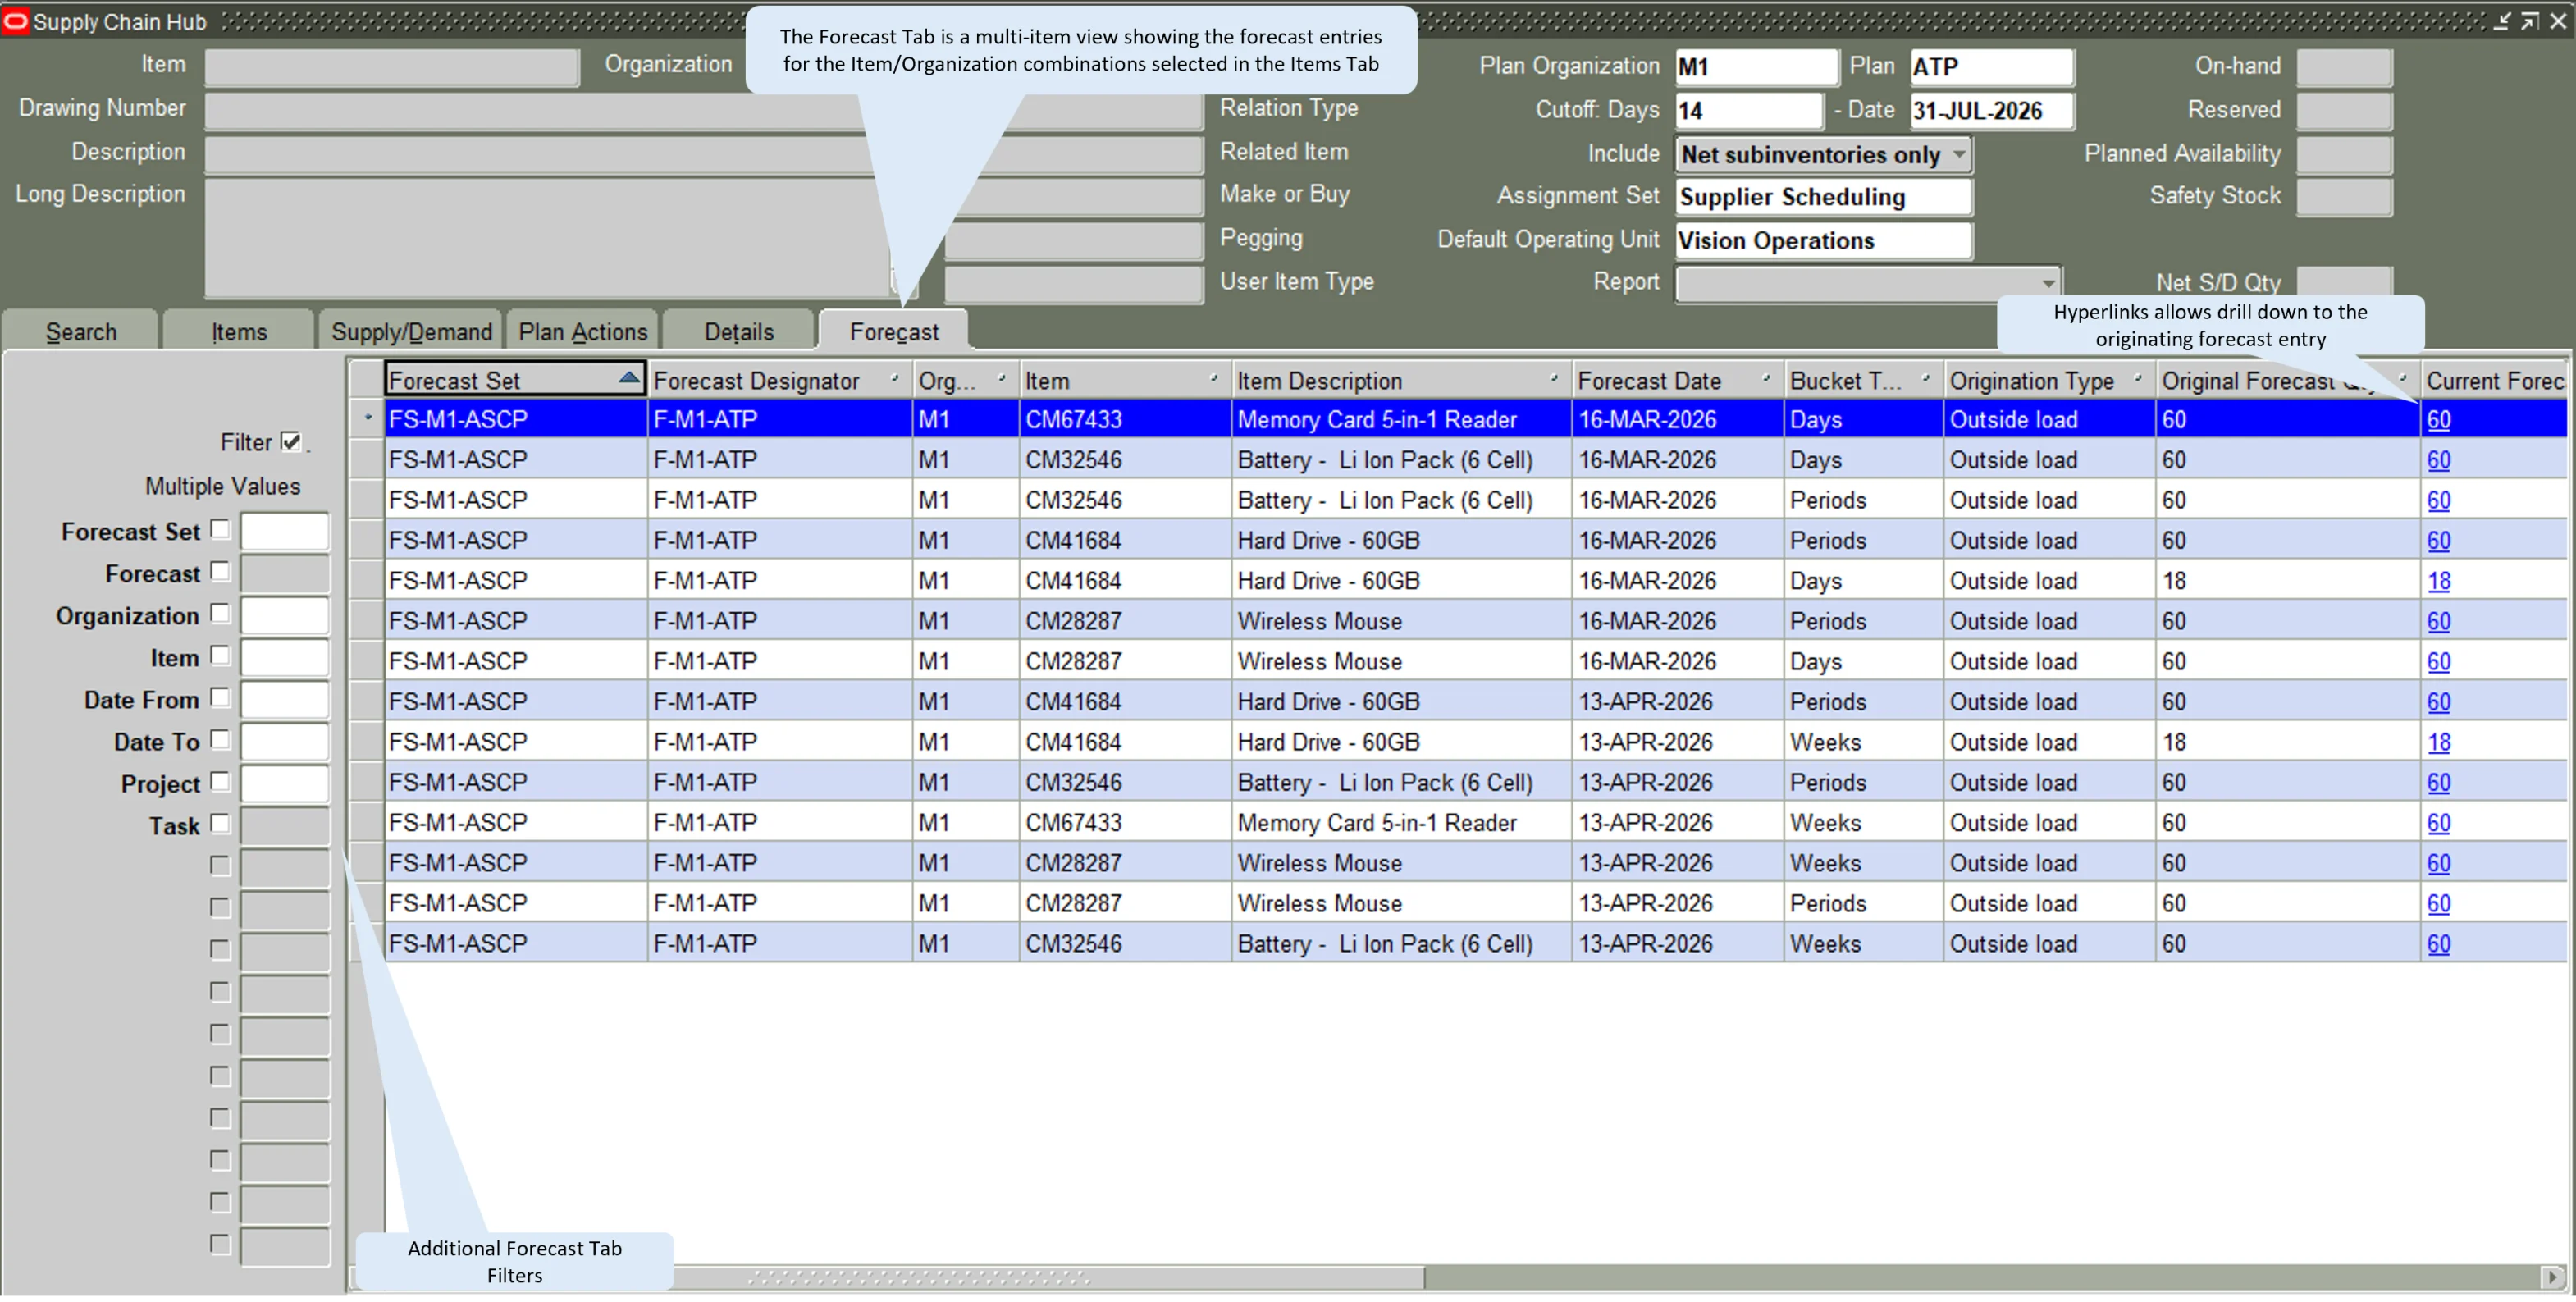
7.7 Drilldowns to Oracle EBS forms
Records in the grids drill down into the corresponding standard Oracle EBS forms, for example from a discrete job supply record into the Discrete Jobs form, so that follow-up actions can be taken directly in Oracle EBS.
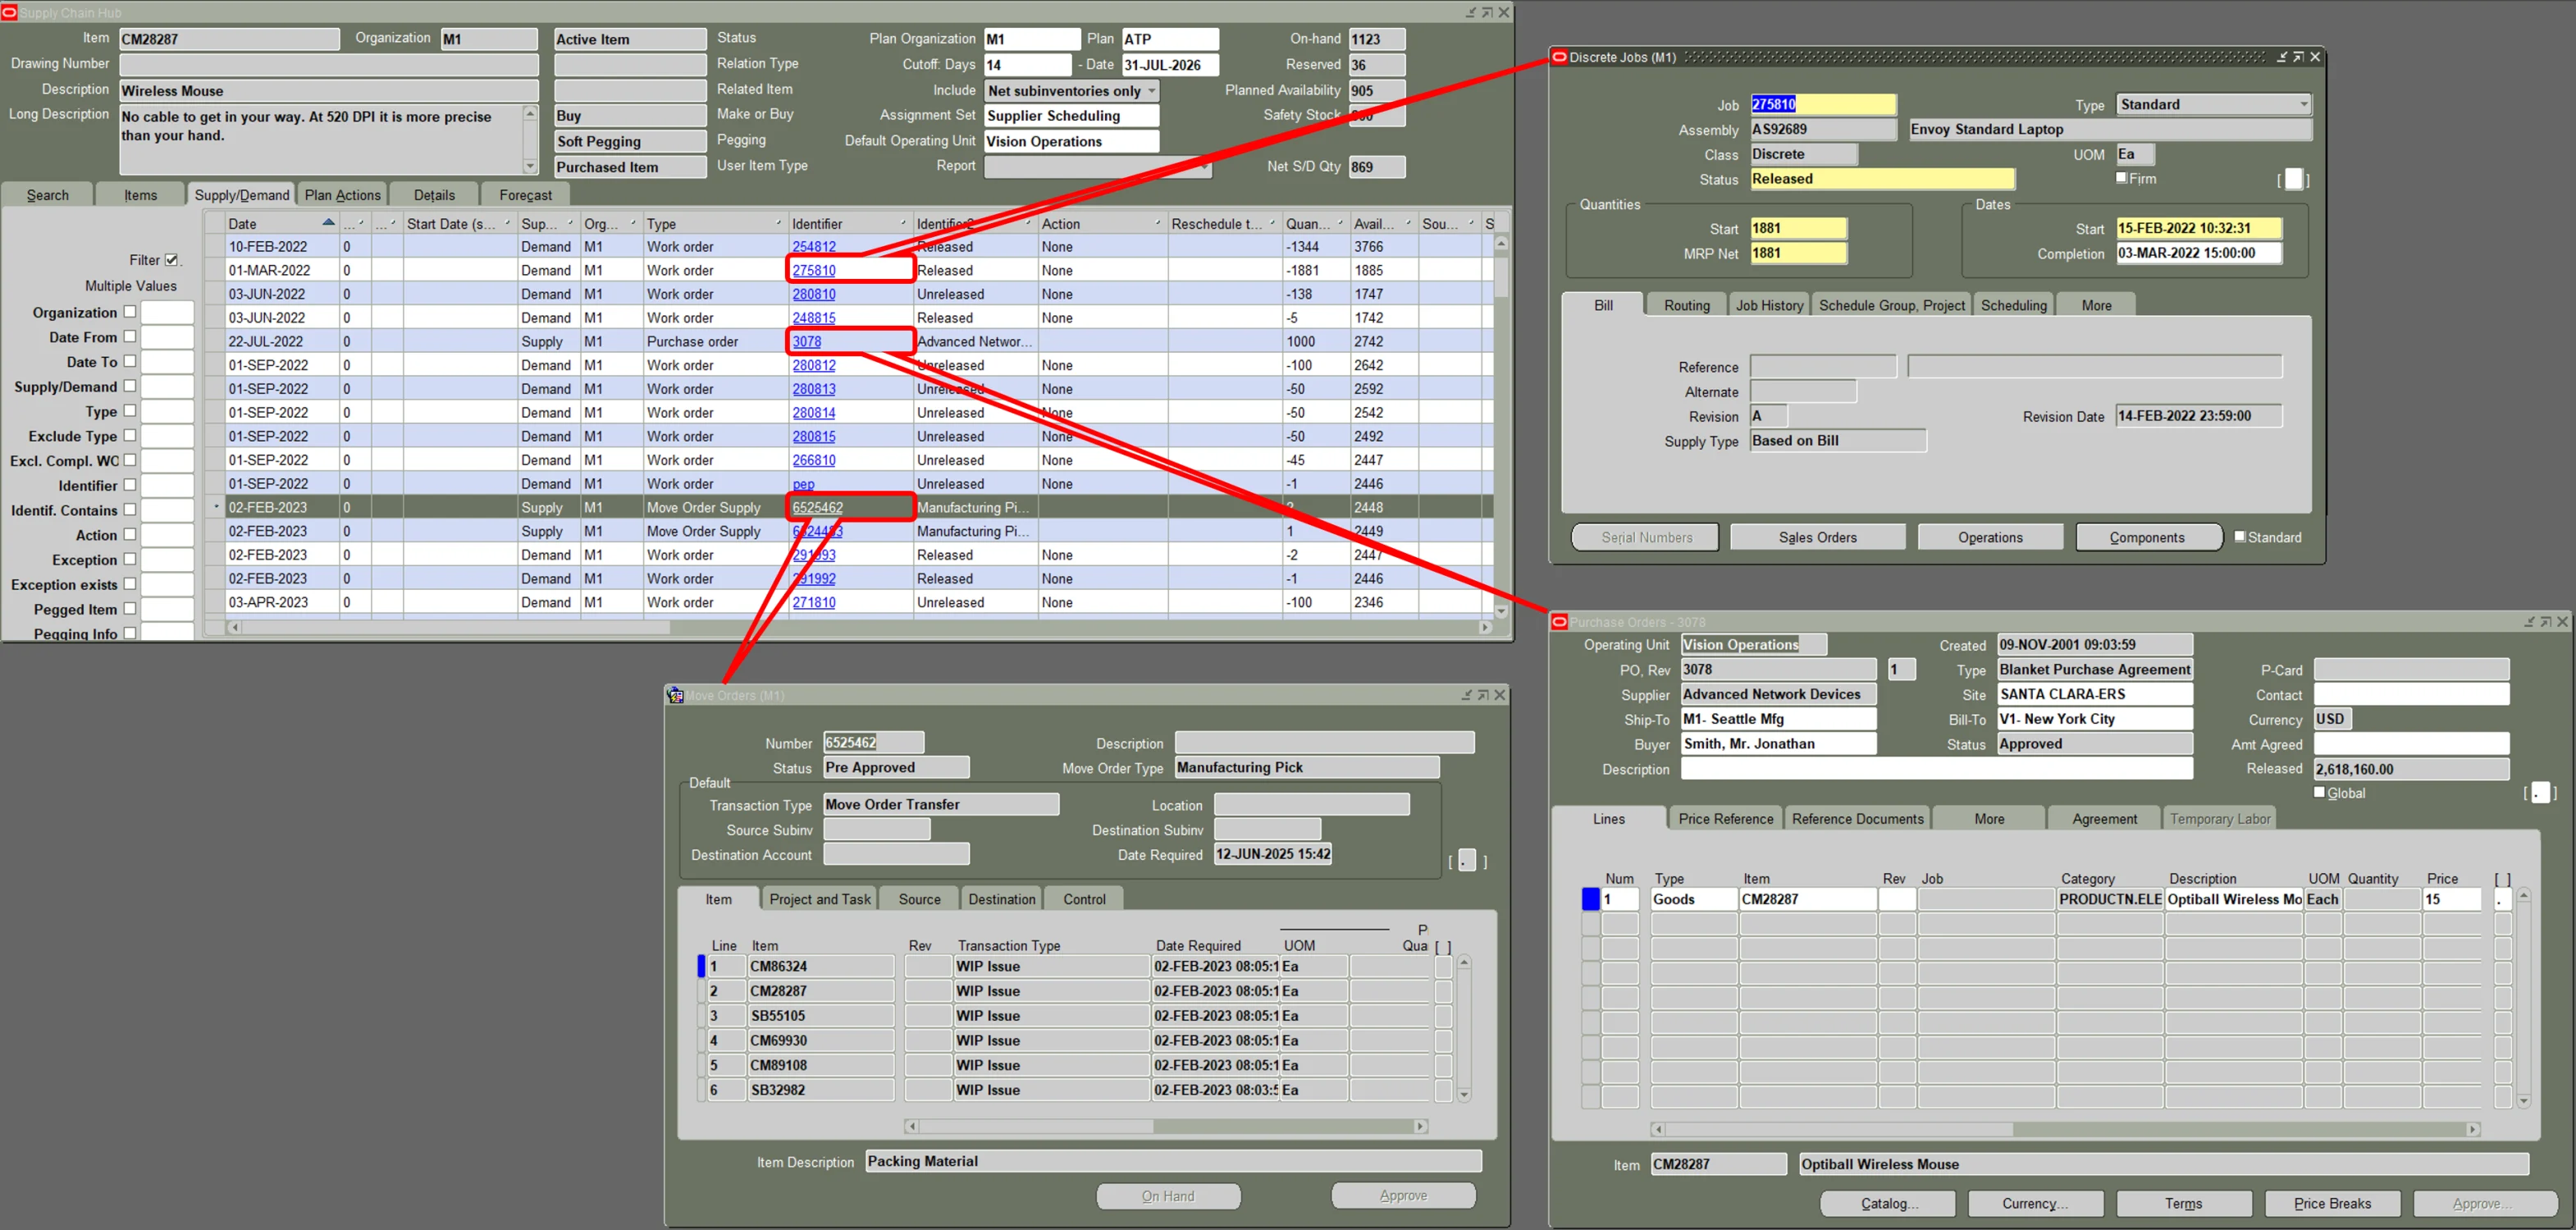
7.8 Release Transactions
The Release Transaction form is used to action the Planning Recommendations. It is accessed from either the Supply/Demand Tab or the Plan Actions Tab by selecting the planning recommendations to be actioned and then selecting the right click menu option – Release Planned Order. Supported actions are Release (Planned Orders), Reschedule In, Reschedule Out, Cancel (Purchase Requisitions, Purchase Orders and Work Orders).